DESCRIPTION
WIRING DIAGRAM
INSPECTION PROCEDURE
CHECK DTC OUTPUT
CHECK GLOW PLUG CONTROLLER
CHECK HARNESS AND CONNECTOR
INSPECT GLOW PLUG
REPLACE GLOW PLUG
REPAIR OR REPLACE HARNESS OR CONNECTOR
CONFIRM WHETHER MALFUNCTION HAS BEEN SUCCESSFULLY REPAIRED
CHECK HARNESS AND CONNECTOR
REPLACE GLOW PLUG CONTROLLER
REPAIR OR REPLACE HARNESS OR CONNECTOR
CONFIRM WHETHER MALFUNCTION HAS BEEN SUCCESSFULLY REPAIRED
REPLACE GLOW PLUG
CHECK HARNESS AND CONNECTOR
REPLACE GLOW PLUG CONTROLLER
REPAIR OR REPLACE HARNESS OR CONNECTOR
CONFIRM WHETHER MALFUNCTION HAS BEEN SUCCESSFULLY REPAIRED
DTC P064C Glow Plug Control Module |
DTC P066B Cylinder 1 Glow Plug Control Circuit High |
DTC P066D Cylinder 2 Glow Plug Control Circuit High |
DTC P066F Cylinder 3 Glow Plug Control Circuit High |
DTC P0671 Cylinder 1 Glow Plug Circuit/Open |
DTC P0672 Cylinder 2 Glow Plug Circuit/Open |
DTC P0673 Cylinder 3 Glow Plug Circuit/Open |
DTC P0674 Cylinder 4 Glow Plug Circuit/Open |
DTC P067B Cylinder 4 Glow Plug Control Circuit High |
DTC P166F Glow Plug Control Module Circuit Short |
DESCRIPTION
P064CDTC Detection Drive Pattern
| DTC Detection Condition
| Trouble Area
|
Enter check mode
| The MOS inside the glow plug control unit is detected as being stuck on 3 times while the glow plugs are on (2 trip detection logic).
| Glow plug controller
|
P066BDTC Detection Drive Pattern
| DTC Detection Condition
| Trouble Area
|
Enter check mode
| A short circuit in the No. 1 glow plug circuit is detected 3 times while the glow plugs are on (2 trip detection logic).
| - Glow plug controller
- No. 1 glow plug
- Short in No. 1 glow plug circuit
|
P066DDTC Detection Drive Pattern
| DTC Detection Condition
| Trouble Area
|
Enter check mode
| A short circuit in the No. 2 glow plug circuit is detected 3 times while the glow plugs are on (2 trip detection logic).
| - Glow plug controller
- No. 2 glow plug
- Short in No. 2 glow plug circuit
|
P066FDTC Detection Drive Pattern
| DTC Detection Condition
| Trouble Area
|
Enter check mode
| A short circuit in the No. 3 glow plug circuit is detected 3 times while the glow plugs are on (2 trip detection logic).
| - Glow plug controller
- No. 3 glow plug
- Short in No. 3 glow plug circuit
|
P067BDTC Detection Drive Pattern
| DTC Detection Condition
| Trouble Area
|
Enter check mode
| A short circuit in the No. 4 glow plug circuit is detected 3 times while the glow plugs are on (2 trip detection logic).
| - Glow plug controller
- No. 4 glow plug
- Short in No. 4 glow plug circuit
|
P0671DTC Detection Drive Pattern
| DTC Detection Condition
| Trouble Area
|
Enter check mode
| An open circuit in the No. 1 glow plug circuit is detected 3 times while the glow plugs are on (2 trip detection logic).
| - Glow plug controller
- No. 1 glow plug
- Open in No. 1 glow plug circuit
|
P0672DTC Detection Drive Pattern
| DTC Detection Condition
| Trouble Area
|
Enter check mode
| An open circuit in the No. 2 glow plug circuit is detected 3 times while the glow plugs are on (2 trip detection logic).
| - Glow plug controller
- No. 2 glow plug
- Open in No. 2 glow plug circuit
|
P0673DTC Detection Drive Pattern
| DTC Detection Condition
| Trouble Area
|
Enter check mode
| An open circuit in the No. 3 glow plug circuit is detected 3 times while the glow plugs are on (2 trip detection logic).
| - Glow plug controller
- No. 3 glow plug
- Open in No. 3 glow plug circuit
|
P0674DTC Detection Drive Pattern
| DTC Detection Condition
| Trouble Area
|
Enter check mode
| An open circuit in the No. 4 glow plug circuit is detected 3 times while the glow plugs are on (2 trip detection logic).
| - Glow plug controller
- No. 4 glow plug
- Open in No. 4 glow plug circuit
|
P166FDTC Detection Drive Pattern
| DTC Detection Condition
| Trouble Area
|
Enter check mode
| A short circuit in a wire harness between the glow plugs is detected 3 times while the glow plugs are on (2 trip detection logic).
| - Glow plug controller
- Open or short in glow plug circuit
|
WIRING DIAGRAM
Refer to DTC P052F (HILUX_TGN26 RM000004HXU00JX_02.html).
INSPECTION PROCEDURE
- NOTICE:
- Inspect the fuses of circuits related to this system before performing the following inspection procedure.
- After replacing the ECM, the new ECM needs registration (HILUX_TGN26 RM0000012XK05AX.html) and initialization (HILUX_TGN26 RM000000TIN058X.html).
- HINT:
- Read freeze frame data using the GTS. Freeze frame data records the engine condition when malfunctions are detected. When troubleshooting, freeze frame data can help determine if the vehicle was moving or stationary, if the engine was warmed up or not, and other data from the time the malfunction occurred.
Connect the GTS to the DLC3.
Turn the ignition switch to ON and turn the GTS on.
Enter the following menus: Powertrain / Engine / Trouble Codes.
Read the DTCs.
ResultResult
| Proceed to
|
P0671, P0672, P0673 and/or P0674 is output
| A
|
P066B, P066D, P066F and/or P067B is output
| B
|
P064C and/or P166F is output
| C
|
| 2.CHECK GLOW PLUG CONTROLLER |
Disconnect the glow plug controller connector.
Measure the voltage according to the value(s) in the table below.
- Standard Voltage:
Tester Connection
| Condition
| Specified Condition
|
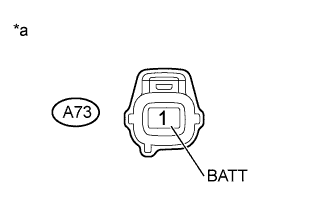
A73-1 (BATT) - Body ground
| Always
| 11 to 14 V
|
Text in Illustration*a
| Front view of wire harness connector
(to Glow Plug Controller)
|
Reconnect the glow plug controller connector.
| 3.CHECK HARNESS AND CONNECTOR |
Disconnect connectors of the glow plug controller.
Remove the No. 1 glow plug connector from the glow plug.
Measure the resistance according to the value(s) in the table below.
- Standard Resistance:
Tester Connection
| Condition
| Specified Condition
|
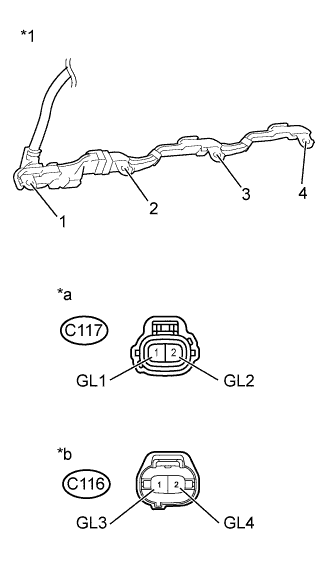
C117-1 (GL1) - No. 1 glow plug connector terminal 1
| Always
| Below 1 Ω
|
C117-2 (GL2) - No. 1 glow plug connector terminal 2
| Always
| Below 1 Ω
|
C116-1 (GL3) - No. 1 glow plug connector terminal 3
| Always
| Below 1 Ω
|
C116-2 (GL4) - No. 1 glow plug connector terminal 4
| Always
| Below 1 Ω
|
Text in Illustration*1
| No. 1 Glow Plug Connector
|
*a
| Front view of wire harness connector
(to Glow Plug Controller)
|
*b
| Front view of wire harness connector
(to Glow Plug Controller)
|
Reconnect the glow plug controller connector.
Reinstall the No. 1 glow plug connector.
Clear the DTCs (HILUX_TGN26 RM000000PDK0X4X.html).
Exchange the glow plugs of the malfunctioning cylinders (the cylinders indicated by output DTCs) with the glow plugs of normally functioning cylinders.
Turn the ignition switch to ON.
Turn the GTS on.
Using the GTS, switch the ECM from normal mode to check mode (HILUX_TGN26 RM000000PDL0O3X.html).
Read the DTCs.
ResultResult
| Proceed to
|
Same DTCs (that have been erased)
| A
|
Other DTCs
| B
|
- HINT:
- Check for DTCs in check mode.
Replace the glow plug (HILUX_TGN26 RM000000JIT00JX.html).
| 6.REPAIR OR REPLACE HARNESS OR CONNECTOR |
Repair or replace the harness or connector.
| 7.CONFIRM WHETHER MALFUNCTION HAS BEEN SUCCESSFULLY REPAIRED |
Connect the GTS to the DLC3.
Clear the DTCs (HILUX_TGN26 RM000000PDK0X4X.html).
Turn the ignition switch off for 30 seconds or more.
Turn the ignition switch to ON.
Turn the GTS on.
Using the GTS, switch the ECM from normal mode to check mode (HILUX_TGN26 RM000000PDL0O3X.html).
Confirm that the DTC is not output again.
- HINT:
- Check for DTCs in check mode.
| 8.CHECK HARNESS AND CONNECTOR |
Disconnect connectors of the glow plug controller.
Remove the No. 1 glow plug connector from the glow plug.
Measure the resistance according to the value(s) in the table below.
- Standard Resistance:
Tester Connection
| Condition
| Specified Condition
|
C117-1 (GL1) or No. 1 glow plug connector terminal 1 - Body ground
| Always
| 10 kΩ or higher
|
C117-2 (GL2) or No. 1 glow plug connector terminal 2 - Body ground
| Always
| 10 kΩ or higher
|
C116-1 (GL3) or No. 1 glow plug connector terminal 3 - Body ground
| Always
| 10 kΩ or higher
|
C116-2 (GL4) or No. 1 glow plug connector terminal 4 - Body ground
| Always
| 10 kΩ or higher
|
- HINT:
- Make sure that there are no short circuits to the battery.
Text in Illustration*1
| No. 1 Glow Plug Connector
|
*a
| Front view of wire harness connector
(to Glow Plug Controller)
|
*b
| Front view of wire harness connector
(to Glow Plug Controller)
|
Reconnect the glow plug controller connector.
Reinstall the No. 1 glow plug connector.
| 9.REPLACE GLOW PLUG CONTROLLER |
Replace the glow plug controller (HILUX_TGN26 RM000004LIW007X.html).
| 10.REPAIR OR REPLACE HARNESS OR CONNECTOR |
Repair or replace the harness or connector.
| 11.CONFIRM WHETHER MALFUNCTION HAS BEEN SUCCESSFULLY REPAIRED |
Connect the GTS to the DLC3.
Clear the DTCs (HILUX_TGN26 RM000000PDK0X4X.html).
Turn the ignition switch off for 30 seconds or more.
Turn the ignition switch to ON.
Turn the GTS on.
Using the GTS, switch the ECM from normal mode to check mode (HILUX_TGN26 RM000000PDL0O3X.html).
Confirm that the DTC is not output again.
- OK:
- No DTC is output.
- HINT:
- Check for DTCs in check mode.
Replace the glow plug (HILUX_TGN26 RM000000JIT00JX.html).
| 13.CHECK HARNESS AND CONNECTOR |
Disconnect connectors of the glow plug controller.
Remove the No. 1 glow plug connector from the glow plug.
Measure the resistance according to the value(s) in the table below.
- Standard Resistance:
Tester Connection
| Condition
| Specified Condition
|
C117-1 (GL1) or No. 1 glow plug connector terminal 1 - Body ground
| Always
| 10 kΩ or higher
|
C117-2 (GL2) or No. 1 glow plug connector terminal 2 - Body ground
| Always
| 10 kΩ or higher
|
C116-1 (GL3) or No. 1 glow plug connector terminal 3 - Body ground
| Always
| 10 kΩ or higher
|
C116-2 (GL4) or No. 1 glow plug connector terminal 4 - Body ground
| Always
| 10 kΩ or higher
|
- HINT:
- Make sure that there are no short circuits to the battery.
Text in Illustration*1
| No. 1 Glow Plug Connector
|
*a
| Front view of wire harness connector
(to Glow Plug Controller)
|
*b
| Front view of wire harness connector
(to Glow Plug Controller)
|
Reconnect the glow plug controller connector.
Reinstall the No. 1 glow plug connector.
| 14.REPLACE GLOW PLUG CONTROLLER |
Replace the glow plug controller (HILUX_TGN26 RM000004LIW007X.html).
| 15.REPAIR OR REPLACE HARNESS OR CONNECTOR |
Repair or replace the harness or connector.
| 16.CONFIRM WHETHER MALFUNCTION HAS BEEN SUCCESSFULLY REPAIRED |
Connect the GTS to the DLC3.
Clear the DTCs (HILUX_TGN26 RM000000PDK0X4X.html).
Turn the ignition switch off for 30 seconds or more.
Turn the ignition switch to ON.
Turn the GTS on.
Using the GTS, switch the ECM from normal mode to check mode (HILUX_TGN26 RM000000PDL0O3X.html).
Confirm that the DTC is not output again.
- HINT:
- Check for DTCs in check mode.