Engine Unit -- Replacement |
| 1. REPLACE RING PIN |
Remove the 2 ring pins.
Install 2 new ring pins to the crankcase.
- Standard protrusion:
- 3 mm (0.118 in.)
 |
| 2. REPLACE STUD BOLT |
For crankcase:
Remove the 2 stud bolts.
Using a "TORX" socket E5, install the 2 stud bolts as shown in the illustration.
- Torque:
- 5.0 N*m{51 kgf*cm, 44 in.*lbf}

For water inlet housing:
Remove the 2 stud bolts.
Using a "TORX" socket E5, install the 2 stud bolts as shown in the illustration.
- Torque:
- 5.0 N*m{51 kgf*cm, 44 in.*lbf}

| 3. REPLACE SPARK PLUG TUBE GASKET |
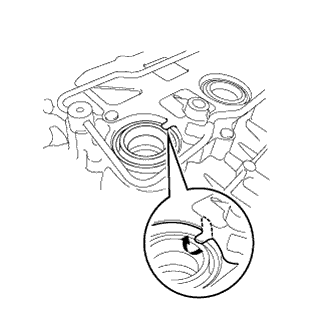
Pry up the claws of the ventilation baffle plate.
- NOTICE:
- Do not deform the claws of the baffle plate more than necessary.
 |
Remove the 4 gaskets from the cylinder head covers.
- NOTICE:
- Prevent the plug tube gaskets from being deformed as much as possible. The removed gaskets will be used when reinstalling the gaskets.
- Do not damage the connection of the cylinder head cover.
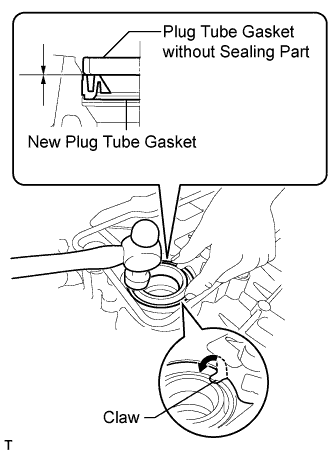
Using a cutter, cut off the sealing part of the removed plug tube gasket.
Using the plug tube gasket which has had the sealing part cut off, uniformly press in a new plug tube gasket all the way.
- NOTICE:
- Keep the lip free of foreign matter.
- Do not tap on the oil seal at an angle.
- HINT:
- If a plug tube gasket that will be used to install a new gasket is deformed, and cannot be positioned on a new gasket, correct the deformation using pliers.

Return the claws of the ventilation baffle plate to their original positions.
| 4. REPLACE TIMING CHAIN COVER OIL SEAL |
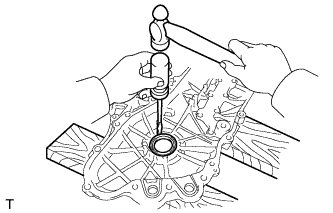
Using a screwdriver and hammer, remove the oil seal.
- NOTICE:
- Be careful not to damage the timing chain cover oil seal.
- HINT:
- Tape the screwdriver tip before use.
 |
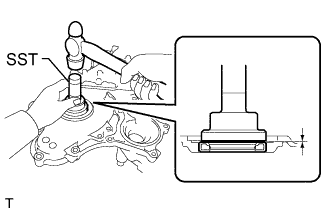
Using SST, tap in a new oil seal until its surface is flush with the timing gear case edge.
- SST
- 09223-22010
 |
Apply a light coat of MP grease to the lip of the oil seal.
- NOTICE:
- Keep the lip free of foreign matter.
- Do not tap on the oil seal at an angle.
- Make sure that the oil seal edge does not stick out of the timing chain cover.
| 5. REPLACE REAR ENGINE OIL SEAL |
Using a knife, cut off the oil seal lip.
 |
Using a screwdriver with its tip taped, pry out the oil seal.
- NOTICE:
- After removing the oil seal, check the crankshaft for damage. If it is damaged, smooth the surface with 400-grit sandpaper.
Using SST and a hammer, evenly tap the oil seal until its surface is flush with the rear oil seal retainer edge.
- SST
- 09223-15030
09950-70010(09951-07100)
- NOTICE:
- Keep the lip free of foreign matter.
- Do not tap on the oil seal at an angle.
 |
Apply MP grease to a new oil seal lip.
- NOTICE:
- Wipe off extra grease on the crankshaft.