Rear Brake (For Drum Type) -- Installation |
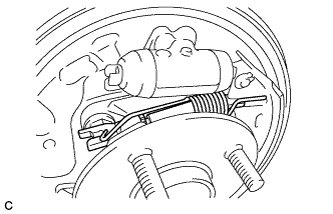
| 1. INSTALL REAR WHEEL BRAKE CYLINDER ASSEMBLY (dummy dummy) |
Install the rear wheel brake cylinder assembly to the backing plate with the 2 bolts.
- Torque:
- 9.8 N*m{100 kgf*cm, 87 in.*lbf}
 |
Using a union nut wrench (10 mm), connect the brake line to the rear wheel brake cylinder assembly.
- Torque:
- without a union nut wrench:
- 15 N*m{155 kgf*cm, 11 ft.*lbf}
- with a union nut wrench:
- 14 N*m{143 kgf*cm, 10 ft.*lbf}
- NOTICE:
- Use a torque wrench with a fulcrum length of 250 mm (9.84 in.).
- This torque value is effective when the union nut wrench is parallel to the torque wrench.
 |
| 2. TEMPORARILY TIGHTEN REAR DRUM BRAKE BLEEDER PLUG |
- HINT:
- Fully tighten the rear drum brake bleeder plug after bleeding any air left in the system.
| 3. INSTALL REAR DRUM BRAKE BLEEDER PLUG CAP |
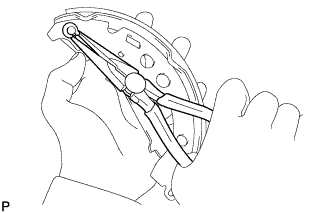
| 4. INSTALL REAR BRAKE PARKING BRAKE SHOE LEVER SUB-ASSEMBLY |
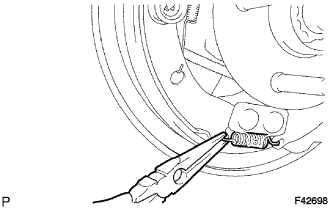
Using needle-nose pliers, install the rear brake parking brake shoe lever sub-assembly with a new C-washer.
 |
| 5. INSTALL REAR BRAKE AUTOMATIC ADJUST LEVER |
Install the rear brake automatic adjust lever and automatic adjust lever tension spring to the rear brake shoe (front).
 |
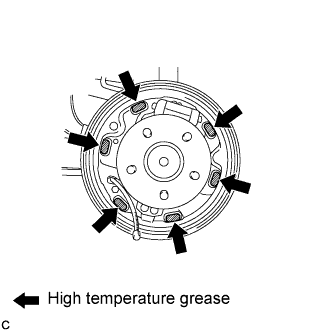
| 6. INSTALL REAR BRAKE SHOE (for Rear Side) |
Apply high temperature grease to the surface of the backing plate that contacts the shoes as shown in the illustration.
 |
Using needle-nose pliers, install the parking brake cable to the rear brake parking brake shoe lever sub-assembly.
 |
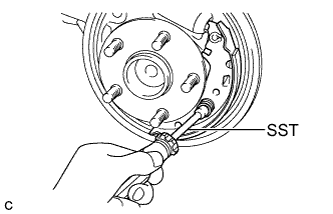
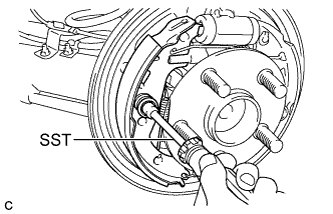
Using SST, install the rear brake shoe, pin, shoe hold down spring and shoe hold down spring cup.
- SST
- 09718-00011
 |
| 7. INSTALL REAR BRAKE STRUT SET |
Apply high temperature grease to the adjustment bolt.
 |
Install the rear brake strut set to the rear brake shoe.
 |
| 8. INSTALL REAR BRAKE SHOE (for Front Side) |
Using SST, install the rear brake shoe, pin, shoe hold down spring and shoe hold down spring cup.
- SST
- 09718-00011
 |
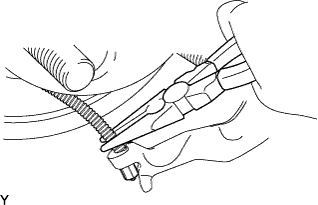
Using needle-nose pliers, install the tension spring to the rear brake shoe.
 |
Using SST, install the shoe return spring to the rear brake shoe.
- SST
- 09921-00010
- NOTICE:
- Do not damage the wheel cylinder boot.
 |
| 9. INSPECT REAR DRUM BRAKE |
Inspect that each part is installed properly as shown in the illustration.
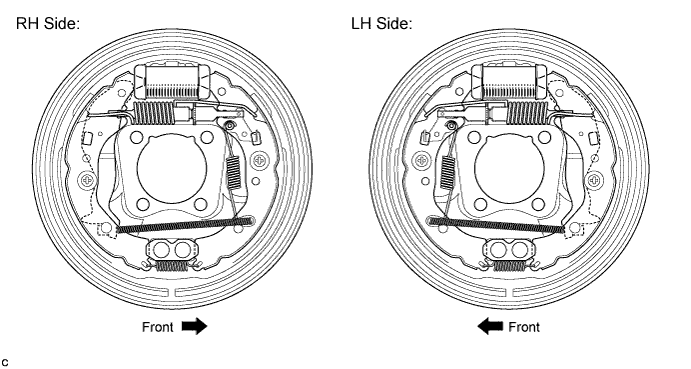
- NOTICE:
- There should be no oil or grease adhering to the friction surfaces of the shoe lining or the drum.
Measure the brake drum inner diameter and the diameter of the brake shoes. Check that the difference between the diameters is equal to the specified shoe clearance.
- Shoe clearance:
- 0.6 mm (0.0236 in.)
 |
| 10. INSTALL REAR BRAKE DRUM |
Install the rear brake drum.
| 11. ADJUST REAR DRUM BRAKE SHOE CLEARANCE |
Temporarily install the 2 wheel nuts.
 |
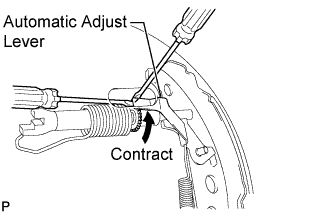
Remove the shoe adjusting hole plug, and turn the adjuster to expand the shoe until the drum locks.
Hold the automatic adjust lever away from the adjuster, and contract the brake shoe by turning the adjust bolt using another screwdriver until the drum can rotate smoothly.
- Standard:
- 11 notches
 |
Install the hole plug.
| 12. INSTALL REAR WHEEL |
- Torque:
- 103 N*m{1050 kgf*cm, 76 ft.*lbf}
| 13. FILL RESERVOIR WITH BRAKE FLUID |
Fill the reservoir with brake fluid.
- Brake Fluid:
- SAE J1703 or FMVSS No. 116 DOT 3
- NOTICE:
- Add brake fluid to keep the level between the MIN and MAX lines of the reservoir while bleeding the brakes.
| 14. BLEED BRAKE LINE |
- NOTICE:
- Bleed the brake line of the wheel farthest from the master cylinder first.
- Add brake fluid to keep the level between the MIN and MAX lines of the reservoir while bleeding the brakes.
Connect a vinyl tube to the bleeder plug.
Depress the brake pedal several times, and then loosen the bleeder plug with the pedal depressed*1.
When fluid stops coming out, tighten the bleeder plug, and then release the brake pedal*2.
Repeat *1 and *2 until all the air in the fluid is completely bled out.
Tighten the bleeder plug completely.
- Torque:
- Front bleeder plug:
- 8.3 N*m{85 kgf*cm, 73 in.*lbf}
- Rear bleeder plug (for Drum Brake):
- 8.5 N*m{87 kgf*cm, 75 in.*lbf}
- Rear bleeder plug (for Disc Brake):
- 10 N*m{102 kgf*cm, 7 ft.*lbf}
Repeat the above procedure for each wheel to bleed the brake line.
| 15. INSPECT FOR BRAKE FLUID LEAK |
| 16. INSPECT FLUID LEVEL |
Check the fluid level.
If brake fluid level is lower than the MIN line, check for leaks and inspect the disc brake pads. If necessary, refill the reservoir with brake fluid to the MAX line after repair or replacement.- Brake Fluid:
- SAE J1703 or FMVSS No. 116 DOT 3
 |
| 17. ADJUST PARKING BRAKE LEVER TRAVEL |
Remove the upper console box assembly (COROLLA_ZRE142 RM000002XV501QX.html).
Completely release the parking brake lever.
Loosen the lock nut and the adjusting nut to completely release the parking brake cable.
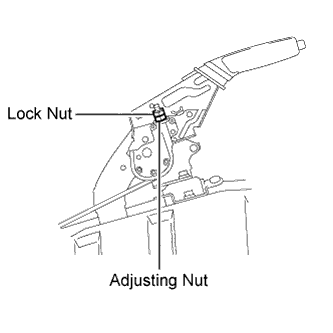 |
Fully depress the brake lever 3 to 5 times with the engine stopped.
Turn the adjusting nut until the parking brake lever travel is corrected to within the specified range.
- Parking brake lever travel:
- 6 to 9 notches at 200 N (20 kgf, 45.0 lbf)
Using a wrench or an equivalent tool, hold the adjusting nut and tighten the lock nut.
- Torque:
- 6.0 N*m{61 kgf*cm, 53 in.*lbf}
Operate the parking brake lever 3 to 4 times, and check the parking brake lever travel.
Check whether the parking brake drags or not.
Install the upper console box assembly (COROLLA_ZRE142 RM000002XV301QX.html).