Compressor And Pulley (For 2Az-Fe) Removal
RECOVER REFRIGERANT FROM REFRIGERATION SYSTEM
DISCONNECT REFRIGERANT FROM REFRIGERATION SYSTEM
DRAIN ENGINE COOLANT
REMOVE FRONT WHEEL RH
REMOVE ENGINE UNDER COVER RH
REMOVE FRONT FENDER APRON SEAL RH
REMOVE V-RIBBED BELT
REMOVE GENERATOR ASSEMBLY
DISCONNECT RADIATOR HOSE OUTLET
REMOVE PIPING CLAMP
DISCONNECT NO. 1 COOLER REFRIGERANT DISCHARGE HOSE
DISCONNECT NO. 1 COOLER REFRIGERANT SUCTION HOSE
REMOVE COMPRESSOR AND PULLEY
Compressor And Pulley (For 2Az-Fe) -- Removal |
| 1. RECOVER REFRIGERANT FROM REFRIGERATION SYSTEM |
Start up the engine.
Turn the A/C switch on.
Operate the cooler compressor at an engine speed of approximately 1,000 rpm for 5 to 6 minutes to circulate the refrigerant. This causes most of the compressor oil from the various components of the A/C system to collect in the A/C compressor.
Stop the engine.
Recover the refrigerant from the A/C system using a refrigerant recovery unit.
| 2. DISCONNECT REFRIGERANT FROM REFRIGERATION SYSTEM |
- CAUTION:
- Wait for 90 seconds after disconnecting the cable to prevent airbag deployment. (CAMRY_ACV40 RM000000KT10BKX.html)
- NOTICE:
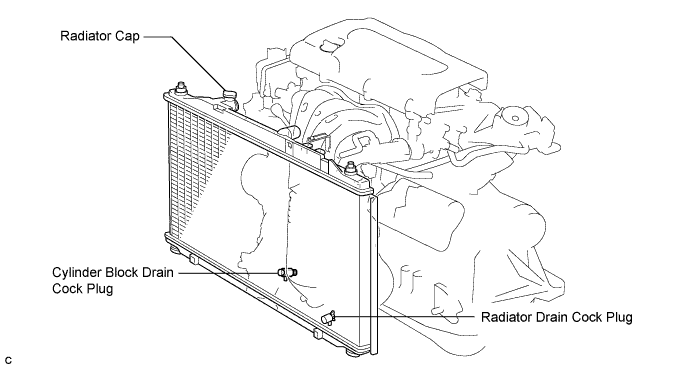
- Do not remove the radiator cap sub-assembly while the engine and radiator are still hot. Pressurized, hot engine coolant and steam may be released and cause serious burns.
Remove the radiator cap sub-assembly from the radiator assembly.
Loosen the radiator drain cock plug and cylinder block drain cock plug, then drain the coolant.
- HINT:
- Collect the coolant in a container and dispose of it according to the regulations in your area.
| 5. REMOVE ENGINE UNDER COVER RH |
| 6. REMOVE FRONT FENDER APRON SEAL RH |
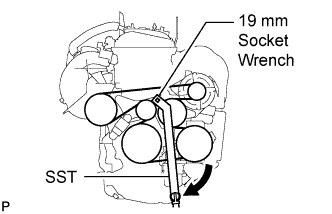
Using SST and 19 mm socket wrench, loosen the V-ribbed belt tensioner arm clockwise, then remove the V-ribbed belt.
- SST
- 09216-42010
- NOTICE:
- Be sure to connect SST and the tools so that they are in line during use.
- When retracting the tensioner, turn it clockwise slowly for 3 seconds or more. Do not apply force rapidly.
- After the tensioner is fully retracted, do not apply force any more than necessary.
| 8. REMOVE GENERATOR ASSEMBLY |
Disconnect the generator connector.
Remove the nut and disconnect the wire harness from terminal B.
Remove the bolt and wire harness clamp bracket.
Remove the wire harness clamps.
Remove the 2 bolts and generator assembly.
| 9. DISCONNECT RADIATOR HOSE OUTLET |
Using pliers, grip the claws of the clip and slide the clip to disconnect the radiator hose outlet.
Remove the piping clamp from the No. 1 cooler refrigerant discharge hose and No. 1 cooler refrigerant suction hose.
| 11. DISCONNECT NO. 1 COOLER REFRIGERANT DISCHARGE HOSE |
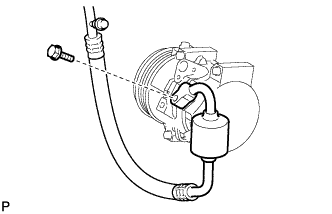
Remove the bolt and disconnect the No. 1 cooler refrigerant discharge hose from the compressor and pulley.
Remove the O-ring from the No. 1 cooler refrigerant discharge hose.
- NOTICE:
- Seal the openings of the disconnected parts using vinyl tape to prevent entry of moisture and foreign matter.
| 12. DISCONNECT NO. 1 COOLER REFRIGERANT SUCTION HOSE |
Remove the bolt and disconnect the No. 1 cooler refrigerant suction hose from the compressor and pulley.
Remove the O-ring from the No. 1 cooler refrigerant suction hose.
- NOTICE:
- Seal the openings of the disconnected parts using vinyl tape to prevent entry of moisture and foreign matter.
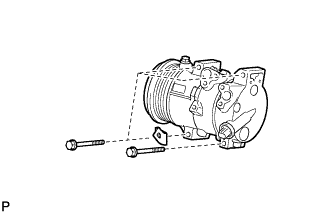
| 13. REMOVE COMPRESSOR AND PULLEY |
Disconnect the connector.
Remove the 4 bolts, engine wire harness bracket, and the compressor and pulley.