INSTALL NO. 1 CONSOLE BOX DUCT (for Automatic Air Conditioning System)
INSTALL NO. 1 CONSOLE BOX INSERT FRONT (for Automatic Air Conditioning System)
INSTALL NO. 2 CONSOLE BOX INSERT FRONT (for Automatic Air Conditioning System)
INSTALL CONSOLE BOX ASSEMBLY (for Automatic Air Conditioning System)
INSTALL CONSOLE BOX CARPET (for Automatic Air Conditioning System)
INSTALL CONSOLE BOX POCKET (for Automatic Air Conditioning System)
INSTALL UPPER CONSOLE PANEL SUB-ASSEMBLY (for Automatic Air Conditioning System)
INSTALL LOWER INSTRUMENT PANEL SUB-ASSEMBLY (for Automatic Air Conditioning System)
INSTALL NO. 2 INSTRUMENT PANEL UNDER COVER SUB-ASSEMBLY (for Automatic Air Conditioning System)
INSTALL LOWER INSTRUMENT PANEL FINISH PANEL LH (for Automatic Air Conditioning System)
INSTALL COWL SIDE TRIM SUB-ASSEMBLY RH (for Automatic Air Conditioning System)
INSTALL FRONT DOOR SCUFF PLATE RH (for Automatic Air Conditioning System)
INSTALL COWL SIDE TRIM SUB-ASSEMBLY LH (for Automatic Air Conditioning System)
INSTALL FRONT DOOR SCUFF PLATE LH (for Automatic Air Conditioning System)
INSTALL UPPER REAR CONSOLE PANEL SUB-ASSEMBLY (for Automatic Transaxle)
INSTALL UPPER REAR CONSOLE PANEL SUB-ASSEMBLY (for Manual Transaxle)
INSTALL SHIFT LEVER KNOB SUB-ASSEMBLY (for Manual Transaxle)
INSTALL SHIFT LEVER KNOB SUB-ASSEMBLY (for Automatic Transaxle)
Yaw Rate And Acceleration Sensor (W/ Vsc) -- Installation |
| 1. INSTALL YAW RATE AND ACCELERATION SENSOR |
Install the yaw rate and acceleration sensor with the 2 bolts.
- NOTICE:
- Do not damage the yaw rate and acceleration sensor.
- Make sure that the yaw rate and acceleration sensor is installed securely.
- Torque:
- 13 N*m{133 kgf*cm, 10 ft.*lbf}
 |
Connect the yaw rate and acceleration sensor connector.
| 2. INSTALL NO. 1 CONSOLE BOX DUCT (for Automatic Air Conditioning System) |
Install the No. 1 console box duct with the clip.
 |
| 3. INSTALL NO. 1 CONSOLE BOX INSERT FRONT (for Automatic Air Conditioning System) |
Engage the clip.
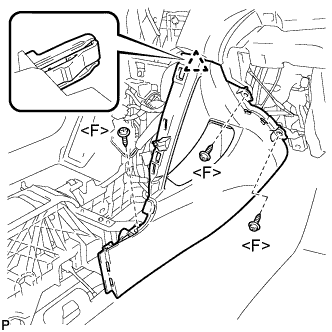 |
Install the No. 1 console box insert front with the 3 screws <F>.
| 4. INSTALL NO. 2 CONSOLE BOX INSERT FRONT (for Automatic Air Conditioning System) |
Engage the clip.
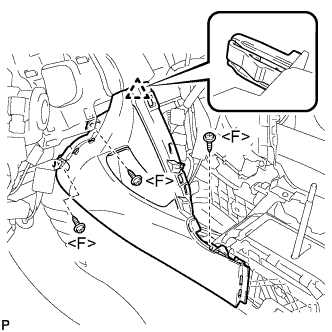 |
Install the No. 2 console box insert front with the 3 screws <F>.
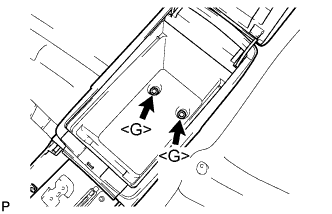
| 5. INSTALL CONSOLE BOX ASSEMBLY (for Automatic Air Conditioning System) |
Install the 2 screws <F>.
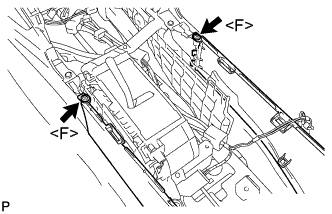 |
Install the console box assembly with the 2 bolts <G>.
 |
| 6. INSTALL CONSOLE BOX CARPET (for Automatic Air Conditioning System) |
Install the console box carpet.
 |
| 7. INSTALL CONSOLE BOX POCKET (for Automatic Air Conditioning System) |
Install the console box pocket.
| 8. INSTALL UPPER CONSOLE PANEL SUB-ASSEMBLY (for Automatic Air Conditioning System) |
Connect each connector.
Engage the 4 claws.
 |
Install the upper console panel sub-assembly with the 2 screws <F>.
| 9. INSTALL LOWER INSTRUMENT PANEL SUB-ASSEMBLY (for Automatic Air Conditioning System) |
Engage the 3 claws and 3 clips.
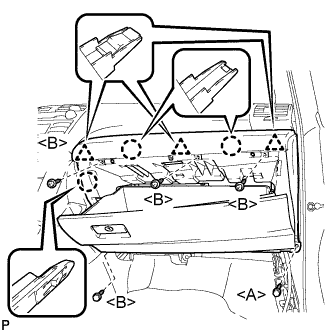 |
Install the 4 screws <B>.
Install the lower instrument panel sub-assembly with the bolt <A>.
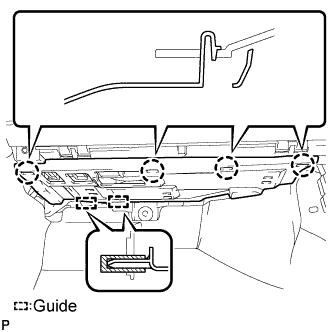
| 10. INSTALL NO. 2 INSTRUMENT PANEL UNDER COVER SUB-ASSEMBLY (for Automatic Air Conditioning System) |
Engage the 4 claws and 2 guides and install the instrument panel No. 2 under cover.
 |
| 11. INSTALL LOWER INSTRUMENT PANEL FINISH PANEL LH (for Automatic Air Conditioning System) |
Install the air hose and connect the connector.
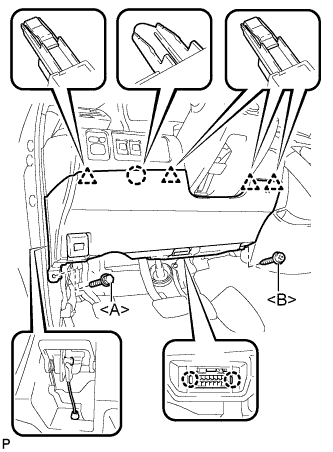 |
Engage the 2 claws and the DLC3.
Engage the claw and the 4 clips.
Instal the lower instrument panel finish panel LH with the screw <B> and bolt <A>.
| 12. INSTALL COWL SIDE TRIM SUB-ASSEMBLY RH (for Automatic Air Conditioning System) |
- HINT:
- Use the same procedures for the RH side and the LH side.
| 13. INSTALL FRONT DOOR SCUFF PLATE RH (for Automatic Air Conditioning System) |
- HINT:
- Use the same procedures for the RH side and the LH side.
| 14. INSTALL COWL SIDE TRIM SUB-ASSEMBLY LH (for Automatic Air Conditioning System) |
Engage the 2 clips.
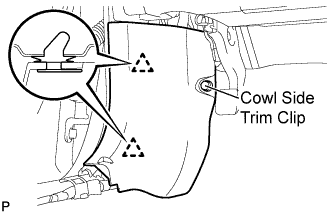 |
Install the cowl side trim sub-assembly LH with the cowl side trim clip.
| 15. INSTALL FRONT DOOR SCUFF PLATE LH (for Automatic Air Conditioning System) |
Engage the 7 claws and 3 clips, then install the front door scuff plate LH.
 |
| 16. INSTALL UPPER REAR CONSOLE PANEL SUB-ASSEMBLY (for Automatic Transaxle) |
Connect the connector.
 |
Engage the 3 claws and 5 clips to install the upper console rear panel sub-assembly.
| 17. INSTALL UPPER REAR CONSOLE PANEL SUB-ASSEMBLY (for Manual Transaxle) |
Engage the 3 claws and 5 clips to install the upper console rear panel sub-assembly.
 |
| 18. INSTALL UPPER CONSOLE PANEL (for Manual Transaxle) |
Engage the 2 claws and the 5 clips to install the upper console panel as shown in the illustration.
 |
| 19. INSTALL FLOOR SHIFT POSITION INDICATOR HOUSING SUB-ASSEMBLY |
with Seat Heater System:
Connect each connector.
Engage the 6 claws and the 3 clips to install the floor shift position indicator housing sub-assembly.
 |
| 20. INSTALL NO. 2 INSTRUMENT CLUSTER FINISH PANEL GARNISH |
Engage the 2 clips and install the No. 2 instrument cluster finish panel garnish.
 |
| 21. INSTALL NO. 1 INSTRUMENT CLUSTER FINISH PANEL GARNISH |
Engage the 2 clips and install the No. 1 instrument cluster finish panel garnish.
 |
| 22. INSTALL SHIFT LEVER KNOB SUB-ASSEMBLY (for Manual Transaxle) |
Install the shift lever knob sub-assembly.
 |
| 23. INSTALL SHIFT LEVER KNOB SUB-ASSEMBLY (for Automatic Transaxle) |
Install the shift lever knob sub-assembly.
 |
| 24. CONNECT CABLE TO NEGATIVE BATTERY TERMINAL |
| 25. PERFORM YAW RATE SENSOR ZERO POINT CALIBRATION |
- HINT:
| 26. INSPECT SENSOR SIGNAL |
- HINT:
| 27. INSPECT DTC AND CLEAR |
- HINT: