Generator -- Removal |
| 1. DISCONNECT CABLE FROM NEGATIVE BATTERY TERMINAL |
| 2. REMOVE FRONT WHEEL RH |
| 3. REMOVE FRONT FENDER APRON SEAL RH |
| 4. REMOVE ENGINE UNDER COVER RH |
| 5. REMOVE ENGINE UNDER COVER LH |
| 6. REMOVE COOL AIR INTAKE DUCT SEAL |
Remove the 7 clips and intake duct seal.
 |
| 7. REMOVE V-BANK COVER SUB-ASSEMBLY |
Hold the front of the V-bank cover and raise it to disengage the 2 retainers on the front of the cover. Continue to raise the cover to disengage the retainer on the rear of the cover and remove the cover.
- NOTICE:
- Attempting to disengage both front and rear clips at the same time may cause the cover to break.
 |
| 8. DRAIN ENGINE COOLANT |
- NOTICE:
- Do not remove the radiator cap sub-assembly while the engine and radiator are still hot. Pressurized, hot engine coolant and steam may be released and cause serious burns.
Remove the radiator cap sub-assembly from the radiator assembly.
Loosen the radiator drain cock plug and 2 cylinder block drain cock plugs, then drain the coolant.

- HINT:
- Collect the coolant in a container and dispose of it according to the regulations in your area.
| 9. REMOVE AIR CLEANER INLET ASSEMBLY |
Remove the 2 bolts, clamp and air cleaner inlet.
 |
| 10. REMOVE AIR CLEANER CAP SUB-ASSEMBLY |
Disconnect the 3 vacuum hoses.
 |
Disconnect the mass air flow meter connector (*1).
 |
Disconnect the No. 2 ventilation hose (*2).
Disconnect the hose band (*3).
Disconnect the 3 bands, and remove the air cleaner cap sub-assembly.
 |
| 11. REMOVE NO. 1 AIR CLEANER INLET |
Remove the bolt and No. 1 air cleaner inlet.
 |
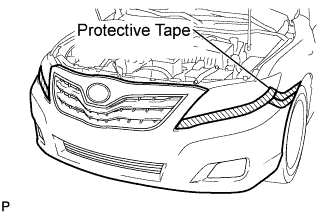
| 12. REMOVE FRONT BUMPER ASSEMBLY |
Put protective tape around the front bumper assembly.
 |
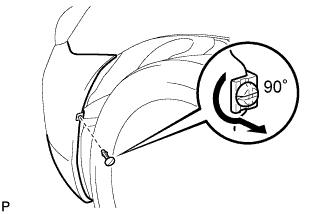
Using a screwdriver, turn the pin 90 degrees and remove the pin hold clip.
- HINT:
- Use the same procedure for the RH side and LH side.
 |
Remove the 8 screws, 2 clips, 2 radiator grille protectors and bolt.
 |
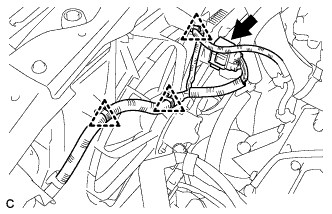
Disengage the 2 claws and disconnect the front bumper assembly as shown in the illustration.
- HINT:
- Use the same procedure for the RH side and LH side.
 |
Disconnect each connector.
w/ TOYOTA Parking Assist-sensor System:
Disengage the clamp and disconnect the No. 1 ultrasonic sensor connector.
w/ Headlight Cleaner System:
Disconnect the headlight cleaner washer hose.
Remove the front bumper assembly.
 |
| 13. REMOVE FRONT BUMPER ENERGY ABSORBER |
Disengage the 2 guides and remove the front bumper energy absorber from the front bumper reinforcement sub-assembly.
 |
| 14. SEPARATE RADIATOR RESERVE TANK HOSE |
Separate the radiator reserve tank hose from the radiator assembly.
 |
| 15. SEPARATE RADIATOR INLET HOSE |
Separate the radiator inlet hose from the radiator assembly.
 |
| 16. SEPARATE RADIATOR OUTLET HOSE |
Separate the radiator outlet hose from the radiator assembly.
 |
| 17. SEPARATE NO. 1 OIL COOLER INLET HOSE |
Separate the No. 1 oil cooler inlet hose from the radiator assembly.
 |
| 18. SEPARATE NO. 1 OIL COOLER OUTLET HOSE |
Separate the No. 1 oil cooler outlet hose from the radiator assembly.
 |
| 19. REMOVE RADIATOR SUPPORT UPPER |
Disconnect the horn connector.
Remove the 3 bolts and separate the hood lock assembly from the radiator support upper.
 |
For LHD:
Remove the clamp and separate the hood lock control cable from the radiator support upper.
 |
For RHD:
Remove the clamp and separate the hood lock control cable from the radiator support upper.
 |
Remove the 5 bolts and radiator support upper.
 |
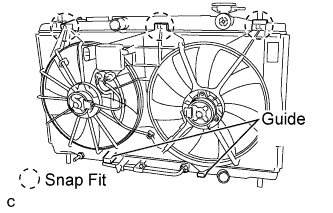
| 20. REMOVE FAN SHROUD |
Remove the 3 clamps and connector.
 |
Release the 3 snap fits and lift the fan assembly with motor from the radiator.
 |
| 21. REMOVE RADIATOR ASSEMBLY |
Remove the 4 bolts and separate the condenser assembly from the radiator assembly.
 |
Remove the radiator assembly from the body.
 |
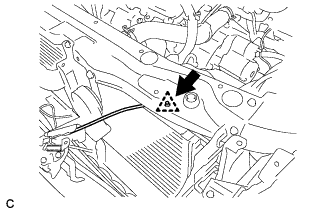
| 22. REMOVE V-RIBBED BELT |
Using SST, release the belt tension by turning the belt tensioner counterclockwise, and remove the V-ribbed belt from the belt tensioner.
- SST
- 09249-63010
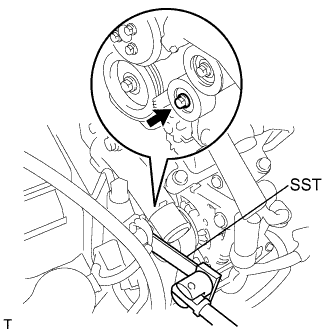 |
While turning the belt tensioner counterclockwise, align with its holes, and then insert the 5 mm bi-hexagon wrench into the holes to fix the V-ribbed belt tensioner.
 |
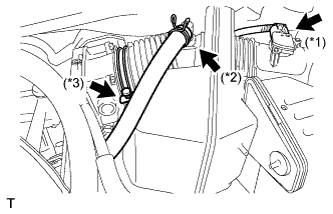
| 23. REMOVE GENERATOR ASSEMBLY |
Remove the terminal cap.
 |
Remove the nut and disconnect the wire harness from terminal B.
Disconnect the generator connector from the generator assembly.
Disconnect the connector from the compressor and magnetic clutch.
Disconnect the 2 wire harness clamps.
Remove the 2 bolts.
 |
Remove the bolt from the cylinder block.
 |
Disconnect the wire harness clamp and remove the generator assembly.
Remove the bolt and wire harness clamp stay.
 |
Remove the bolt and bracket.
 |