Transmission Control Cable Installation
INSTALL TRANSMISSION CONTROL CABLE ASSEMBLY
INSTALL TRANSMISSION CONTROL CABLE ASSEMBLY
INSTALL CENTER AIRBAG SENSOR ASSEMBLY
INSTALL AIR CONDITIONER UNIT ASSEMBLY
INSTALL INSTRUMENT PANEL SAFETY PAD SUB-ASSEMBLY
REMOVE UPPER CONSOLE REAR PANEL SUB-ASSEMBLY
INSTALL UPPER CONSOLE PANEL
INSTALL NO. 2 INSTRUMENT CLUSTER FINISH PANEL GARNISH
INSTALL NO. 1 INSTRUMENT CLUSTER FINISH PANEL GARNISH
INSTALL SHIFT LEVER KNOB SUB-ASSEMBLY
INSTALL BATTERY
INSTALL AIR CLEANER CASE SUB-ASSEMBLY
INSTALL AIR CLEANER CAP SUB-ASSEMBLY
INSTALL AIR CLEANER INLET ASSEMBLY
INSTALL NO. 1 ENGINE COVER SUB-ASSEMBLY
CONNECT CABLE TO NEGATIVE BATTERY TERMINAL
Transmission Control Cable -- Installation |
| 1. INSTALL TRANSMISSION CONTROL CABLE ASSEMBLY |
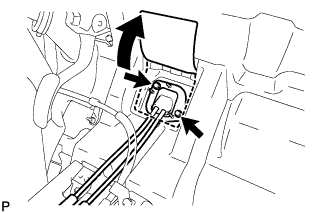
Install the No. 2 shift cable grommet retainer to the transmission control cable assembly.
Install the control cable assembly through the floor hole.
Install the control cable assembly with the 2 bolts.
- Torque:
- 5.0 N*m{51 kgf*cm, 44 in.*lbf}
Connect the ends of the 2 cables and install the 2 washers and 2 clips.
Install 2 new clips to the control cable bracket.
| 2. INSTALL TRANSMISSION CONTROL CABLE ASSEMBLY |
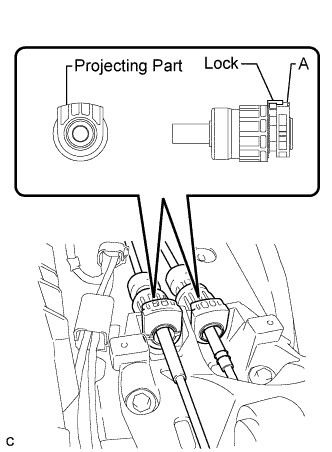
Connect the control cable to the shift lever retainer.
- NOTICE:
- The projecting part of the cable outer should face upward when the shift cable is connected.
- After installation, make sure that the cable outer lock is projecting from A as shown in the illustration.
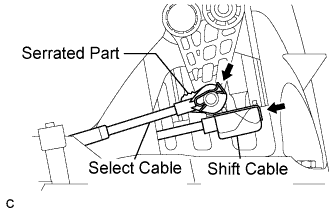
Connect the end of the shift cable to the shift lever assembly with the clip.
Connect the end of the select cable to the shift lever assembly with a new clip.
- NOTICE:
- The serrated part of the select cable point should face upward when the select cable point is connected.
- The clip should be installed in the direction as shown in the illustration.
| 3. INSTALL CENTER AIRBAG SENSOR ASSEMBLY |
Check that the ignition switch is off.
Check that the battery negative (-) cable is disconnected.
- CAUTION:
- Wait for 90 seconds after disconnecting the cable to prevent airbag deployment.
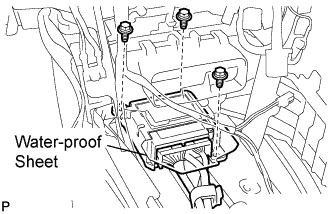
Install the center airbag sensor assembly with the 3 bolts.
- Torque:
- 17.5 N*m{179 kgf*cm, 13 ft.*lbf}
- NOTICE:
- If the center airbag sensor assembly has been dropped, or there are any cracks, dents or other defects in the case, bracket or connector, replace it with a new one.
- When installing the center airbag sensor assembly, be careful that the SRS wiring does not interfere with other parts and that it is not pinched between other parts.
Check that there is no looseness in the installation parts of the center airbag sensor assembly.
Connect the holder (with connectors).
Check that the water-proof sheet is properly set.
| 4. INSTALL AIR CONDITIONER UNIT ASSEMBLY |
CAMRY_ACV40 RM000001HLU0DCX.html.
| 5. INSTALL INSTRUMENT PANEL SAFETY PAD SUB-ASSEMBLY |
CAMRY_ACV40 RM0000024DA049X.html.
| 6. REMOVE UPPER CONSOLE REAR PANEL SUB-ASSEMBLY |
Engage the 3 claws and 5 clips to install the upper console rear panel sub-assembly.
| 7. INSTALL UPPER CONSOLE PANEL |
Engage the 2 claws and the 5 clips to install the upper console panel as shown in the illustration.
| 8. INSTALL NO. 2 INSTRUMENT CLUSTER FINISH PANEL GARNISH |
Engage the 2 clips and install the No. 2 instrument cluster finish panel garnish.
| 9. INSTALL NO. 1 INSTRUMENT CLUSTER FINISH PANEL GARNISH |
Engage the 2 clips and install the No. 1 instrument cluster finish panel garnish.
| 10. INSTALL SHIFT LEVER KNOB SUB-ASSEMBLY |
Install the shift lever knob sub-assembly.
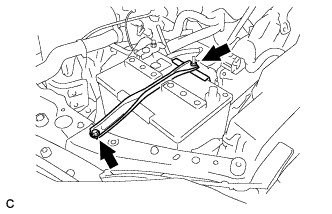
Install the battery and battery tray.
Install the battery clamp with the bolt and nut.
- Torque:
- Bolt:
- 9.0 N*m{92 kgf*cm, 80 in.*lbf}
- Nut:
- 3.5 N*m{36 kgf*cm, 31 in.*lbf}
| 12. INSTALL AIR CLEANER CASE SUB-ASSEMBLY |
Install the air cleaner case with the 3 bolts.
- Torque:
- 5.0 N*m{51 kgf*cm, 44 in.*lbf}
Connect the hose clamp.
| 13. INSTALL AIR CLEANER CAP SUB-ASSEMBLY |
Install the air cleaner filter element onto the air cleaner case.
Insert the hinges. Install the air cleaner cap sub-assembly with the 2 bolts.
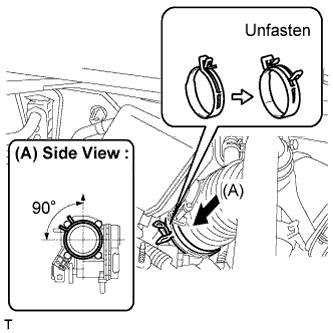
Align the matchmarks of the No. 1 air cleaner hose and throttle body, and then connect the air cleaner hose No. 1 to the throttle body and unfasten the No. 1 air cleaner hose clamp.
- NOTICE:
- Make sure that the hose clamp is at the correct angle.
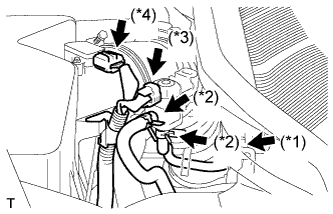
Connect the No. 2 ventilation hose to the air cleaner hose.
Connect the purge line hose to the clamp (*1).
Connect the 2 purge VSV vacuum hoses (*2).
Connect the purge VSV connector (*3).
Connect the mass air flow meter connector (*4).
| 14. INSTALL AIR CLEANER INLET ASSEMBLY |
Install the air cleaner inlet with the 2 bolts.
- Torque:
- 5.0 N*m{51 kgf*cm, 44 in.*lbf}
| 15. INSTALL NO. 1 ENGINE COVER SUB-ASSEMBLY |
Install the engine cover with the 2 nuts.
- Torque:
- 9.0 N*m{92 kgf*cm, 80 in.*lbf}
| 16. CONNECT CABLE TO NEGATIVE BATTERY TERMINAL |
- Torque:
- 6.9 N*m{70 kgf*cm, 61 in.*lbf}