Curtain Shield Airbag Assembly Installation
INSTALL CURTAIN SHIELD AIRBAG ASSEMBLY
INSTALL ROOF HEADLINING ASSEMBLY (w/o Sliding Roof)
INSTALL ROOF HEADLINING ASSEMBLY (w/ Sliding Roof)
INSTALL SUNSHADE TRIM HOLDER (w/ Rear Sunshade)
INSTALL SUN ROOF OPENING TRIM MOULDING (w/ Sliding Roof)
INSTALL SPOT LIGHT ASSEMBLY (w/ Sliding Roof)
INSTALL NO. 1 ROOM LIGHT ASSEMBLY (w/o Sliding Roof)
INSTALL FRONT ASSIST GRIP SUB-ASSEMBLY
INSTALL REAR ASSIST GRIP SUB-ASSEMBLY
INSTALL VISOR HOLDER
INSTALL VISOR ASSEMBLY LH
INSTALL VISOR ASSEMBLY RH
INSTALL ROOF CONSOLE BOX ASSEMBLY
INSTALL FRONT PILLAR GARNISH LH
INSTALL FRONT PILLAR GARNISH RH
INSTALL ROOF SIDE INNER GARNISH LH
INSTALL ROOF SIDE INNER GARNISH RH
INSTALL UPPER CENTER PILLAR GARNISH LH
INSTALL LOWER CENTER PILLAR GARNISH LH
CONNECT FRONT SEAT OUTER BELT ASSEMBLY LH
INSTALL LAP BELT OUTER ANCHOR COVER (for LH Side)
INSTALL FRONT DOOR OPENING TRIM WEATHERSTRIP LH
INSTALL COWL SIDE TRIM SUB-ASSEMBLY LH
INSTALL FRONT DOOR SCUFF PLATE LH
INSTALL UPPER CENTER PILLAR GARNISH RH
INSTALL LOWER CENTER PILLAR GARNISH RH
CONNECT FRONT SEAT OUTER BELT ASSEMBLY RH
INSTALL LAP BELT OUTER ANCHOR COVER (for RH Side)
INSTALL FRONT DOOR OPENING TRIM WEATHERSTRIP RH
INSTALL COWL SIDE TRIM SUB-ASSEMBLY RH
INSTALL FRONT DOOR SCUFF PLATE RH
INSTALL REAR DOOR INNER GLASS WEATHERSTRIP LH
INSTALL REAR DOOR TRIM BOARD SUB-ASSEMBLY LH
INSTALL DOOR ASSIST GRIP COVER LH
INSTALL REAR DOOR INSIDE HANDLE BEZEL PLUG LH
INSTALL RECLINING REMOTE CONTROL LEVER SUB-ASSEMBLY LH (for Reclining Seat Type)
INSTALL RECLINING REMOTE CONTROL LEVER SUB-ASSEMBLY RH (for Reclining Seat Type)
INSTALL REAR DOOR OPENING TRIM WEATHERSTRIP LH
INSTALL REAR DOOR SCUFF PLATE LH
INSTALL REAR DOOR OPENING TRIM WEATHERSTRIP RH
INSTALL REAR DOOR SCUFF PLATE RH
INSTALL CENTER SEATBACK ASSEMBLY (for Reclining Seat Type)
INSTALL SEPARATE TYPE REAR SEATBACK ASSEMBLY LH (for Reclining Seat Type)
INSTALL SEPARATE TYPE REAR SEATBACK ASSEMBLY RH (for Reclining Seat Type)
INSTALL REAR SEATBACK COVER (for Reclining Seat Type)
INSTALL REAR SIDE SEATBACK ASSEMBLY LH (for Fold Down Seat Type)
INSTALL REAR SIDE SEATBACK ASSEMBLY RH (for Fold Down Seat Type)
INSTALL SEPARATE TYPE REAR SEATBACK ASSEMBLY LH (for Fold Down Seat Type)
INSTALL SEPARATE TYPE REAR SEATBACK ASSEMBLY RH (for Fold Down Seat Type)
INSTALL REAR CENTER SEAT HEADREST ASSEMBLY
INSTALL REAR SEAT HEADREST ASSEMBLY
INSTALL REAR SEAT CUSHION ASSEMBLY
INSTALL FRONT SEAT ASSEMBLY LH (for Power Seat)
INSTALL INNER SEAT TRACK BRACKET COVER RH (for Power Seat)
INSTALL SEAT TRACK COVER LH (for Power Seat)
INSTALL FRONT SEAT HEADREST ASSEMBLY (for Power Seat)
INSTALL FRONT SEAT ASSEMBLY LH (for Manual Seat)
INSTALL INNER SEAT TRACK BRACKET COVER LH (for Manual Seat)
INSTALL SEAT TRACK COVER LH (for Manual Seat)
INSTALL FRONT SEAT HEADREST ASSEMBLY (for Manual Seat)
INSTALL FRONT SEAT ASSEMBLY RH (for Power Seat)
INSTALL INNER SEAT TRACK BRACKET COVER LH (for Power Seat)
INSTALL SEAT TRACK COVER RH (for Power Seat)
INSTALL FRONT SEAT HEADREST ASSEMBLY (for Power Seat)
INSTALL FRONT SEAT ASSEMBLY RH (for Manual Seat)
INSTALL INNER SEAT TRACK BRACKET COVER RH (for Manual Seat)
INSTALL SEAT TRACK COVER RH (for Manual Seat)
INSTALL FRONT SEAT HEADREST ASSEMBLY (for Manual Seat)
CONNECT CABLE TO NEGATIVE BATTERY TERMINAL
INSPECT SRS WARNING LIGHT
INSPECT FRONT SEAT ASSEMBLY (for Power Seat)
INSPECT SLIDE ADJUSTER LOCK (for Manual Seat)
Curtain Shield Airbag Assembly -- Installation |
| 1. INSTALL CURTAIN SHIELD AIRBAG ASSEMBLY |
Check that the ignition switch is off.
Check that the battery negative (-) terminal is disconnected.
- CAUTION:
- Wait for 90 seconds after disconnecting the cable to prevent airbag deployment.
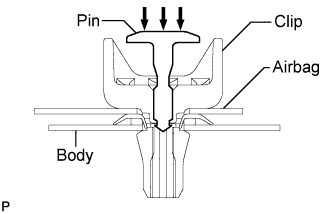
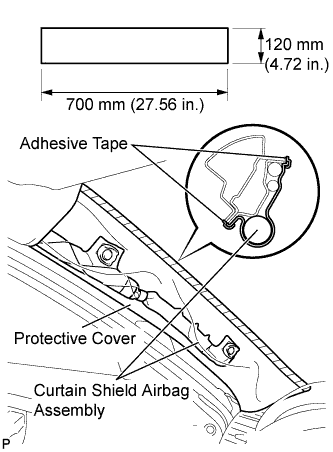
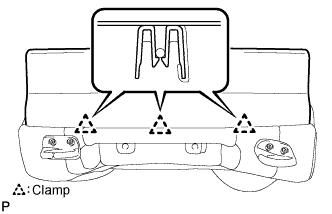
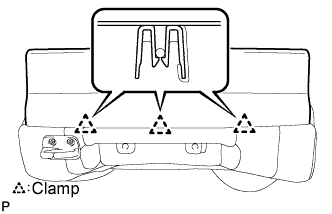
Install 4 new clips and 4 new spacers to the curtain shield airbag assembly as shown in the illustration.
- NOTICE:
- Do not push in the pin.
- Make sure that the clips are installed in the correct direction.
- Make sure that the spacers are installed properly, in the correct direction, and that they are not damaged.
Install the curtain shield airbag assembly with 5 new bolts.
- Torque:
- 11 N*m{112 kgf*cm, 8 ft.*lbf}
- NOTICE:
- Do not twist the curtain shield airbag assembly when installing it.
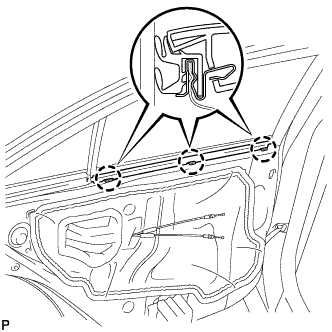
Install the 4 clips with the curtain shield airbag assembly to the body panel as shown in the illustration.
- NOTICE:
- Make sure that the pins of the clips are pushed in firmly.
Mark the clips.
- HINT:
- Mark the clips to make sure that they are not reused.
Connect the connector.
- NOTICE:
- When handling the airbag connector, take care not to damage the airbag wire harness.
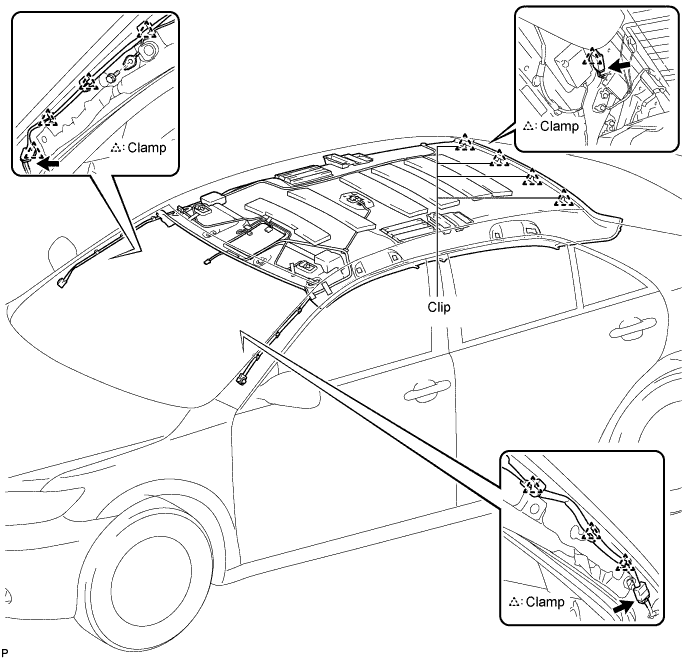
| 2. INSTALL ROOF HEADLINING ASSEMBLY (w/o Sliding Roof) |
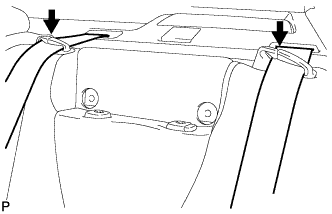
Pull the roof headlining assembly into the vehicle through the rear left door.
Engage the 4 clips.
Connect the antenna cord sub-assembly connector and engage the clamp to the rear pillar RH.
Connect the antenna cord sub-assembly connector and engage each clamp to the front pillar RH.
Install the radio setting condenser to the front pillar RH with the bolt.
Connect the No. 1 roof wire connector and engage each clamp to the front pillar LH.
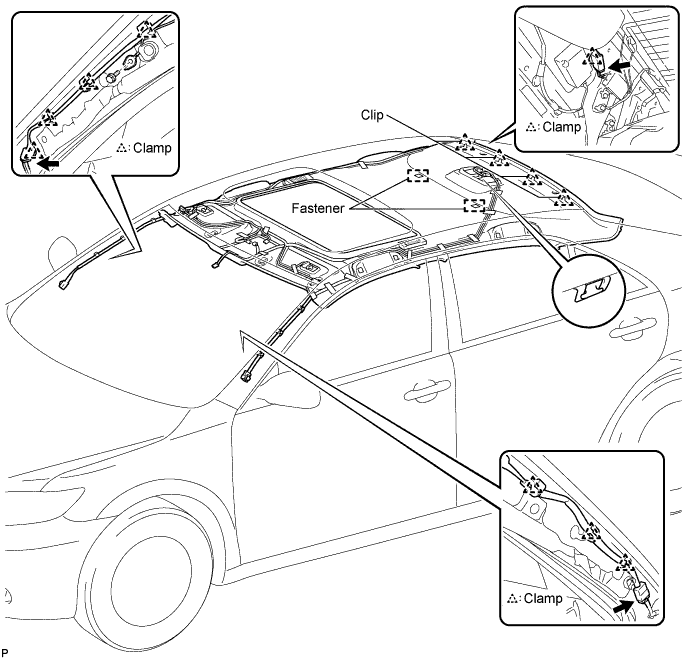
| 3. INSTALL ROOF HEADLINING ASSEMBLY (w/ Sliding Roof) |
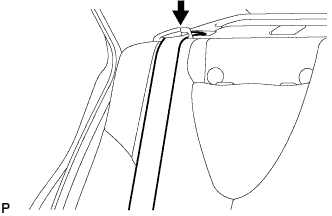
Pull the roof headlining assembly into the vehicle through the rear left door.
Engage the hook, 4 clips, and 2 fasteners.
Connect the sliding roof drive gear connector.
Connect the antenna cord sub-assembly connector and engage the clamp to the rear pillar RH.
Connect the antenna cord sub-assembly connector and engage each clamp to the front pillar RH.
Install the radio setting condenser to the front pillar RH with the bolt.
Connect the No. 1 roof wire connector and engage each clamp to the front pillar LH.
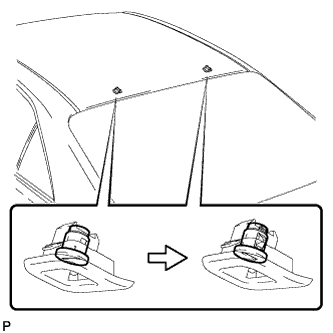
| 4. INSTALL SUNSHADE TRIM HOLDER (w/ Rear Sunshade) |
Engage the 2 claws.
Using a screwdriver, turn the pin of each sunshade trim holder 90°to install the sunshade trim holders.
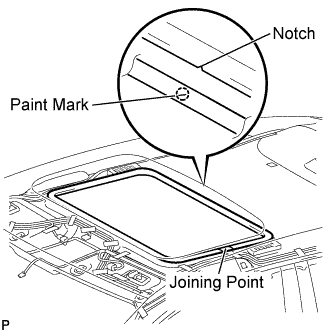
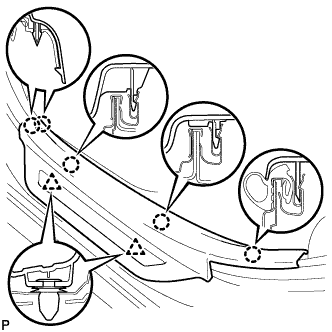
| 5. INSTALL SUN ROOF OPENING TRIM MOULDING (w/ Sliding Roof) |
Align the paint mark on the inner surface of the opening trim moulding with the notch of the roof headlining, and install the sun roof opening trim moulding so that joining point of the opening trim is on the left side of the vehicle as shown in the illustration.
- NOTICE:
- After installation, check that the corners fit correctly.
| 6. INSTALL SPOT LIGHT ASSEMBLY (w/ Sliding Roof) |
Push the light bulb holder in the direction indicated by the arrow in the illustration to engage the claw.
Engage the 4 claws.
Engage the 6 claws and install the spot light assembly.
| 7. INSTALL NO. 1 ROOM LIGHT ASSEMBLY (w/o Sliding Roof) |
Engage the 4 claws and install the room light switch base to the No. 1 room light assembly.
Engage the 4 claws.
Engage the 4 claws and install the lens cover.
| 8. INSTALL FRONT ASSIST GRIP SUB-ASSEMBLY |
Assemble the front assist grip sub-assembly as shown in the illustration.
Install the front assist grip sub-assembly.
- HINT:
- Use the same procedures for the RH side and the LH side.
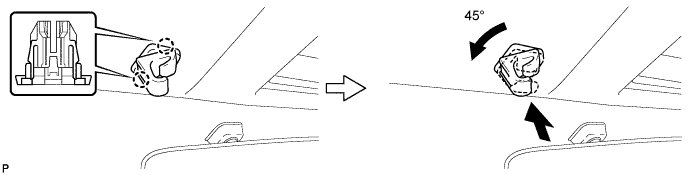
| 9. INSTALL REAR ASSIST GRIP SUB-ASSEMBLY |
- HINT:
- Use the same procedures for the rear side and the front side.
Engage the 2 claws.
Push in the visor holder and turn it approximately 45°as shown in the illustration.
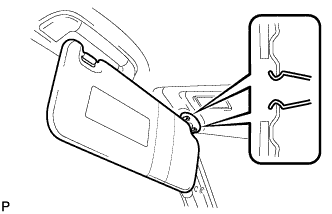
| 11. INSTALL VISOR ASSEMBLY LH |
Engage the 2 clips and install the visor assembly LH.
Engage the 4 claws and install the visor bracket cover.
| 12. INSTALL VISOR ASSEMBLY RH |
- HINT:
- Use the same procedures for the RH side and the LH side.
| 13. INSTALL ROOF CONSOLE BOX ASSEMBLY |
Connect the connectors.
Engage the 2 claws and 2 clips, and then install the roof console box assembly.
| 14. INSTALL FRONT PILLAR GARNISH LH |
Remove the protective cover.
Install a new clip <A> on the front pillar garnish LH.
Engage the 2 claws and 2 clips, then install the front pillar garnish LH.
| 15. INSTALL FRONT PILLAR GARNISH RH |
| 16. INSTALL ROOF SIDE INNER GARNISH LH |
Engage the 5 clips and 2 claws, then install the roof side inner garnish LH.
| 17. INSTALL ROOF SIDE INNER GARNISH RH |
- HINT:
- Use the same procedures for the RH side and the LH side.
| 18. INSTALL UPPER CENTER PILLAR GARNISH LH |
Engage the clip.
Install the upper center pillar garnish LH with the bolt.
| 19. INSTALL LOWER CENTER PILLAR GARNISH LH |
Engage the 2 claws and 2 clips, then install the lower center pillar garnish LH.
| 20. CONNECT FRONT SEAT OUTER BELT ASSEMBLY LH |
Install the floor end of the front seat outer belt assembly LH with the bolt.
- Torque:
- 42 N*m{428 kgf*cm, 31 ft.*lbf}
| 21. INSTALL LAP BELT OUTER ANCHOR COVER (for LH Side) |
Engage the 3 claws and install the lap belt outer anchor cover.
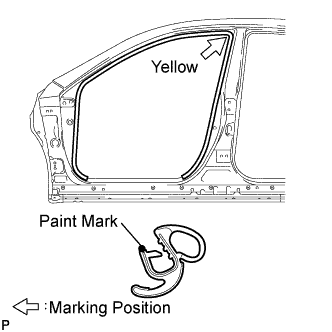
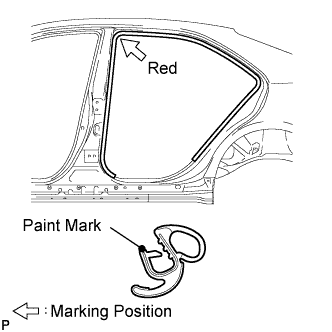
| 22. INSTALL FRONT DOOR OPENING TRIM WEATHERSTRIP LH |
Install the front door opening trim weatherstrip LH as shown in the illustration.
- NOTICE:
- After installation, check that the corners fit correctly.
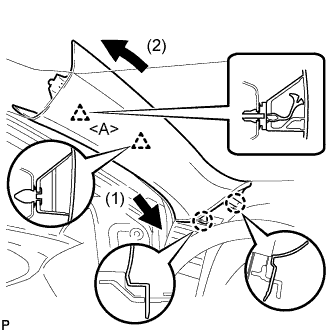
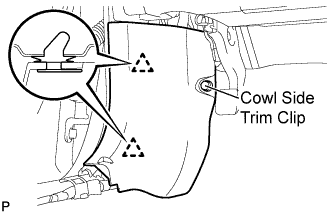
| 23. INSTALL COWL SIDE TRIM SUB-ASSEMBLY LH |
Engage the 2 clips.
Install the cowl side trim sub-assembly LH with the cowl side trim clip.
| 24. INSTALL FRONT DOOR SCUFF PLATE LH |
Engage the 7 claws and 3 clips, then install the front door scuff plate LH.
| 25. INSTALL UPPER CENTER PILLAR GARNISH RH |
- HINT:
- Use the same procedures for the RH side and the LH side.
| 26. INSTALL LOWER CENTER PILLAR GARNISH RH |
- HINT:
- Use the same procedures for the RH side and the LH side.
| 27. CONNECT FRONT SEAT OUTER BELT ASSEMBLY RH |
- HINT:
- Use the same procedures for the RH side and the LH side.
| 28. INSTALL LAP BELT OUTER ANCHOR COVER (for RH Side) |
- HINT:
- Use the same procedures for the RH side and the LH side.
| 29. INSTALL FRONT DOOR OPENING TRIM WEATHERSTRIP RH |
Install the front door opening trim weatherstrip RH as shown in the illustration.
- NOTICE:
- After installation, check that the corners fit correctly.
| 30. INSTALL COWL SIDE TRIM SUB-ASSEMBLY RH |
- HINT:
- Use the same procedures for the RH side and the LH side.
| 31. INSTALL FRONT DOOR SCUFF PLATE RH |
- HINT:
- Use the same procedures for the RH side and the LH side.
| 32. INSTALL REAR DOOR INNER GLASS WEATHERSTRIP LH |
Engage the 3 claws to install the rear door inner glass weatherstrip.
| 33. INSTALL REAR DOOR TRIM BOARD SUB-ASSEMBLY LH |
Engage the claw to install the No. 1 door scuff plate clamp.
Connect each connector.
Engage the rear door trim board with the 4 clips of the rear door inner glass weatherstrip.
Engage the 7 clips to install the rear door trim board to the rear door panel.
Install the 3 screws.
| 34. INSTALL DOOR ASSIST GRIP COVER LH |
Engage the 6 claws and install the door assist grip cover.
| 35. INSTALL REAR DOOR INSIDE HANDLE BEZEL PLUG LH |
Engage the 3 claws to install the rear door inside handle bezel plug.
| 36. INSTALL RECLINING REMOTE CONTROL LEVER SUB-ASSEMBLY LH (for Reclining Seat Type) |
Install the rear seat reclining control cable.
Engage the 2 clips and claw and then install the reclining remote control lever sub-assembly.
Install the bolt.
- Torque:
- 18 N*m{184 kgf*cm, 13 ft.*lbf}
Adjust the control lever to set the rear reclining adjuster assembly to its upper most position.
Pull plate A toward the front of the vehicle to lock the plate.
| 37. INSTALL RECLINING REMOTE CONTROL LEVER SUB-ASSEMBLY RH (for Reclining Seat Type) |
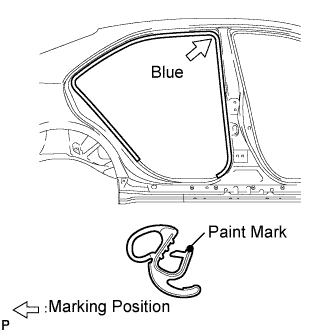
| 38. INSTALL REAR DOOR OPENING TRIM WEATHERSTRIP LH |
Install the rear door opening trim weatherstrip LH as shown in the illustration.
- NOTICE:
- After installation, check that the corners fit correctly.
| 39. INSTALL REAR DOOR SCUFF PLATE LH |
Engage the 5 claws and 2 clips, then install the rear door scuff plate LH.
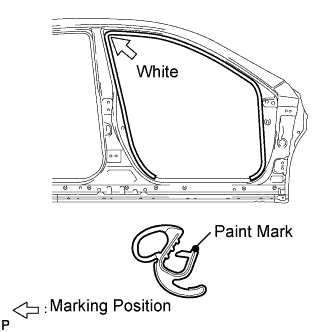
| 40. INSTALL REAR DOOR OPENING TRIM WEATHERSTRIP RH |
Install the rear door opening trim weatherstrip RH as shown in the illustration.
- NOTICE:
- After installation, check that the corners fit correctly.
| 41. INSTALL REAR DOOR SCUFF PLATE RH |
- HINT:
- Use the same procedures for the RH side and the LH side.
| 42. INSTALL CENTER SEATBACK ASSEMBLY (for Reclining Seat Type) |
Install the center seatback assembly with the 2 bolts.
- Torque:
- 18 N*m{184 kgf*cm, 13 ft.*lbf}
| 43. INSTALL SEPARATE TYPE REAR SEATBACK ASSEMBLY LH (for Reclining Seat Type) |
Install the separate type rear seatback assembly LH with the 2bolts and 2 nuts.
- Torque:
- 18 N*m{184 kgf*cm, 13 ft.*lbf}
Engage the 3 clamps and install the cover.
Install the 2 rear seat belts.
| 44. INSTALL SEPARATE TYPE REAR SEATBACK ASSEMBLY RH (for Reclining Seat Type) |
Install the separate type rear seatback assembly RH with the 2 bolts and 2 nuts.
- Torque:
- 18 N*m{184 kgf*cm, 13 ft.*lbf}
Engage the 3 clamps and install the cover.
Install the rear seat belt.
| 45. INSTALL REAR SEATBACK COVER (for Reclining Seat Type) |
| 46. INSTALL REAR SIDE SEATBACK ASSEMBLY LH (for Fold Down Seat Type) |
Install the rear side seatback assembly with the bolt.
- Torque:
- 18 N*m{184 kgf*cm, 13 ft.*lbf}
| 47. INSTALL REAR SIDE SEATBACK ASSEMBLY RH (for Fold Down Seat Type) |
| 48. INSTALL SEPARATE TYPE REAR SEATBACK ASSEMBLY LH (for Fold Down Seat Type) |
Install the separate type rear seatback assembly with the 2 bolts.
- Torque:
- 18 N*m{184 kgf*cm, 13 ft.*lbf}
| 49. INSTALL SEPARATE TYPE REAR SEATBACK ASSEMBLY RH (for Fold Down Seat Type) |
Install the separate type rear seat back assembly with the 2 bolts.
- Torque:
- 18 N*m{184 kgf*cm, 13 ft.*lbf}
| 50. INSTALL REAR CENTER SEAT HEADREST ASSEMBLY |
| 51. INSTALL REAR SEAT HEADREST ASSEMBLY |
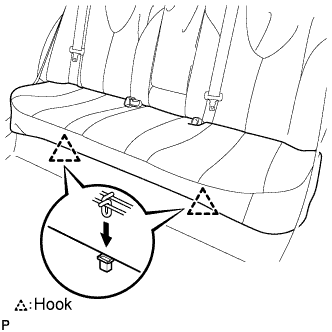
| 52. INSTALL REAR SEAT CUSHION ASSEMBLY |
Attach the front hooks of the bench type rear seat cushion assembly to the vehicle body.
Confirm that the seat cushion is firmly installed.
- NOTICE:
- When installing the bench type rear seat cushion assembly, make sure that the seat belt buckle is not under the bench type rear seat cushion assembly.
| 53. INSTALL FRONT SEAT ASSEMBLY LH (for Power Seat) |
Place the seat in the cabin.
Connect the connectors under the seat.
Connect the cable to the negative (-) battery terminal.
Move the front seat assembly fully forward by operating the slide and vertical power seat switch knob.
- NOTICE:
- Check that the seat is locked.
Temporarily install the front side of the front seat assembly with the 2 bolts.
Move the front seat assembly fully forward by operating the slide and vertical power seat switch knob.
- NOTICE:
- Check that the seat is locked.
Temporarily install the rear side of the front seat assembly with the 2 bolts.
Move the front seat assembly to the rearmost position by operating the slide and vertical power seat switch knob.
- NOTICE:
- Check that the seat is locked.
Fully tighten the 2 bolts on the front side of the front seat assembly in the order of the inner side bolt and then the outer side bolt.
- Torque:
- 37 N*m{377 kgf*cm, 27 ft.*lbf}
Move the front seat assembly fully forward by operating the slide and vertical power seat switch knob.
- NOTICE:
- Check that the seat is locked.
Fully tighten the 2 bolts on the rear side of the front seat assembly in the order of the inner side bolt and then the outer side bolt.
- Torque:
- 37 N*m{377 kgf*cm, 27 ft.*lbf}
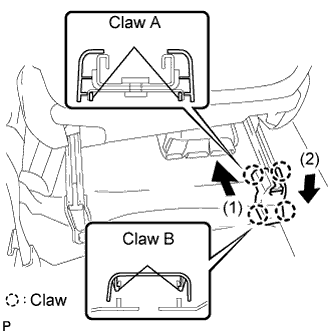
| 54. INSTALL INNER SEAT TRACK BRACKET COVER RH (for Power Seat) |
Slide the inner seat track bracket cover along the seat rail toward the front of the vehicle. Engage claw A to the seat rail.
Push the inner seat track bracket cover to engage claw B.
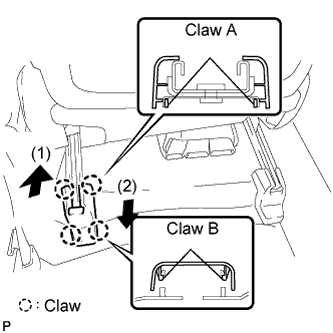
| 55. INSTALL SEAT TRACK COVER LH (for Power Seat) |
Slide the seat track cover along the seat rail toward the front of the vehicle. Engage claw A to the seat rail.
Push the seat track cover to engage claw B.
| 56. INSTALL FRONT SEAT HEADREST ASSEMBLY (for Power Seat) |
| 57. INSTALL FRONT SEAT ASSEMBLY LH (for Manual Seat) |
Place the front seat assembly in the vehicle and align the adjuster pin with the hole on the vehicle side.
Connect the connector and clamp.
Move the front seat assembly to the rearmost position by operating the slide handle.
- NOTICE:
- Check that the seat is locked.
Temporarily install the front seat track bracket with the 2 bolts.
Move the front seat assembly fully forward by operating the slide handle.
- NOTICE:
- Check that the seat is locked.
Temporarily install the rear seat track bracket with the 2 bolts.
Move the front seat assembly to the rearmost position by operating the slide handle.
- NOTICE:
- Check that the seat is locked.
Fully tighten the 2 bolts on the front seat track bracket in the order of the inner side bolt and then the outer side bolt.
- Torque:
- 37 N*m{377 kgf*cm, 27 ft.*lbf}
Move the front seat assembly fully forward by operating the slide handle.
- NOTICE:
- Check that the seat is locked.
Fully tighten the 2 bolts on the rear seat track bracket in the order of the inner side bolt and then the outer side bolt.
- Torque:
- 37 N*m{377 kgf*cm, 27 ft.*lbf}
| 58. INSTALL INNER SEAT TRACK BRACKET COVER LH (for Manual Seat) |
Slide the inner seat track bracket cover along the seat rail toward the front of the vehicle. Engage claw A to the seat rail.
Push the seat track bracket cover inner to engage claw B.
| 59. INSTALL SEAT TRACK COVER LH (for Manual Seat) |
Slide the seat track cover along the seat rail toward the front of the vehicle. Engage claw A to the seat rail.
Push the seat track cover to engage claw B.
| 60. INSTALL FRONT SEAT HEADREST ASSEMBLY (for Manual Seat) |
| 61. INSTALL FRONT SEAT ASSEMBLY RH (for Power Seat) |
- HINT:
- Use the same procedures for the RH side and the LH side.
| 62. INSTALL INNER SEAT TRACK BRACKET COVER LH (for Power Seat) |
- HINT:
- Use the same procedures for the RH side and the LH side.
| 63. INSTALL SEAT TRACK COVER RH (for Power Seat) |
- HINT:
- Use the same procedures for the RH side and the LH side.
| 64. INSTALL FRONT SEAT HEADREST ASSEMBLY (for Power Seat) |
| 65. INSTALL FRONT SEAT ASSEMBLY RH (for Manual Seat) |
- HINT:
- Use the same procedures for the RH side and the LH side.
| 66. INSTALL INNER SEAT TRACK BRACKET COVER RH (for Manual Seat) |
- HINT:
- Use the same procedures for the RH side and the LH side.
| 67. INSTALL SEAT TRACK COVER RH (for Manual Seat) |
- HINT:
- Use the same procedures for the RH side and the LH side.
| 68. INSTALL FRONT SEAT HEADREST ASSEMBLY (for Manual Seat) |
| 69. CONNECT CABLE TO NEGATIVE BATTERY TERMINAL |
| 70. INSPECT SRS WARNING LIGHT |
Inspect the SRS warning light (CAMRY_ACV40 RM000000XFD0BDX.html).
| 71. INSPECT FRONT SEAT ASSEMBLY (for Power Seat) |
Check the power seat operation.
Check the seat heater operation (with seat heater system).
Turn the ignition switch on (IG).
Turn the seat heater switch ON.
Wait 5 minutes or more and confirm that the seat surface becomes warm.
| 72. INSPECT SLIDE ADJUSTER LOCK (for Manual Seat) |