Land Cruiser URJ200 URJ202 GRJ200 VDJ200 - HEATING / AIR CONDITIONING
FRONT EVAPORATOR TEMPERATURE SENSOR (for LHD) - REASSEMBLY
| 1. INSTALL FRONT EVAPORATOR TEMPERATURE SENSOR |
- NOTICE:
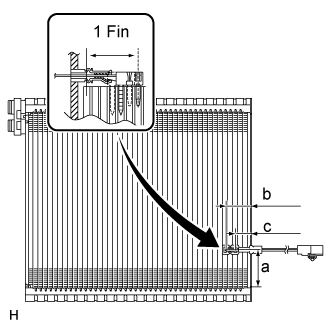
- If reusing the evaporator, do not insert the sensor into a location where the sensor was previously inserted.
Insert the sensor to a location that is 1 fin to the right or left of its previous location.
- Standard Dimension:
Area Specified Condition a 50 mm (1.97 in.) b 34.3 mm (1.35 in.) c 20.9 mm (1.97 in.)
| 2. INSTALL NO. 1 COOLER EVAPORATOR SUB-ASSEMBLY |
Install the evaporator.
Attach the 6 claws to install the unit case.
Install the 7 screws.
| 3. INSTALL SERVO MOTOR (for Automatic Air Conditioning System) |
Install the rear air mix damper control servo motor LH.
Attach the claw to install the lever and servo motor.
Install the 2 screws.
Install the rear mode control servo motor.
Attach the claw to install the plate and servo motor.
Install the 2 screws.
Set the damper servo so that the cutout part engages with the tooth of the gear, and attach the claw to install the servo motor unit.
Check that the pin is in the groove of the link.
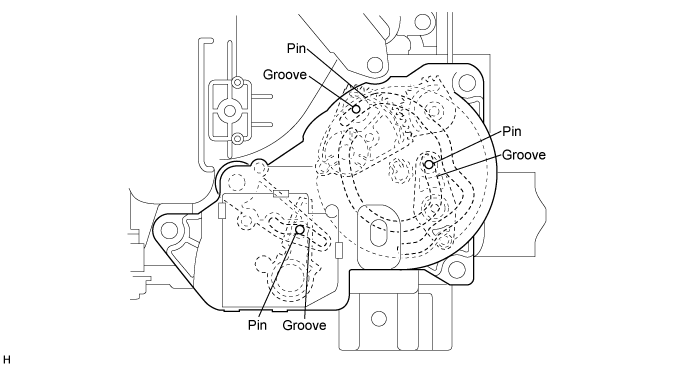
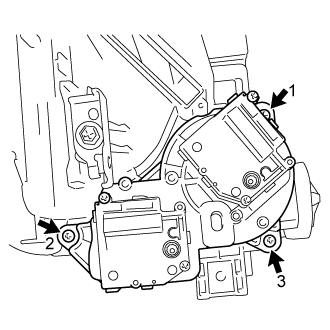
Install the 3 screws in the order shown in the illustration, and install the servo motor unit.
| 4. INSTALL SERVO MOTOR |
for Automatic Air Conditioning System:
Install the front air mix damper control servo motor LH.
Attach the claw to install the plate and servo motor.
Install the 2 screws.
Install the front mode control servo motor LH.
Attach the claw to install the plate and servo motor.
Install the 2 screws.
Attach the 3 claws to install the plate.
Set the damper servo so that the cutout part engages with the tooth of the gear, and attach the claw to install the servo motor unit.
Install the 4 screws.
| 5. INSTALL SERVO MOTOR |
for Automatic Air Conditioning System:
Install the front air mix damper control servo motor RH.
Attach the claw to install the plate and servo motor.
Install the 2 screws.
Install the control air bypass damper control servo motor.
Attach the claw to install the plate and servo motor.
Install the 2 screws.
for 4 Zone Type:
Install the front mode control servo motor RH.
Attach the claw to install the plate and servo motor.
Install the 2 screws.
Set the damper servo so that the cutout part engages with the tooth of the gear, and attach the claw to install the servo motor unit.
Install the 4 screws.
| 6. INSTALL REAR AIR MIX DAMPER CONTROL SERVO MOTOR RH (for 4 Zone Type) |
Install the servo motor with the 3 screws.
| 7. INSTALL COOLER EXPANSION VALVE (w/o Cool Box) |
Sufficiently apply compressor oil to 4 new O-rings and the fitting surface of the hose joint.
- Compressor oil:
- ND-OIL 8 or equivalent
Install the 2 O-rings to the cooler evaporator.
Install the 2 O-rings to the air conditioner tube and accessory assembly.
Install the cooler expansion valve and air conditioner tube and accessory assembly to the evaporator.
Using a 4 mm hexagon wrench, install the 2 hexagon bolts.
- Torque:
- 3.5 N*m{ 36 kgf*cm, 31 in.*lbf}
Install new packing.
| 8. INSTALL AIR CONDITIONER TUBE AND ACCESSORY ASSEMBLY (w/ Cool Box) |
Sufficiently apply compressor oil to 2 new O-rings and the fitting surface of the hose joint.
- Compressor oil:
- ND-OIL 8 or equivalent
Install the 2 O-rings to the air conditioner tube and accessory assembly.
Install the air conditioner tube and accessory assembly to the evaporator.
Using a 4 mm hexagon wrench, install the 2 hexagon bolts.
- Torque:
- 3.5 N*m{ 36 kgf*cm, 31 in.*lbf}
Install the bracket with the screw.
| 9. INSTALL COOLER EXPANSION VALVE (w/ Cool Box) |
Sufficiently apply compressor oil to 4 new O-rings and the fitting surface of the hose joint.
- Compressor oil:
- ND-OIL 8 or equivalent
Install the 2 O-rings to the cooler evaporator.
Install the 2 O-rings to the air conditioner tube and accessory assembly.
Install the cooler expansion valve and air conditioner tube and accessory assembly to the evaporator.
Using a 4 mm hexagon wrench, install the 2 hexagon bolts.
- Torque:
- 3.5 N*m{ 36 kgf*cm, 31 in.*lbf}
Install new packing.
| 10. INSTALL AIR CONDITIONING RADIATOR ASSEMBLY |
Install the radiator.
Install the bracket with the screw.
| 11. INSTALL AIR CONDITIONER HARNESS |
Attach the clamps to install the harness.
Connect the connectors.
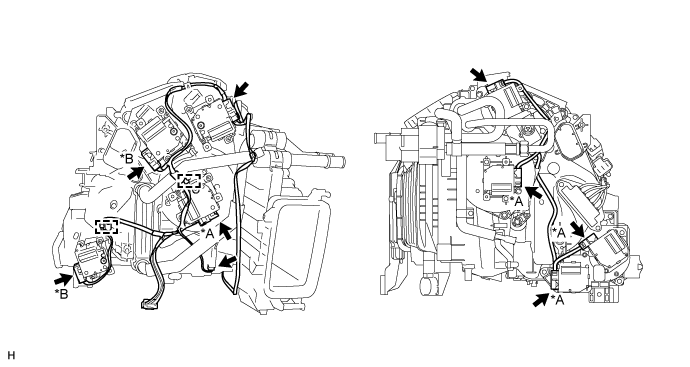
| *A | for Automatic Air Conditioning System | *B | for 4 Zone Type |
| 12. INSTALL QUICK HEATER ASSEMBLY (w/ PTC Heater) |

Attach the clamps to install the quick heater assembly (PTC heater assembly).
Install the 2 screws.
| 13. INSTALL COOL BOX LIQUID TUBE (w/ Cool Box) |

Lubricate 2 new O-rings with compressor oil and install them to the tube.
- Compressor oil:
- ND-OIL 8 or equivalent
| *a | Correct |
| *b | Incorrect |
Connect the liquid tube with the piping clamp.
- NOTICE:
- After connection, check the claw engagement of the piping clamp.
Attach the clamp.
| 14. INSTALL ASPIRATOR |
Attach the 2 claws to install the aspirator.
| 15. INSTALL NO. 4 AIR DUCT SUB-ASSEMBLY |
Install the duct with the screw.
| 16. INSTALL NO. 5 AIR DUCT SUB-ASSEMBLY |
Install the duct with the screw.
| 17. INSTALL BLOWER ASSEMBLY |
()