Land Cruiser URJ200 URJ202 GRJ200 VDJ200 - WINDOW / GLASS
BACK WINDOW GLASS - INSTALLATION
| 1. CLEAN BACK DOOR GLASS |
Using a scraper, remove the damaged clips, spacers and adhesive sticking to the glass.

Clean the outer circumference of the glass with non-residue solvent.
- NOTICE:
| 2. INSTALL BACK WINDOW GLASS CLIP RH |
Apply Primer G to the glass where the clip will be installed.
- HINT:
- If the primer is applied to an area that is not specified, apply non-residue solvent to a clean cloth and wipe off the excess primer before it dries.

Remove the peeling paper from a new clip. Install a new clip onto the glass as shown in the illustration.
- NOTICE:
| 3. INSTALL BACK WINDOW GLASS CLIP LH |
Apply Primer G to the glass where the clip will be installed.
- HINT:
- If the primer is applied to an area that is not specified, apply non-residue solvent to a clean cloth and wipe off the excess primer before it dries.

Remove the peeling paper from a new clip. Install a new clip onto the glass as shown in the illustration.
- NOTICE:
| 4. INSTALL NO. 1 BACK WINDOW GLASS SPACER |
Apply Primer G to the glass where the spacer will be installed.
- HINT:
- If the primer is applied to an area that is not specified, apply non-residue solvent to a clean cloth and wipe off the excess primer before it dries.

Remove the peeling paper from a new spacer. Install a new spacer onto the glass as shown in the illustration.
- NOTICE:
| 5. INSTALL NO. 2 BACK WINDOW GLASS SPACER |
Apply Primer G to the glass where the spacer will be installed.
- HINT:
- If the primer is applied to an area that is not specified, apply non-residue solvent to a clean cloth and wipe off the excess primer before it dries.

Remove the peeling paper from a new spacer. Install a new spacer onto the glass as shown in the illustration.
- NOTICE:
| 6. INSTALL BACK WINDOW OUTSIDE MOULDING |

Using a brush or sponge, coat the application area of the back window glass outside moulding with Primer G.
- Standard:
Area Specified Condition a 13.0 mm (0.512 in.)
- NOTICE:
- HINT:
- If the primer is applied to an area that is not specified, apply non-residue solvent to a clean cloth and wipe off the excess primer before it dries.
Remove the peeling paper from 2 new back window outside mouldings. Install the 2 mouldings as shown in the illustration.

- Standard:
Area Specified Condition a 1.5 mm (0.0591 in.) b 1.0 mm (0.0394 in.) c 11.0 mm (0.433 in.)
| 7. INSTALL BACK WINDOW GLASS |

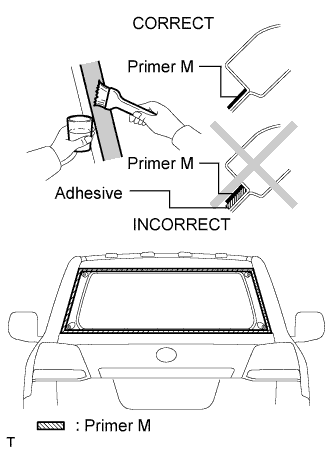
Using a brush or sponge, apply Primer M to the exposed part of the vehicle body.
- NOTICE:
Using a brush or sponge, apply Primer G to the contact surface of the back window glass.

- Standard:
Area Specified Condition a 11.0 mm (0.433 in.) b 8.0 mm (0.315 in.) c 13.0 mm (0.512 in.) d 5.0 mm (0.197 in.)
- HINT:
- If primer is applied to an area that is not specified, wipe off the primer with a non-residue solvent before it dries.
- NOTICE:
Apply adhesive to the back window glass.
- Adhesive:
- Toyota Genuine Windshield Glass Adhesive or equivalent
Cut off the tip of the cartridge nozzle as shown in the illustration below.
- HINT:
- After cutting off the tip, use all adhesive within the time written in the table below.
- Usage Time Frame:
Temperature Usage Time Frame 35°C (95°F) 15 minutes 20°C (68°F) 1 hour 40 minutes 5°C (41°F) 8 hours
Load the sealer gun with the cartridge.
Apply adhesive to the back window glass as shown in the illustration.

- Standard:
Area Specified Condition a 12.0 mm (0.472 in.) b 8.0 mm (0.315 in.) c 11.0 mm (0.433 in.) d 13.0 mm (0.512 in.) e 5.0 mm (0.197 in.)
Install the back window glass to the vehicle body.
Hold the back window glass securely in place with tape or equivalent until the adhesive has hardened.
- NOTICE:
Lightly press the front surface of the back window glass to ensure that the back window glass is securely fit to the vehicle body.

Using a scraper, remove any excess or protruding adhesive.
- HINT:
- Apply adhesive onto the glass rim.
- NOTICE:
- Do not drive the vehicle within the time written in the table below.
- Minimum time:
Temperature Minimum Time Prior to Driving Vehicle 35°C (95°F) 1 hour 30 minutes 20°C (68°F) 5 hours 5°C (41°F) 24 hours
Connect the connectors.
| 8. INSTALL REAR WIPER MOTOR ASSEMBLY (w/ Rear Wiper) |

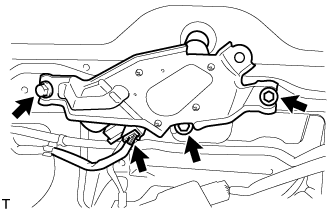
Temporarily install the rear wiper motor assembly with the 3 bolts.
Tighten the 3 bolts.
- Torque:
- 5.5 N*m{ 56 kgf*cm, 49 in.*lbf}
Connect the connector.
| 9. INSTALL REAR WIPER MOTOR GROMMET (w/ Rear Wiper) |

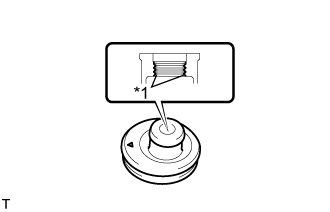
Apply MP grease to the entire inner surface of the rear wiper motor grommet.
| *1 | MP Grease |
- HINT:
- Make sure that the hole does not get clogged with grease and the grooves in the grommet are filled with grease.

Install the rear wiper motor grommet with the position mark facing upward as shown in the illustration.
| *1 | Position Mark |
| 10. INSTALL REAR WIPER ARM (w/ Rear Wiper) |

Operate the rear wiper, and stop the rear wiper motor at the automatic stop position.
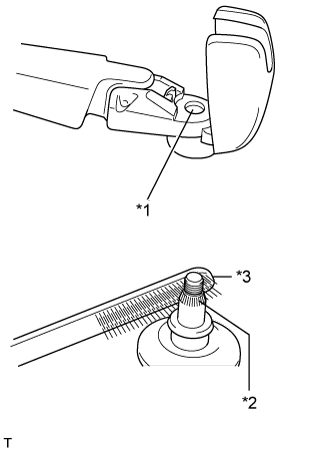
| *1 | Wiper Arm Serration |
| *2 | Wiper Pivot Serration |
| *3 | Wire Brush |
Clean the wiper arm serration and wiper pivot serration with a wire brush.

Set the head of the blade on the defogger line.
| *1 | Defogger Line |
Install the nut and rear wiper arm.
- Torque:
- 5.5 N*m{ 56 kgf*cm, 49 in.*lbf}
Close the cover.
| 11. CHECK FOR LEAK AND REPAIR |
Conduct a leak test after the adhesive has completely hardened.
Seal any leaks with auto glass sealer.
| 12. INSTALL REAR SPOILER SUB-ASSEMBLY (w/ Rear Spoiler) |
Attach the 3 clips to install the rear spoiler sub-assembly.
w/ Power Back Door:
Install the 4 bolts and 2 hole plugs.
w/o Power Back Door:
Install the 4 bolts.
| 13. INSTALL BACK DOOR GLASS CHANNEL LH |

Attach the clip and install the back door glass channel.
| 14. INSTALL BACK DOOR GLASS CHANNEL RH |

Attach the clip and install the back door glass channel.
| 15. INSTALL BACK DOOR GARNISH |
Attach the 14 clips to install the back door garnish.
| 16. INSTALL POWER BACK DOOR MAIN SWITCH (for Face to Face Seat Type) |
Attach the 2 claws to install the power back door main switch.
| 17. INSTALL NO. 2 BACK DOOR SERVICE HOLE COVER (for Face to Face Seat Type) |
Connect the connector.
Attach the 4 claws to install the No. 2 back door service hole cover.
| 18. INSTALL ASSIST GRIP (for Face to Face Seat Type) |
Install the assist grip with the 2 screws.
| 19. INSTALL BACK DOOR SIDE GARNISH LH |
Attach the 3 clips and 2 claws to install the back door side garnish LH.
| 20. INSTALL BACK DOOR SIDE GARNISH RH |
w/o Power Back Door:
- HINT:
- Use the same procedure described for the LH side.
w/ Power Back Door:
Attach the clip and 4 claws to install the back door side garnish RH.
| 21. INSTALL CENTER BACK DOOR GARNISH |
Attach the 5 clips and 4 claws to install the center back door garnish.
| 22. CONNECT CABLE TO NEGATIVE BATTERY TERMINAL |
- NOTICE:
- When disconnecting the cable, some systems need to be initialized after the cable is reconnected ().