Land Cruiser URJ200 URJ202 GRJ200 VDJ200 - NETWORKING
NETWORK GATEWAY ECU (for LHD) - INSTALLATION
| 1. INSTALL NETWORK GATEWAY ECU |

Install the ECU with the nut.
Connect the connector.
| 2. INSTALL LOWER NO. 2 INSTRUMENT PANEL FINISH PANEL |

Connect the connector.
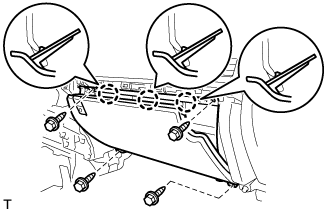
Attach the 3 claws to install the lower No. 2 instrument panel finish panel.
Install the 4 bolts.
| 3. INSTALL INSTRUMENT PANEL BOX DOOR KNOB |

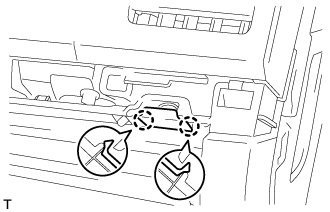
Attach the 2 claws to install the instrument panel box door knob.
| 4. INSTALL NO. 3 INSTRUMENT CLUSTER FINISH PANEL GARNISH |

Attach the 6 claws to install the No. 3 instrument cluster finish panel garnish.
| 5. INSTALL FRONT PASSENGER SIDE KNEE AIRBAG ASSEMBLY (w/ Passenger Side Knee Airbag) |

Connect the connector.
- NOTICE:
- When handling the airbag connector, take care not to damage the airbag wire harness.
Attach the 4 claws to install the front passenger side knee airbag.
Install the 4 bolts.
- Torque:
- 10 N*m{ 102 kgf*cm, 7 ft.*lbf}
| 6. INSTALL LOWER INSTRUMENT PANEL (w/o Passenger Side Knee Airbag) |

Attach the 4 claws to install the lower instrument panel.
Install the 2 bolts.
| 7. INSTALL NO. 2 INSTRUMENT PANEL UNDER COVER SUB-ASSEMBLY (w/ Floor Under Cover) |

Attach the 4 claws to install the No. 2 instrument panel under cover.
| 8. INSTALL LOWER INSTRUMENT PANEL PAD SUB-ASSEMBLY RH |
w/o Console Box Lid:
Install the lower instrument panel pad sub-assembly RH ().
w/ Cool Box:
Install the lower instrument panel pad sub-assembly RH ().
w/o Cool Box:
Install the lower instrument panel pad sub-assembly RH ().
| 9. INSTALL NO. 1 INSTRUMENT PANEL FINISH PANEL CUSHION |
w/o Console Box Lid:
Install the No. 1 instrument panel finish panel cushion ().
w/ Cool Box:
Install the No. 1 instrument panel finish panel cushion ().
w/o Cool Box:
Install the No. 1 instrument panel finish panel cushion ().
| 10. INSTALL FRONT DOOR SCUFF PLATE RH |
w/ Sliding Roof:
Install the front door scuff plate ( ).
w/o Sliding Roof:
Install the front door scuff plate ().
| 11. CONNECT CABLE TO NEGATIVE BATTERY TERMINAL (w/ Passenger Side Knee Airbag) |
- NOTICE:
- When disconnecting the cable, some systems need to be initialized after the cable is reconnected ().
| 12. CHECK SRS WARNING LIGHT (w/ Passenger Side Knee Airbag) |
Check the SRS warning light ().