Land Cruiser URJ200 URJ202 GRJ200 VDJ200 - 3UR-FE COOLING
THERMOSTAT - REMOVAL
- HINT:
- If the thermostat is not installed, cooling efficiency decreases. Even if the engine tends to overheat, do not remove the thermostat.
| 1. REMOVE FRONT FENDER SPLASH SHIELD SUB-ASSEMBLY LH |
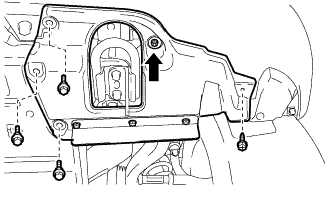
Remove the 3 bolts and screw.
Turn the clip indicated by the arrow in the illustration to remove the front fender splash shield sub-assembly LH.
| 2. REMOVE FRONT FENDER SPLASH SHIELD SUB-ASSEMBLY RH |
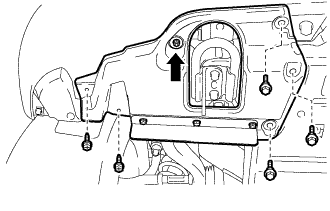
Remove the 3 bolts and 2 screws.
Turn the clip indicated by the arrow in the illustration to remove the front fender splash shield sub-assembly RH.
| 3. REMOVE NO. 1 ENGINE UNDER COVER SUB-ASSEMBLY |

Remove the 10 bolts and No. 1 engine under cover.
| 4. DRAIN ENGINE COOLANT |
- CAUTION:
- Do not remove the radiator cap while the engine and radiator are still hot. Pressurized, hot engine coolant and steam may be released and cause serious burns.
Loosen the radiator drain cock plug.
- HINT:
- Collect the coolant in a container and dispose of it according to the regulations in your area.
Remove the radiator cap. Then drain the coolant from the radiator.
Loosen the 2 cylinder block drain cock plugs. Then drain the coolant from the engine.
Tighten the 2 cylinder block drain cock plugs.
- Torque:
- 13 N*m{ 133 kgf*cm, 10 ft.*lbf}
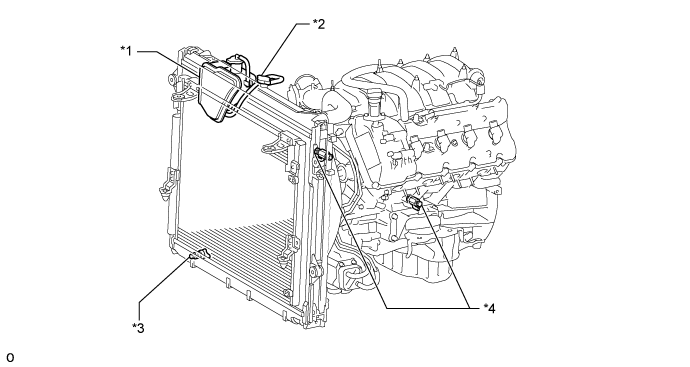
| *1 | Radiator Reservoir | *2 | Radiator Cap |
| *3 | Radiator Drain Cock Plug | *4 | Cylinder Block Drain Cock Plug |
Tighten the radiator drain cock plug by hand.
| 5. REMOVE V-BANK COVER SUB-ASSEMBLY |

Raise the front of the V-bank cover to detach the 3 pins. Then remove the 2 V-bank cover hooks from the bracket, and remove the V-bank cover.
| *1 | Bracket |
| *2 | Hook |
| *3 | Pin |
| *4 | Grommet |
| 6. REMOVE AIR CLEANER HOSE ASSEMBLY |

Disconnect the vacuum hose and No. 2 ventilation hose.
Loosen the 2 hose clamps.
Remove the air cleaner hose.
| 7. REMOVE AIR CLEANER ASSEMBLY |
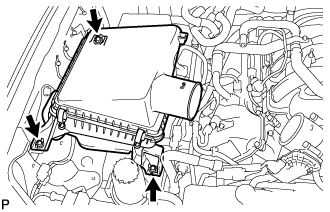
Remove the 3 bolts and air cleaner.
| 8. REMOVE NO. 1 RADIATOR HOSE |
| 9. REMOVE NO. 2 RADIATOR HOSE |
| 10. REMOVE FAN SHROUD |

Loosen the 4 nuts holding the fluid coupling fan.
Remove the fan and generator V-belt ().

Disconnect the reservoir hose from the upper radiator tank.
Detach the claw to open the flexible hose clamp.
Remove the 2 bolts and disconnect the oil cooler tube from the fan shroud.
Remove the 2 bolts holding the fan shroud.
Remove the 4 nuts of the fluid coupling fan, and then remove the shroud together with the coupling fan.
- NOTICE:
- Be careful not to damage the radiator core.
Remove the fan pulley.
| 11. REMOVE WATER INLET SUB-ASSEMBLY WITH THERMOSTAT |

Disconnect the No. 5 water by-pass hose.
| *1 | No. 5 Water By-pass Hose |

Remove the 3 nuts, water inlet with thermostat and gasket.