Land Cruiser URJ200 URJ202 GRJ200 VDJ200 - BRAKE REAR
REAR BRAKE - INSTALLATION
- HINT:
| 1. INSTALL REAR DISC |
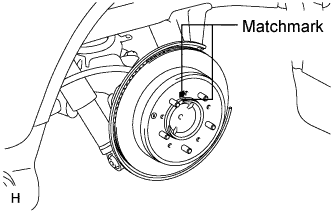
Align the matchmarks, and then install the rear disc.
- HINT:
- When replacing the rear disc with a new one, select the installation position where the rear disc has the minimum runout.
| 2. INSTALL PARKING BRAKE SHOE ADJUSTING HOLE PLUG |
| 3. INSTALL REAR DISC BRAKE CYLINDER MOUNTING LH |
Install a new boot and a new cylinder slide bush to the rear disc brake cylinder mounting.
- NOTICE:
- Install the boot securely to the grooves of the rear disc brake cylinder mounting.
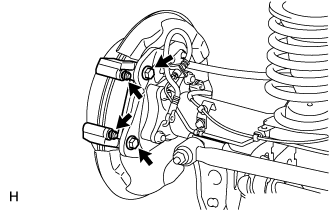
Install the rear disc brake cylinder mounting with 2 new bolts.
- Torque:
- 95 N*m{ 969 kgf*cm, 70 ft.*lbf}
| 4. INSTALL REAR NO. 1 DISC BRAKE PAD SUPPORT PLATE |
- NOTICE:
Clean the cylinder mounting surface where the pad support plates will be attached.
Remove the peeling paper from the double-sided tape, and install 2 new pad support plates to the cylinder mounting.
| 5. INSTALL REAR NO. 2 DISK BRAKE PAD SUPPORT PLATE |
- NOTICE:
Clean the cylinder mounting surface where the pad support plates will be attached.
Remove the peeling paper from the double-sided tape, and install 2 new pad support plates to the cylinder mounting.
| 6. INSTALL REAR DISC BRAKE PAD WEAR INDICATOR PLATE |
Install the pad wear indicator plate to the inner side disc brake pad.
| 7. INSTALL REAR DISC BRAKE ANTI-SQUEAL SHIM KIT |
Install the anti-squeal shims to each brake pad.
- NOTICE:
- There should be no oil or grease on the friction surfaces of the brake pads and the rear disc.
| 8. INSTALL REAR DISC BRAKE PAD |
- NOTICE:
Install the 2 disc brake pads to the disc brake cylinder mounting.
| 9. INSTALL REAR DISC BRAKE CYLINDER ASSEMBLY LH |
Apply lithium soap base glycol grease to the sliding part of the 2 cylinder slide pins.
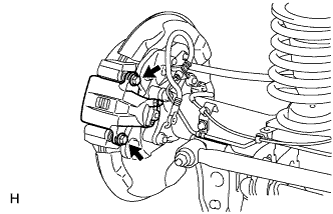
Install the cylinder with the 2 cylinder slide pins.
- Torque:
- 88 N*m{ 897 kgf*cm, 65 ft.*lbf}
| 10. CONNECT REAR FLEXIBLE HOSE LH |
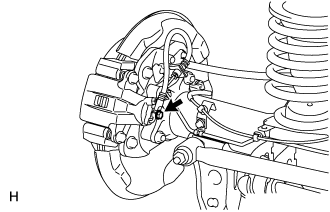
Install a new gasket and connect the flexible hose with the new union bolt.
- Torque:
- 30 N*m{ 306 kgf*cm, 22 ft.*lbf}
| 11. BLEED BRAKE LINE |
Turn the ignition switch to ON.
Remove the brake master cylinder reservoir filler cap assembly.
Add brake fluid until the fluid level is between the MIN and MAX lines of the reservoir.
Repeatedly depress the brake pedal and bleed air from the bleeder plug of the front disc brake cylinder RH.
Repeat the step above until the air is completely bled, and then tighten the bleeder plug while depressing the brake pedal.
- Torque:
- 11 N*m{ 110 kgf*cm, 8 ft.*lbf}
Bleed the air from the bleeder plug of the front disc brake cylinder LH using the same procedure as for the RH side.
With the brake pedal depressed, loosen the bleeder plug of the rear disc brake cylinder RH, continue to hold the brake pedal and allow brake fluid to be drained from the bleeder plug while the pump motor operates.
- HINT:
When there is no more air in the brake fluid, tighten the bleeder plug, and then release the brake pedal.
- Torque:
- 11 N*m{ 110 kgf*cm, 8 ft.*lbf}
Bleed the air from the bleeder plug of the rear disc brake cylinder LH using the same procedure as for the RH side.
Turn the ignition switch off.
Inspect for brake fluid leaks.
Check and adjust the brake fluid level ().
Clear the DTCs ().
| 12. ADJUST PARKING BRAKE LEVER TRAVEL |
Completely release the parking brake lever.
Loosen the adjusting nut to completely release the parking brake cable.

Temporarily install the hub nuts.
Remove the hole plug.
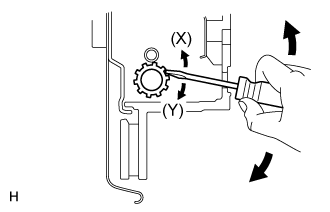
Insert an adjustment tool into the adjustment hole of the disc. Rotate the adjustment wheel in the "X" direction until the shoes are locked. Then rotate the adjustment wheel in the "Y" direction 8 notches.
Check that the disc can be rotated lightly. If not, rotate the adjustment wheel in the "Y" direction and check again.
Install the hole plug.
Remove the hub nuts.
Turn the adjusting nut until the parking brake lever travel becomes correct.
- Standard Parking Brake Lever Travel when Pulled with a Force of 200 N (20 kgf, 45 lbf):
- 5 to 7 clicks
Operate the parking brake lever 3 to 4 times, and check the parking brake lever travel.
- Standard Parking Brake Lever Travel when Pulled with a Force of 200 N (20 kgf, 45 lbf):
- 5 to 7 clicks
Check whether the parking brake drags or not.
When operating the parking brake lever, check that the brake warning light comes on.
- Standard Condition:
- The brake warning light always illuminates at the first click.
| 13. INSTALL PARKING BRAKE SHOE ADJUSTING HOLE PLUG |
| 14. INSTALL REAR WHEEL |
- Torque:
- for Aluminum Wheel:
- 131 N*m{ 1336 kgf*cm, 97 ft.*lbf}
- for Steel Wheel:
- 209 N*m{ 2131 kgf*cm, 154 ft.*lbf}