Land Cruiser URJ200 URJ202 GRJ200 VDJ200 - BRAKE FRONT
FRONT BRAKE - INSTALLATION
| 1. INSTALL FRONT DISC |

Align the matchmarks, and then install the front disc.
- HINT:
- When replacing the front disc with a new one, select the installation position where the front disc has the minimum runout.
| 2. INSTALL DISC BRAKE CALIPER ASSEMBLY LH |

Install the disc brake caliper with 2 new bolts.
- Torque:
- 99 N*m{ 1,010 kgf*cm, 73 ft.*lbf}
| 3. CONNECT FRONT FLEXIBLE HOSE |

Install a new gasket and connect the flexible hose with the new union bolt.
- Torque:
- 30 N*m{ 306 kgf*cm, 22 ft.*lbf}
| 4. INSTALL FRONT DISC BRAKE PAD |

Install the No. 1 anti-squeal shims to each pad.

Install the 2 pads to the disc brake caliper.
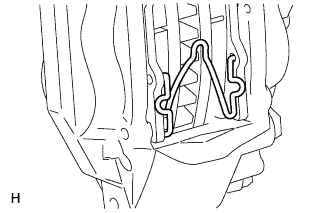
Install the front disc brake anti-rattle spring between the 2 pads.
- NOTICE:
- The anti-rattle spring can be reused if it has sufficient rebound; no deformation, cracks or wear; and has had all rust, dirt and foreign particles cleaned off.

Install the 2 hole pins.
Install the pin hold clip.
- NOTICE:
- The pin hold clip can be reused if it has sufficient rebound; no deformation or wear; and has had all rust, dirt and foreign particles cleaned off.
| 5. BLEED BRAKE LINE |
Turn the ignition switch to ON.
Remove the brake master cylinder reservoir filler cap assembly.
Add brake fluid until the fluid level is between the MIN and MAX lines of the reservoir.
Repeatedly depress the brake pedal and bleed air from the bleeder plug of the front disc brake cylinder RH.
Repeat the step above until the air is completely bled, and then tighten the bleeder plug while depressing the brake pedal.
- Torque:
- 11 N*m{ 110 kgf*cm, 8 ft.*lbf}
Bleed the air from the bleeder plug of the front disc brake cylinder LH using the same procedure as for the RH side.
With the brake pedal depressed, loosen the bleeder plug of the rear disc brake cylinder RH, continue to hold the brake pedal and allow brake fluid to be drained from the bleeder plug while the pump motor operates.
- HINT:
When there is no more air in the brake fluid, tighten the bleeder plug, and then release the brake pedal.
- Torque:
- 11 N*m{ 110 kgf*cm, 8 ft.*lbf}
Bleed the air from the bleeder plug of the rear disc brake cylinder LH using the same procedure as for the RH side.
Turn the ignition switch off.
Inspect for brake fluid leaks.
Check and adjust the brake fluid level ().
Clear the DTCs ().
| 6. INSTALL FRONT WHEEL |
- Torque:
- for Aluminum Wheel:
- 131 N*m{ 1336 kgf*cm, 97 ft.*lbf}
- for Steel Wheel:
- 209 N*m{ 2131 kgf*cm, 154 ft.*lbf}