Land Cruiser URJ200 URJ202 GRJ200 VDJ200 - AUDIO / VIDEO
BACK DOOR SPEAKER - REMOVAL
| 1. PRECAUTION |
- NOTICE:
- After turning the ignition switch off, waiting time may be required before disconnecting the cable from the battery terminal. Therefore, make sure to read the disconnecting the cable from the battery terminal notice before proceeding with work ().
| 2. DISCONNECT CABLE FROM NEGATIVE BATTERY TERMINAL |
- NOTICE:
- When disconnecting the cable, some systems need to be initialized after the cable is reconnected ().
| 3. REMOVE CENTER BACK DOOR GARNISH |

Detach the 5 clips and 4 claws, and remove the center back door garnish.
| 4. REMOVE BACK DOOR SIDE GARNISH LH |

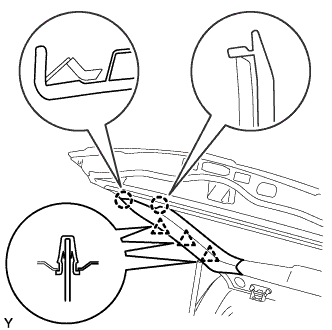
Detach the 3 clips and 2 claws, and remove the back door side garnish LH.
| 5. REMOVE BACK DOOR SIDE GARNISH RH |
w/o Power Back Door:
- HINT:
- Use the same procedure described for the LH side.

w/ Power Back Door:
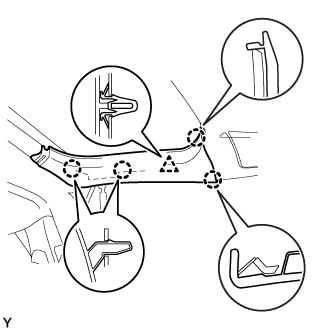
Detach the clip and 4 claws, and remove the back door side garnish RH.
| 6. REMOVE ASSIST GRIP (for Face to Face Seat Type) |

Remove the 2 screws and assist grip.
| 7. REMOVE NO. 2 BACK DOOR SERVICE HOLE COVER (for Face to Face Seat Type) |

Using a screwdriver, detach the 4 claws and remove the No. 2 back door service hole cover.
Disconnect connector.
| 8. REMOVE DOOR OPENING SWITCH SUB-ASSEMBLY (for Face to Face Seat Type) |

Detach the 2 claws and remove the door opening switch sub-assembly.
| 9. REMOVE BACK DOOR TRIM PANEL ASSEMBLY |

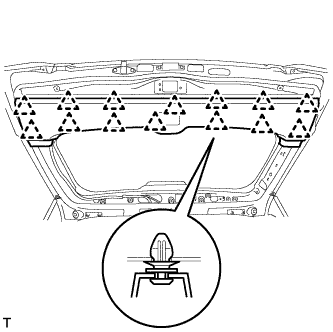
Using a screwdriver, detach the 14 clips and remove the back door garnish.
- HINT:
- Tape the screwdriver tip before use.
| 10. REMOVE REAR HEADER SPEAKER ASSEMBLY |
- HINT:
- Use the same procedure as for the opposite side.

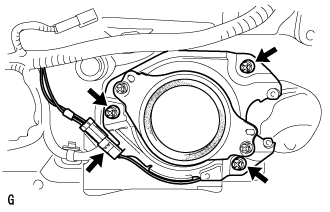
Remove the 3 screws.
Disconnect the connector and remove the rear header speaker assembly.