Transfer Assembly Disassembly
REMOVE TRANSFER INDICATOR SWITCH
REMOVE TRANSFER GEAR SHIFT HEAD
REMOVE TRANSFER BEARING RETAINER SUB-ASSEMBLY
REMOVE TRANSFER COVER TYPE T OIL SEAL
REMOVE TRANSFER CONTROL SHIFT LEVER RETAINER SUB-ASSEMBLY (for Select Lever on Transfer)
REMOVE TRANSFER CASE COVER SUB-ASSEMBLY (for Select Lever on Transfer Adapter)
REMOVE BREATHER OIL DEFLECTOR
REMOVE OUTPUT SHAFT COMPANION FLANGE SUB-ASSEMBLY (for Front Side)
REMOVE TRANSFER OUTPUT SHAFT COMPANION FLANGE OIL SEAL (for Front Side)
REMOVE OUTPUT SHAFT COMPANION FLANGE SUB-ASSEMBLY (for Rear Side)
REMOVE TRANSFER OUTPUT SHAFT COMPANION FLANGE OIL SEAL (for Rear Side)
REMOVE SPEEDOMETER DRIVEN GEAR ASSEMBLY WITH VEHICLE SPEED SENSOR
REMOVE TRANSFER EXTENSION HOUSING SUB-ASSEMBLY
REMOVE TRANSFER EXTENSION HOUSING TYPE T OIL SEAL
REMOVE TRANSFER OUTPUT SHAFT WASHER
REMOVE REAR TRANSFER CASE
REMOVE NO. 2 TRANSFER GEAR SHIFT FORK WITH TRANSFER HIGH AND LOW CLUTCH SLEEVE
REMOVE CENTER DIFFERENTIAL LOCK FORK SUB-ASSEMBLY WITH FRONT DRIVE CLUTCH SLEEVE
REMOVE REAR TRANSFER OUTPUT SHAFT, FRONT DRIVE CHAIN AND DRIVEN SPROCKET SUB-ASSEMBLY
REMOVE TRANSFER DRIVEN SPROCKET BEARING
REMOVE TRANSFER INPUT GEAR RADIAL BALL BEARING
REMOVE NO. 1 TRANSFER CASE PLUG
REMOVE NO. 1 TRANSFER CASE PLUG
REMOVE TRANSFER OIL SEPARATOR SUB-ASSEMBLY
REMOVE TRANSFER CASE MAGNET
REMOVE TRANSFER OIL PUMP BODY SUB-ASSEMBLY
REMOVE TRANSFER OIL PUMP BODY O-RING
REMOVE TRANSFER OIL PUMP GEAR
REMOVE TRANSFER LOW PLANETARY GEAR ASSEMBLY WITH TRANSFER INPUT SHAFT
REMOVE TRANSFER FRONT DRIVE CLUTCH SYNCHRONIZER RING (for Manual Transmission)
REMOVE OUTPUT SHAFT SPACER
REMOVE TRANSFER OUTPUT SHAFT FRONT NEEDLE ROLLER BEARING
REMOVE TRANSFER CASE OIL SEAL
REMOVE TRANSFER INPUT GEAR STOPPER SHAFT SNAP RING
REMOVE TRANSFER INPUT GEAR STOPPER
REMOVE TRANSFER INPUT GEAR STOPPER BALL
REMOVE MANUAL TRANSFER PLANETARY CARRIER WASHER
REMOVE TRANSFER INPUT SHAFT
REMOVE NO. 1 TRANSFER THRUST BEARING RACE
REMOVE TRANSFER LOW PLANETARY GEAR BEARING
REMOVE NO. 1 TRANSFER INPUT SHAFT SEAL RING
REMOVE TRANSFER INPUT SHAFT BEARING
REMOVE TRANSFER LOW PLANETARY GEAR SPLINE PIECE
REMOVE TRANSFER LOW PLANETARY GEAR BEARING
REMOVE TRANSFER LOW PLANETARY RING GEAR HOLE SNAP RING
REMOVE NO. 2 TRANSFER OUTPUT SHAFT SPACER
REMOVE TRANSFER OUTPUT SHAFT SPACER BALL
REMOVE CENTER DIFFERENTIAL CASE
REMOVE TRANSFER CLUTCH HUB
REMOVE FRONT TRANSFER OUTPUT SHAFT NEEDLE ROLLER BEARING
REMOVE TRANSFER OUTPUT SHAFT PLATE WASHER
REMOVE REAR TRANSFER OUTPUT SHAFT RADIAL BALL BEARING
REMOVE NO. 1 TRANSFER OUTPUT SHAFT SPACER
REMOVE TRANSFER DRIVE SPROCKET SUB-ASSEMBLY
REMOVE TRANSFER DRIVE SPROCKET BEARING
REMOVE TRANSFER OUTPUT SHAFT PLATE WASHER
REMOVE TRANSFER CASE PLUG
REMOVE COMPRESSION SPRING
REMOVE TRANSFER CASE STRAIGHT PIN
REMOVE TRANSFER LOW PLANETARY RING GEAR
Transfer Assembly -- Disassembly |
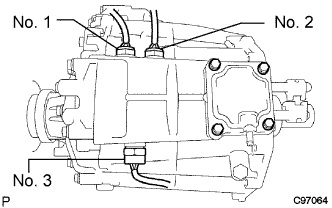
| 1. REMOVE TRANSFER INDICATOR SWITCH |
Remove the indicator switches and gaskets.
- HINT:
- Indicator switch:
No. 1 (for Automatic Transmission)
| Indicator switch (neutral position)
|
No. 2
| Indicator switch (L4 position)
|
No. 3
| Indicator switch (differential lock)
|
| 2. REMOVE TRANSFER GEAR SHIFT HEAD |
Using a pin punch and hammer, tap out the 2 slotted pins from the No. 1 and No. 2 gear shift heads.
Remove the No. 1 and No. 2 gear shift heads from the front drive shift fork shaft and the high and low shift fork shaft.
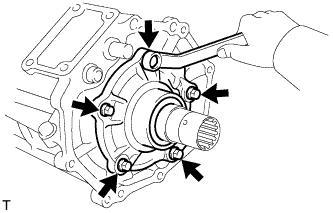
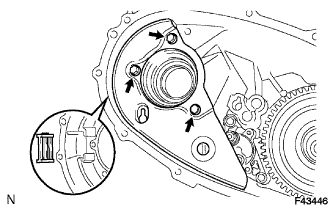
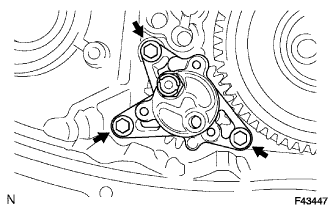
| 3. REMOVE TRANSFER BEARING RETAINER SUB-ASSEMBLY |
Remove the 5 bolts and bearing retainer.
- HINT:
- If necessary, tap the bearing retainer with a plastic-faced hammer to remove it.
| 4. REMOVE TRANSFER COVER TYPE T OIL SEAL |
Using a screwdriver and hammer, tap out the oil seal from the bearing retainer.
- NOTICE:
- Be careful not to damage the oil seal and bearing retainer contact surfaces.
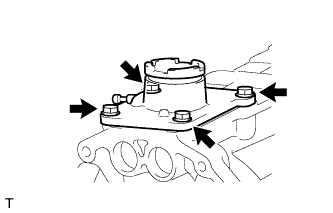
| 5. REMOVE TRANSFER CONTROL SHIFT LEVER RETAINER SUB-ASSEMBLY (for Select Lever on Transfer) |
Remove the 4 bolts and retainer.
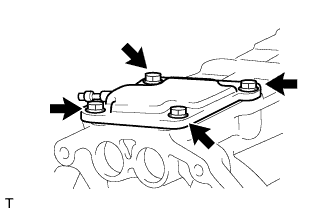
| 6. REMOVE TRANSFER CASE COVER SUB-ASSEMBLY (for Select Lever on Transfer Adapter) |
Remove the 4 bolts and case cover.
| 7. REMOVE BREATHER OIL DEFLECTOR |
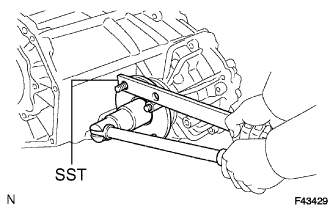
| 8. REMOVE OUTPUT SHAFT COMPANION FLANGE SUB-ASSEMBLY (for Front Side) |
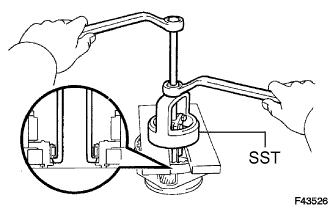
Using a chisel and hammer, loosen the staked part of the lock nut.
Using SST to hold the companion flange, remove the lock nut.
- SST
- 09330-00021
Using SST, remove the companion flange.
- SST
- 09950-40011(09951-04020,09952-04010,09953-04030,09954-04010,09955-04051,09957-04010,09958-04011)
| 9. REMOVE TRANSFER OUTPUT SHAFT COMPANION FLANGE OIL SEAL (for Front Side) |
Using a screwdriver and hammer, tap out the oil seal from the companion flange.
- NOTICE:
- Be careful not to damage the oil seal and companion flange contact surfaces.
| 10. REMOVE OUTPUT SHAFT COMPANION FLANGE SUB-ASSEMBLY (for Rear Side) |
Using SST, remove the lock nut and companion flange (rear) in the same way as the companion flange (front).
- SST
- 09330-00021
09950-40011(09951-04020,09952-04010,09953-04030,09954-04010,09955-04051,09957-04010,09958-04011)
| 11. REMOVE TRANSFER OUTPUT SHAFT COMPANION FLANGE OIL SEAL (for Rear Side) |
Using a screwdriver and hammer, tap out the oil seal from the companion flange.
- NOTICE:
- Be careful not to damage the oil seal and companion flange contact surfaces.
| 12. REMOVE SPEEDOMETER DRIVEN GEAR ASSEMBLY WITH VEHICLE SPEED SENSOR |
Disconnect the sensor connector.
Remove the bolt and sensor with driven gear.
| 13. REMOVE TRANSFER EXTENSION HOUSING SUB-ASSEMBLY |
Remove the 5 bolts and extension housing.
- HINT:
- If necessary, tap the extension housing with a plastic-faced hammer to remove it.
| 14. REMOVE TRANSFER EXTENSION HOUSING TYPE T OIL SEAL |
Using a screwdriver and hammer, tap out the oil seal.
- NOTICE:
- Be careful not to damage the oil seal and extension housing contact surfaces.
| 15. REMOVE TRANSFER OUTPUT SHAFT WASHER |
Remove the 2 washers and drive gear.
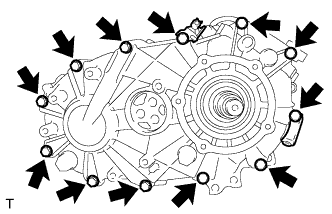
| 16. REMOVE REAR TRANSFER CASE |
Remove the 12 bolts and 2 clamps.
Remove the rear case.
- HINT:
- If necessary, tap the rear case with a plastic-faced hammer to remove it.
| 17. REMOVE NO. 2 TRANSFER GEAR SHIFT FORK WITH TRANSFER HIGH AND LOW CLUTCH SLEEVE |
Mount the rear case in a vise.
- NOTICE:
- Place aluminum plates on the vise to prevent damage to the rear case.
Using a pin punch and hammer, drive out the slotted spring pin.
Using a hexagon wrench, remove the No. 1 plug.
Using a magnetic finger, remove the spring and ball from the hole.
Remove the No. 2 gear shift fork and high and low shift fork shaft.
Using a magnetic finger, remove the straight pin.
Automatic transmission:
Remove the high and low clutch sleeve.
Manual transmission:
Remove the high and low clutch sleeve, 3 shifting keys and 2 No. 1 springs.
| 18. REMOVE CENTER DIFFERENTIAL LOCK FORK SUB-ASSEMBLY WITH FRONT DRIVE CLUTCH SLEEVE |
Mount the rear case in a vise.
- NOTICE:
- Place aluminum plates on the vise to prevent damage to the rear case.
Using a pin punch and hammer, drive out the slotted spring pin.
Using 2 screwdrivers and hammer, tap out the snap ring.
Using a hexagon wrench, remove the No. 2 plug.
Using a magnetic finger, remove the spring and ball from the hole.
Remove the center differential lock fork, shift shaft stopper, 2 springs, 3 stoppers, front drive shift shaft and front drive clutch sleeve.
| 19. REMOVE REAR TRANSFER OUTPUT SHAFT, FRONT DRIVE CHAIN AND DRIVEN SPROCKET SUB-ASSEMBLY |
Mount the rear case in a vise.
- NOTICE:
- Place aluminum plates on the vise to prevent damage to the rear case.
Using a snap ring expander, remove the snap ring.
Using a plastic-faced hammer, carefully tap the rear case, and remove the output shaft together with the front drive chain and driven sprocket.
Remove the output shaft and driven sprocket from the front drive chain.
| 20. REMOVE TRANSFER DRIVEN SPROCKET BEARING |
Using a press, press out the bearing.
- NOTICE:
- Be careful not to drop or damage the driven sprocket.
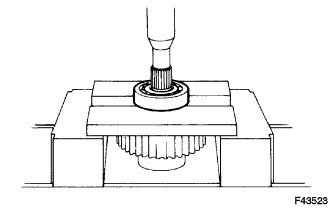
| 21. REMOVE TRANSFER INPUT GEAR RADIAL BALL BEARING |
Using SST, a press and steel bar, press out the bearing.
- SST
- 09555-55010
- NOTICE:
- Be careful not to drop or damage the driven sprocket.
| 22. REMOVE NO. 1 TRANSFER CASE PLUG |
Remove the filler plug (for filler) and gasket.
| 23. REMOVE NO. 1 TRANSFER CASE PLUG |
Remove the drain plug (for drain) and gasket.
| 24. REMOVE TRANSFER OIL SEPARATOR SUB-ASSEMBLY |
Remove the 3 bolts and separator.
| 25. REMOVE TRANSFER CASE MAGNET |
| 26. REMOVE TRANSFER OIL PUMP BODY SUB-ASSEMBLY |
Remove the 3 bolts and pump body.
| 27. REMOVE TRANSFER OIL PUMP BODY O-RING |
Using a screwdriver, remove the O-ring from the pump body.
- NOTICE:
- Be careful not to damage the pump body.
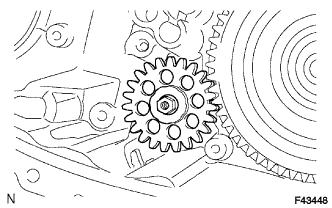
| 28. REMOVE TRANSFER OIL PUMP GEAR |
Remove the nut and pump gear.
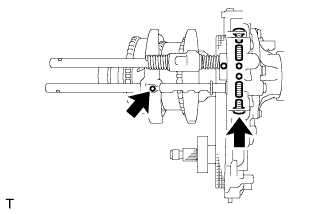
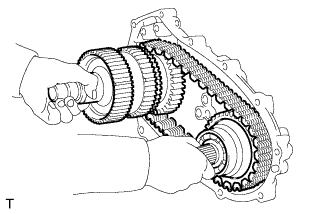
| 29. REMOVE TRANSFER LOW PLANETARY GEAR ASSEMBLY WITH TRANSFER INPUT SHAFT |
Using a snap ring expander, remove the snap ring.
Remove the low planetary gear with the input shaft.
| 30. REMOVE TRANSFER FRONT DRIVE CLUTCH SYNCHRONIZER RING (for Manual Transmission) |
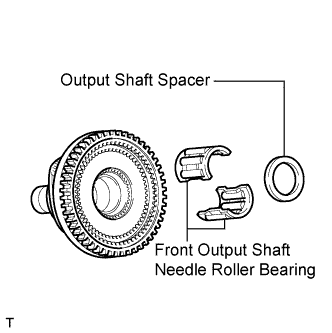
| 31. REMOVE OUTPUT SHAFT SPACER |
| 32. REMOVE TRANSFER OUTPUT SHAFT FRONT NEEDLE ROLLER BEARING |
| 33. REMOVE TRANSFER CASE OIL SEAL |
Using a screwdriver and hammer, tap out the oil seal (No. 1).
Using a screwdriver and hammer, tap out the oil seal (No. 2).
- NOTICE:
- Be careful not to damage the oil seal and front case contact surfaces.
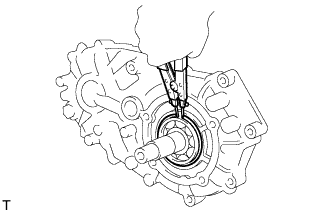
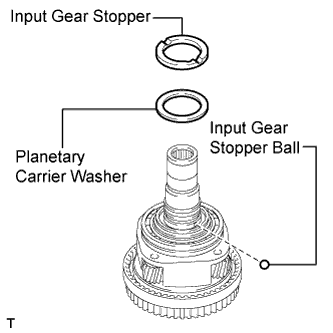
| 34. REMOVE TRANSFER INPUT GEAR STOPPER SHAFT SNAP RING |
Using a snap ring expander, pry out the snap ring.
| 35. REMOVE TRANSFER INPUT GEAR STOPPER |
| 36. REMOVE TRANSFER INPUT GEAR STOPPER BALL |
| 37. REMOVE MANUAL TRANSFER PLANETARY CARRIER WASHER |
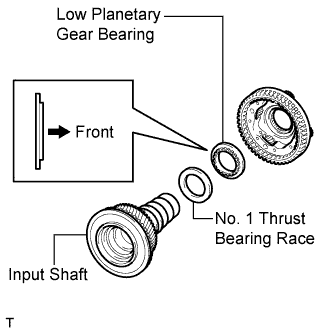
| 38. REMOVE TRANSFER INPUT SHAFT |
| 39. REMOVE NO. 1 TRANSFER THRUST BEARING RACE |
| 40. REMOVE TRANSFER LOW PLANETARY GEAR BEARING |
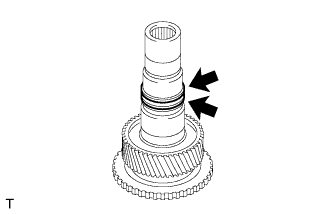
| 41. REMOVE NO. 1 TRANSFER INPUT SHAFT SEAL RING |
Remove the 2 seal rings.
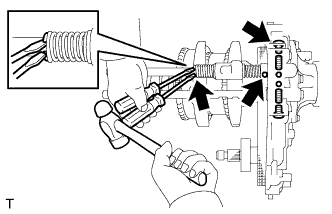
| 42. REMOVE TRANSFER INPUT SHAFT BEARING |
Using a snap ring expander, remove the snap ring.
Using SST and a press, press out the bearing.
- SST
- 09554-30011
09555-55010
- NOTICE:
- Be careful not to drop or damage the low planetary gear.
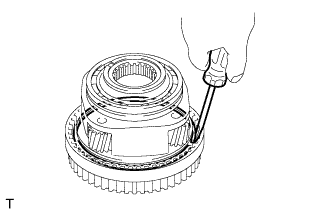
| 43. REMOVE TRANSFER LOW PLANETARY GEAR SPLINE PIECE |
Using a screwdriver, remove the snap ring.
- NOTICE:
- Be careful not to damage the spline piece.
Remove the spline piece.
| 44. REMOVE TRANSFER LOW PLANETARY GEAR BEARING |
Using SST, remove the bearing.
- SST
- 09612-65014(09612-01030,09612-01050)
- NOTICE:
- Hang SST securely between the bearing and low planetary gear.
| 45. REMOVE TRANSFER LOW PLANETARY RING GEAR HOLE SNAP RING |
Using a snap ring expander, remove the snap ring.
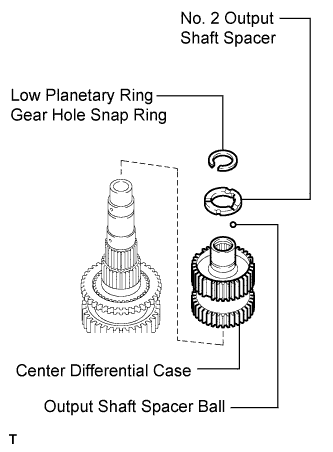
| 46. REMOVE NO. 2 TRANSFER OUTPUT SHAFT SPACER |
| 47. REMOVE TRANSFER OUTPUT SHAFT SPACER BALL |
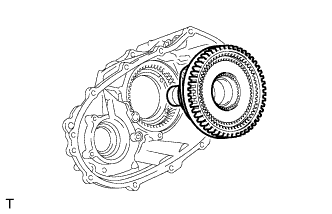
| 48. REMOVE CENTER DIFFERENTIAL CASE |
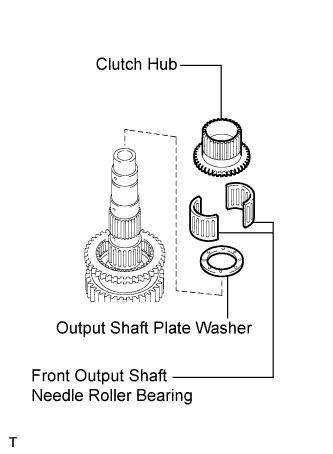
| 49. REMOVE TRANSFER CLUTCH HUB |
| 50. REMOVE FRONT TRANSFER OUTPUT SHAFT NEEDLE ROLLER BEARING |
| 51. REMOVE TRANSFER OUTPUT SHAFT PLATE WASHER |
| 52. REMOVE REAR TRANSFER OUTPUT SHAFT RADIAL BALL BEARING |
Using SST and a press, press out the bearing.
- SST
- 09555-55010
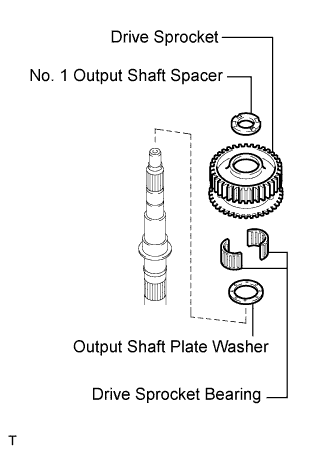
| 53. REMOVE NO. 1 TRANSFER OUTPUT SHAFT SPACER |
| 54. REMOVE TRANSFER DRIVE SPROCKET SUB-ASSEMBLY |
| 55. REMOVE TRANSFER DRIVE SPROCKET BEARING |
| 56. REMOVE TRANSFER OUTPUT SHAFT PLATE WASHER |
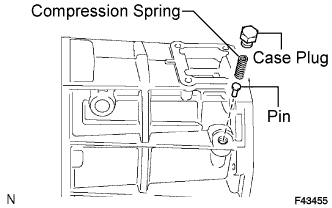
| 57. REMOVE TRANSFER CASE PLUG |
| 58. REMOVE COMPRESSION SPRING |
| 59. REMOVE TRANSFER CASE STRAIGHT PIN |
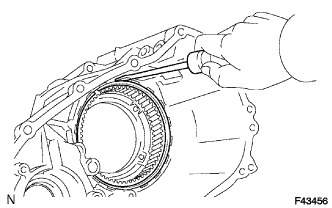
| 60. REMOVE TRANSFER LOW PLANETARY RING GEAR |
Using a screwdriver, pry out the snap ring.
- NOTICE:
- Be careful not to damage the ring gear and front case.
Remove the ring gear from the front case.