Stop Light Switch -- Installation |
| 1. INSTALL STOP LIGHT SWITCH ASSEMBLY |
 |
Install the adjuster to the support.
Insert the switch into the adjuster until it slightly touches the pedal.
- NOTICE:
- Do not depress the pedal.
Turn the switch a quarter turn clockwise.
- Torque:
- 1.5 N*m{15 kgf*cm, 13 in.*lbf}
- NOTICE:
- Do not depress the pedal.
 |
Check the switch clearance.
- Standard stop light switch clearance:
- 1.5 to 2.5 mm (0.059 to 0.098 in.)
| 2. ADJUST STOP LIGHT SWITCH ASSEMBLY |
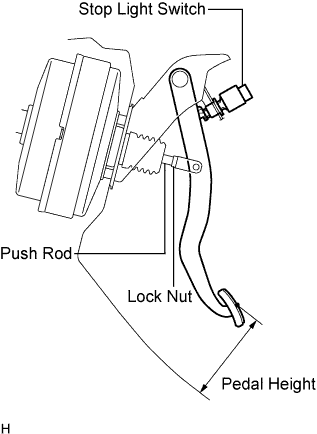 |
Check the pedal height.
- Standard pedal height from dash panel:
Model Specified Condition for Manual Transmission 156.9 to 166.9 mm (6.177 to 6.571 in.) for Automatic Transmission 158.1 to 168.1 mm (6.224 to 6.618 in.)
Adjust the pedal height.
Disconnect the connector from the stop light switch.
Remove the switch.
Loosen the push rod clevis lock nut.
Adjust the pedal height by turning the push rod.
Tighten the lock nut.
- Torque:
- 26 N*m{265 kgf*cm, 19 ft.*lbf}
Insert the switch into the adjuster until it slightly touches the pedal.
- NOTICE:
- Do not depress the pedal.
Turn the switch a quarter turn clockwise.
- Torque:
- 1.5 N*m{15 kgf*cm, 13 in.*lbf}
- NOTICE:
- Do not depress the pedal.
Connect the connector to the switch.
Check the switch clearance.
- Standard stop light switch clearance:
- 1.5 to 2.5 mm (0.059 to 0.098 in.)
| 3. CONNECT CABLE TO NEGATIVE BATTERY TERMINAL |