Meter / Gauge System -- On-Vehicle Inspection |
| 1. CHECK SPEEDOMETER |
Check the speedometer operation.
Using a speedometer tester, check that the speedometer reading is within the allowable range shown in the table below. Also, check for proper operation of the odometer.
*: for 2TR-FE, 1GR-FE, 1KD-FTVReference Standard Indication Allowable Range 20 km/h 21 to 25 km/h 40 km/h 41.7 to 46.2 km/h 60 km/h 62.7 to 67.2 km/h 80 km/h 83.4 to 88.4 km/h 100 km/h 104.3 to 109.3 km/h 120 km/h 125.1 to 130.6 km/h 140 km/h 145.8 to 151.8 km/h 160 km/h 166.2 to 173.2 km/h 180 km/h* 186.9 to 194.5 km/h - NOTICE:
- Do not use worn, underinflated or overinflated tires, as the speedometer reading will be inaccurate.
Check the deflection width of the speedometer indicator.
- Reference:
- Allowable range +-0.5 km/h
| 2. CHECK OUTPUT SIGNAL OF VEHICLE SPEED SENSOR |
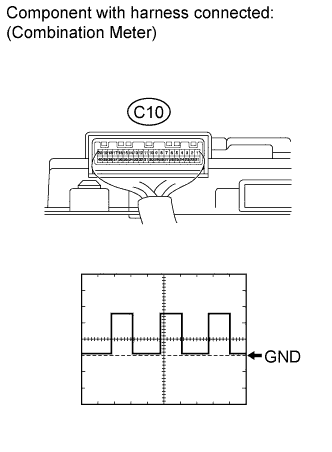 |
Check the output signal waveform
Remove the combination meter, but do not disconnect the connector.
Using an oscilloscope, check the waveform of the combination meter.
Item Content Tester Connection C10-6 - Body ground Tool Setting 5 V/DIV., 10 msec./DIV. Vehicle Condition Being driven at approximately 20 km/h (12.4 mph) - OK:
- Refer to the illustration.
- HINT:
- As vehicle speed increases, the wavelength shortens.
| 3. CHECK TACHOMETER |
Check the tachometer operation.
Connect a tune-up test tachometer, and start the engine.
- NOTICE:
- Do not reverse the connections of the tachometer. This will damage its transistors and diodes.
- When removing or installing the tachometer, be careful not to drop or strike it.
Compare the test tachometer values and vehicle tachometer values under the following conditions:
- Vehicle battery voltage is 13.5 V
- Ambient temperature is 25°C (77°F)
*: for 2TR-FE, 1GR-FEOK Standard Tachometer Indication (rpm) Acceptable Range (rpm)
Data in ( ) are for reference only700 630 to 770 1000 (900 to 1100) 2000 (1850 to 2150) 3000 2800 to 3200 4000 (3800 to 4200) 5000 4800 to 5200 6000* (5750 to 6250)
If the result is not as specified, the tachometer may have a malfunction.- Vehicle battery voltage is 13.5 V
| 4. CHECK FUEL SENDER ASSEMBLY |
Disconnect the F14*1 or F13*2 gauge connector.
*1: for 2TR-FE, 1GR-FE
*2: for 1KD-FTV, 5L-E
 |
Turn the ignition switch ON, and then check the position of the receiver gauge needle.
- OK:
- Fuel receiver gauge indicates E.
Connect terminals 2 and 3 of the wire harness side connector.
Turn the ignition switch ON, and then check the position of the receiver gauge needle.
- OK:
- Fuel receiver gauge indicates F.
| 5. CHECK FUEL WARNING LIGHT |
Disconnect the F14*1 or F13*2 gauge connector.
*1: for 2TR-FE, 1GR-FE
*2: for 1KD-FTV, 5L-E
|
Turn the ignition switch ON, and then check that the fuel receiver gauge indicates E and that the fuel warning light turns on.
- OK:
- FUEL warning light turns on.
| 6. CHECK OIL PRESSURE WARNING LIGHT |
for 2TR-FE, 1GR-FE, 2KD-FTV:
Disconnect the E3 switch connector.
Connect terminal 1 of the wire harness side connector to the body ground.
Turn the ignition switch ON, and then check that the oil pressure warning light turns on.
- OK:
- OIL PRESSURE warning light turns on.

for 5L-E:
Disconnect the E3 switch connector.
Connect terminal 1 of the wire harness side connector to the body ground.
Turn the ignition switch ON, and then check that the oil pressure warning light turns on.
- OK:
- OIL PRESSURE warning light turns on.

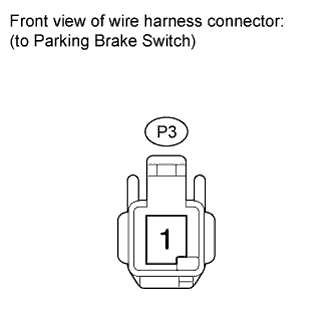
| 7. CHECK BRAKE WARNING LIGHT |
Check the parking brake warning light.
Disconnect the P3 switch connector.
Connect terminal 1 of the wire harness side connector to the body ground.
Turn the ignition switch ON, and then check that the warning light turns on.
- OK:
- BRAKE warning light turns on.
Check the brake fluid level warning light.
Disconnect the B2 switch connector.
Connect terminals 1 and 2 of the wire harness side connector.
Turn the ignition switch ON, and then check that the warning light turns on.
- OK:
- BRAKE warning light turns on.

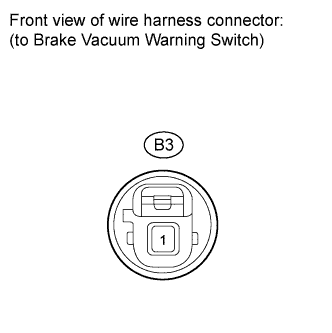
for 1KD-FTV (w/ VSC):
Check the vacuum pump warning light.Disconnect the B3 switch connector.
Connect terminals 1 and 2 of the wire harness side connector.
Turn the ignition switch ON, and then check that the brake warning light turns on.
- OK:
- BRAKE warning light turns on.

for 1KD-FTV, 5L-E (w/o VSC):
Check the vacuum pump warning light.Disconnect the B3 switch connector.
Connect terminal 1 of the wire harness side connector to the body ground.
Turn the ignition switch ON, and then check that the warning light turns on.
- OK:
- BRAKE warning light turns on.
| 8. CHECK FRONT PASSENGER SEAT BELT WARNING LIGHT (w/ Front Passenger Seat Belt Warning System) |
Disconnect the F12 belt connector.
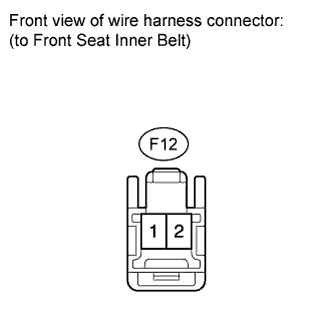 |
Connect terminals 1 and 2 of the wire harness side connector.
Turn the ignition switch ON, and then check that the warning light blinks.
- OK:
- Seat belt warning light for passenger side blinks.
*1: w/ Multi-display
*2: w/o Multi-display