Engine Coolant Temperature Sensor (For Hatchback) -- Removal |
| 1. DRAIN ENGINE COOLANT |
 |
- NOTICE:
- To avoid the danger of being burned, do not remove the water filler cap sub-assembly while the engine and radiator assembly are still hot. Thermal expansion will cause hot coolant and steam to blow out from the radiator assembly.
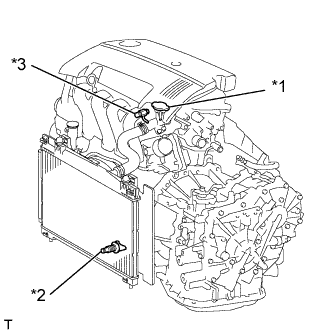
| *1 | Water Filler Cap Sub-assembly |
| *2 | Radiator Drain Cock Plug |
| *3 | Cylinder Block Drain Cock Plug |
Loosen the radiator drain cock plug.
Remove the water filler cap sub-assembly.
Loosen the cylinder block drain cock plug, then drain the coolant.
| 2. REMOVE NO. 2 CYLINDER HEAD COVER |
Remove the 4 nuts and No. 2 cylinder head cover.
 |
| 3. REMOVE AIR CLEANER CAP SUB-ASSEMBLY WITH NO. 1 AIR CLEANER HOSE |
Disengage the clamp and disconnect the fuel vapor feed hose assembly from the No. 1 air cleaner hose.
 |
Loosen the 2 hose clamps and disconnect the fuel vapor feed hose assembly from the No. 1 air cleaner hose and vacuum switching valve assembly.
Disconnect the No. 2 fuel vapor feed hose from the intake manifold.
 |
Disengage the 2 clamps and disconnect the wire harness from the air cleaner cap sub-assembly and vacuum switching valve assembly.
 |
Disconnect the mass air flow meter connector.
Disconnect the vacuum switching valve connector.
Loosen the hose clamp and disconnect the No. 1 air cleaner hose from the throttle with motor body assembly.
 |
Disengage the 2 clamps and remove the air cleaner cap sub-assembly with No. 1 air cleaner hose.
| 4. REMOVE BATTERY |
 |
Disconnect the battery terminal.
Remove the 2 nuts and the battery clamp.
Remove the battery.
| 5. REMOVE ENGINE COOLANT TEMPERATURE SENSOR |
Disconnect the engine coolant temperature sensor connector.
 |
Using a 19 mm deep socket wrench, remove the engine coolant temperature sensor and gasket.
 |