Ecm (For Sedan) -- Removal |
- NOTICE:
- Replace the ECM with a new one if necessary.
| 1. DISCONNECT CABLE FROM NEGATIVE BATTERY TERMINAL |
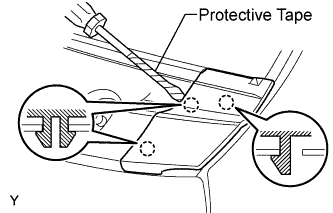
| 2. REMOVE FRONT WIPER ARM HEAD CAP |
Using a screwdriver with its tip wrapped in protective tape, disengage the claw and remove the 2 front wiper arm head caps.
 |
| 3. REMOVE FRONT WIPER ARM AND BLADE ASSEMBLY LH |
Operate the wiper, then stop the windshield wiper motor in the automatic stop position.
 |
Remove the nut and front wiper arm.
| 4. REMOVE FRONT WIPER ARM AND BLADE ASSEMBLY RH |
- HINT:
- Use the same procedure as for the LH side.
| 5. REMOVE COWL SIDE VENTILATOR SUB-ASSEMBLY LH |
Using a screwdriver with its tip wrapped in protective tape, disengage the 3 claws and remove the cowl side ventilator sub-assembly LH.
 |
| 6. REMOVE COWL SIDE VENTILATOR SUB-ASSEMBLY RH |
- HINT:
- Use the same procedure as for the LH side.
| 7. REMOVE COWL TOP VENTILATOR LOUVER SUB-ASSEMBLY |
Disengage the 3 clips, the 4 claws and the 8 hooks.
 |
Remove the cowl top ventilator louver sub-assembly.
Disconnect the washer hoses.
 |
Disengage the 5 hooks.
| 8. REMOVE FRONT WIPER MOTOR AND LINK |
Remove the 2 bolts.
 |
Slide the wiper link. Disengage the meshing of the rubber pin, then disconnect the connector and remove the front wiper motor and link.
| 9. REMOVE FRONT AIR SHUTTER SEAL |
Disengage the 3 claws and remove the front air shutter seal.
 |
| 10. REMOVE COWL TOP PANEL OUTER |
Disengage the claw and disconnect the wire harness.
 |
Remove the 2 bolts and remove the cowl top panel outer center bracket.
 |
Remove the 8 bolts and remove the cowl top panel outer.
 |
| 11. REMOVE ECM |
 |
Remove the 2 lock knobs and harness clamp.
Disconnect the 2 ECM connectors.
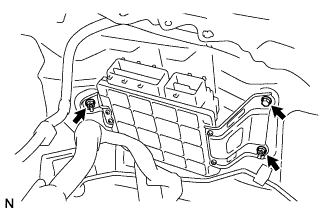 |
Remove the bolt and 2 nuts and remove the ECM.
| 12. REMOVE ECM BRACKET |
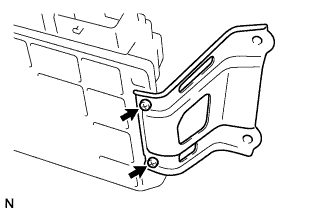 |
Remove the 2 screws and the ECM bracket.
| 13. REMOVE ECM BRACKET NO. 2 |
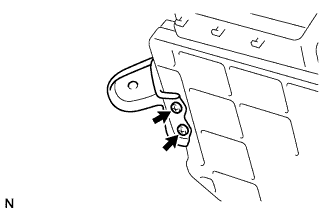 |
Remove the 2 screws and ECM bracket No. 2.