Rear Axle Beam (For Sedan) Removal
REMOVE REAR SEAT CUSHION COVER PAD SUB-ASSEMBLY (for Fixed Seat Type)
REMOVE REAR SEATBACK ASSEMBLY (for Fixed Seat Type)
REMOVE REAR WHEEL
DRAIN BRAKE FLUID
SEPARATE SKID CONTROL SENSOR WIRE (w/ ABS)
SEPARATE REAR NO. 4 BRAKE TUBE
SEPARATE REAR NO. 3 BRAKE TUBE
SEPARATE NO. 3 PARKING BRAKE CABLE ASSEMBLY
SEPARATE NO. 2 PARKING BRAKE CABLE ASSEMBLY
REMOVE REAR BRAKE DRUM SUB-ASSEMBLY
REMOVE REAR AXLE HUB AND BEARING ASSEMBLY LH
REMOVE REAR AXLE HUB AND BEARING ASSEMBLY RH
LOOSEN REAR AXLE BEAM
REMOVE REAR SHOCK ABSORBER LH
REMOVE REAR SHOCK ABSORBER RH
REMOVE REAR COIL SPRING LH
REMOVE REAR COIL SPRING RH
REMOVE REAR AXLE BEAM
REMOVE REAR AXLE CARRIER BUSH LH
REMOVE REAR AXLE CARRIER BUSH RH
Rear Axle Beam (For Sedan) -- Removal |
| 1. REMOVE REAR SEAT CUSHION COVER PAD SUB-ASSEMBLY (for Fixed Seat Type) |
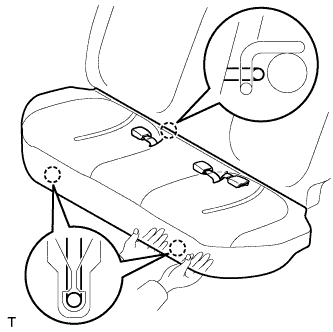
Hold the front edge of the rear seat cushion cover pad and lift it up, as shown in the illustration, to disengage the 2 hooks.
- NOTICE:
- Hold the area around the hooks so as to avoid deforming the rear seat cushion frame.
Pass the rear seat inner belt through the slit in the rear seat cushion cover pad, disengage the hook between the rear seat cushion cover pad and the rear seatback, and remove the rear seat cushion cover pad.
| 2. REMOVE REAR SEATBACK ASSEMBLY (for Fixed Seat Type) |
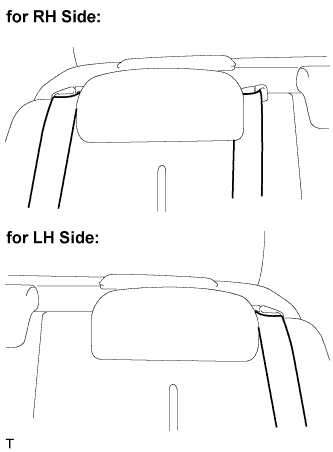
Remove the rear seat outer belt from the rear seat shoulder belt guide.
- HINT:
- Use the same procedure for both sides.
Remove the rear center seat outer belt from the rear center seat shoulder belt guide.
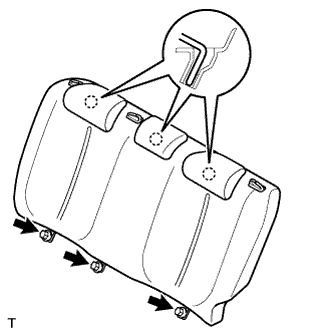
Remove the 3 bolts.
Disengage the 3 hooks and remove the rear seatback.
- NOTICE:
- Immediately wash off any brake fluid that comes into contact with any painted surfaces.
| 5. SEPARATE SKID CONTROL SENSOR WIRE (w/ ABS) |
Using a screwdriver, remove the claw of the connector lock portion and disconnect the skid control sensor wire connector.
- NOTICE:
- Do not remove the connector cover from the connector because the skid control sensor wire may be damaged.
| 6. SEPARATE REAR NO. 4 BRAKE TUBE |
Using a union nut wrench (10 mm), separate the brake tube while holding the flexible hose with a wrench.
Remove the clip and disconnect the flexible hose from the axle beam.
Remove the nut and separate the brake tube.
| 7. SEPARATE REAR NO. 3 BRAKE TUBE |
- HINT:
- The removal procedure for the RH side is the same as that for the LH side.
| 8. SEPARATE NO. 3 PARKING BRAKE CABLE ASSEMBLY |
Using pliers, pinch both ends of the claw of cable clamp and flex the clamp to remove it.
Remove the bolt and separate the parking brake cable.
Remove the cable clamp from the parking brake cable.
- HINT:
- Replace the clamp with a new one when installing the parking brake cable.
| 9. SEPARATE NO. 2 PARKING BRAKE CABLE ASSEMBLY |
- HINT:
- The removal procedure for the RH side is the same as that for the LH side.
| 10. REMOVE REAR BRAKE DRUM SUB-ASSEMBLY |
Release the parking brake and remove the rear brake drum.
If the rear brake drum cannot be removed easily, perform the following procedure.
Remove the hole plug and insert a screwdriver through the hole into the backing plate, and hold the automatic adjust lever away from the adjuster.
Using another screwdriver, contract the brake shoe by turning the adjusting bolt.
| 11. REMOVE REAR AXLE HUB AND BEARING ASSEMBLY LH |
Remove the 4 bolts and remove the axle hub and bearing from the axle beam.
- NOTICE:
- Suspend the backing plate with a piece of rope.
| 12. REMOVE REAR AXLE HUB AND BEARING ASSEMBLY RH |
- HINT:
- The removal procedure for the RH side is the same as that for the LH side.
| 13. LOOSEN REAR AXLE BEAM |
Loosen the 2 bolts.
Text in Illustration*a
| RH Side
|
*b
| LH Side
|
- NOTICE:
- Do not remove the bolts.
| 14. REMOVE REAR SHOCK ABSORBER LH |
Support the axle beam with a jack. Insert a wooden block between the jack and the rear axle spring seat to prevent damage.
Remove the 2 nuts while keeping the piston rod from rotating.
Remove the cushion retainer and suspension support.
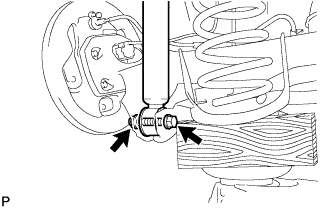
Remove the bolt while keeping the nut from rotating and remove the shock absorber.
- NOTICE:
- Remove the nut on the bolt side because the one on the lower side is a jam nut.
| 15. REMOVE REAR SHOCK ABSORBER RH |
- HINT:
- The removal procedure for the RH side is the same as that for the LH side.
| 16. REMOVE REAR COIL SPRING LH |
Lower the jacks slowly.
Remove the coil spring, coil spring insulator upper and coil spring insulator lower.
| 17. REMOVE REAR COIL SPRING RH |
- HINT:
- The removal procedure for the RH side is the same as that for the LH side.
| 18. REMOVE REAR AXLE BEAM |
Remove the 2 bolts and remove the axle beam.
Text in Illustration*a
| RH Side
|
*b
| LH Side
|
| 19. REMOVE REAR AXLE CARRIER BUSH LH |
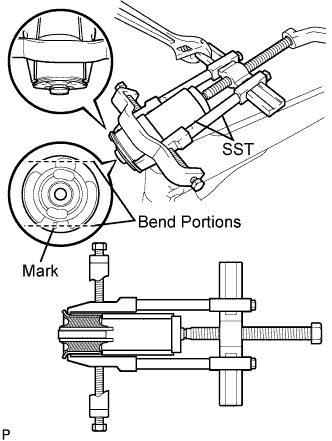
Place a match mark on the axle beam with it aligned with the bush mark.
Using a chisel and hammer, bend the 2 portions of the bush rib.
- NOTICE:
- Bend the bush rib until the claw of SST can be suspended.
Using SST, remove the bush from the axle beam.
- SST
- 09950-40011(09951-04020,09952-04010,09953-04030,09954-04020,09955-04011,09957-04010,09958-04011)
09612-30012
09950-60010(09951-00590)
- NOTICE:
- Apply paint to any scratches on the rear axle beam.
| 20. REMOVE REAR AXLE CARRIER BUSH RH |
- HINT:
- The removal procedure for the RH side is the same as that for the LH side.