Occupant Classification System (For Sedan) Trouble In Passenger Airbag On/Off Indicator
DESCRIPTION
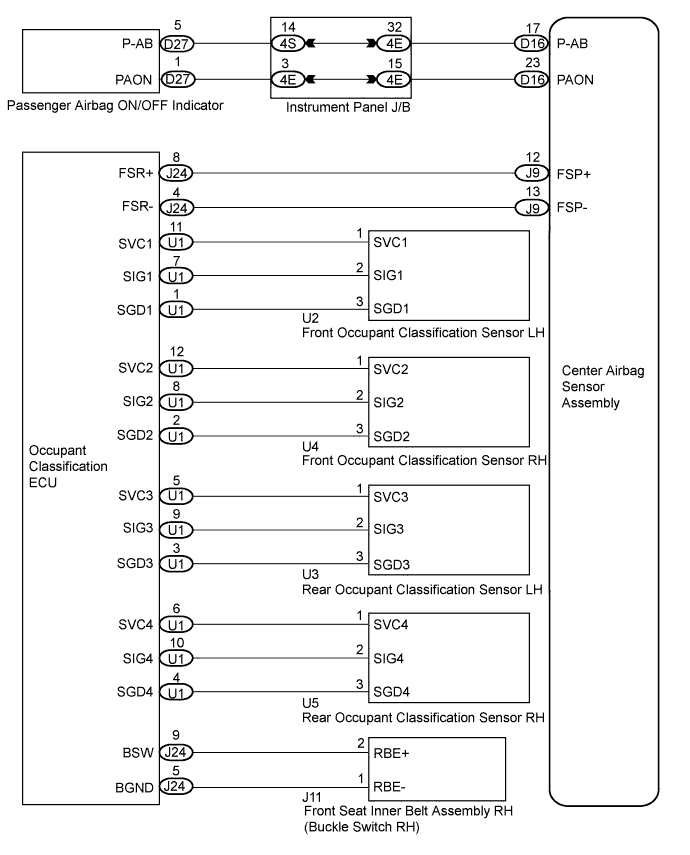
WIRING DIAGRAM
INSPECTION PROCEDURE
CHECK SRS WARNING LIGHT
CHECK PASSENGER AIRBAG ON/OFF INDICATOR CONDITION
PERFORM ZERO POINT CALIBRATION
PERFORM SENSITIVITY CHECK
RETIGHTEN FRONT SEAT ASSEMBLY RH BOLT
PERFORM ZERO POINT CALIBRATION
PERFORM SENSITIVITY CHECK
CHECK CONNECTORS
CHECK DTC
REPLACE OCCUPANT CLASSIFICATION ECU
PERFORM ZERO POINT CALIBRATION
PERFORM SENSITIVITY CHECK
OCCUPANT CLASSIFICATION SYSTEM (for Sedan) - Trouble in Passenger Airbag ON/OFF Indicator |
DESCRIPTION
The occupant classification system detects the front passenger seat condition and then indicates whether the front passenger airbag is activated or not through the passenger airbag ON/OFF indicator illumination.The passenger airbag ON/OFF indicator illumination changes depending on the front passenger seat condition as shown in the table below.Front passenger seat condition
| ON Indicator
| OFF Indicator
|
Vacant
| OFF
| OFF
|
Adult is seated
| ON
| OFF
|
Child is seated
| OFF
| ON
|
Child restraint system is set
| OFF
| ON
|
Front passenger occupant classification system failure
| OFF
| ON
|
WIRING DIAGRAM
INSPECTION PROCEDURE
| 1.CHECK SRS WARNING LIGHT |
Turn the ignition switch to the on position, and check the SRS warning light condition.
- OK:
- The SRS warning light does not come on.
| 2.CHECK PASSENGER AIRBAG ON/OFF INDICATOR CONDITION |
Turn the ignition switch to the on position.
Check if the passenger airbag ON/OFF indicator correctly indicates the front passenger seat condition.
- OK:
Front passenger seat condition
| ON Indicator
| OFF Indicator
|
Vacant
| OFF
| OFF
|
Adult is seated
| ON
| OFF
|
Child is seated
| OFF
| ON
|
Child restraint system is set
| OFF
| ON
|
Front passenger occupant classification system failure
| OFF
| ON
|
| 3.PERFORM ZERO POINT CALIBRATION |
Turn the ignition switch to the lock position.
Connect the Techstream to the DLC3.
Turn the ignition switch to the on position.
Using the Techstream, perform the zero point calibration (YARIS_NCP93 RM0000010VN06EX.html).
- OK:
- COMPLETE is displayed.
| 4.PERFORM SENSITIVITY CHECK |
Using the Techstream, perform the sensitivity check (YARIS_NCP93 RM0000010VN06EX.html).
Confirm that nothing is placed on the passenger seat.
Confirm that the beginning sensor reading is within the standard range.
- Standard range:
- -3.2 to 3.2 kg (-7 to 7 lb)
Place a 30 kg (66.14 lb) weight (e.g. a lead mass) onto the front passenger seat.
Confirm that the sensitivity is within the standard range.
- Standard range:
- 27 to 33 kg (59.52 to 72.75 lb)
- HINT:
- When performing the sensitivity check, use a solid metal weight (the check result may not be accurate if a liquid weight is used).
| 5.RETIGHTEN FRONT SEAT ASSEMBLY RH BOLT |
Turn the ignition switch to the lock position.
Loosen the 4 installation bolts of the front seat assembly RH.
Tighten the 4 installation bolts of the front seat assembly RH to the specified torque.
- Torque:
- 37 N*m{375 kgf*cm, 27 ft.*lbf}
| 6.PERFORM ZERO POINT CALIBRATION |
Connect the Techstream to the DLC3.
Turn the ignition switch to the on position.
Using the Techstream, perform the zero point calibration (YARIS_NCP93 RM0000010VN06EX.html).
- OK:
- COMPLETE is displayed.
| 7.PERFORM SENSITIVITY CHECK |
Using the Techstream, perform the sensitivity check (YARIS_NCP93 RM0000010VN06EX.html).
Confirm that nothing is placed on the passenger seat.
Confirm that the beginning sensor reading is within the standard range.
- Standard range:
- -3.2 to 3.2 kg (-7 to 7 lb)
Place a 30 kg (66.14 lb) weight (e.g. a lead mass) onto the front passenger seat.
Confirm that the sensitivity is within the standard range.
- Standard range:
- 27 to 33 kg (59.52 to 72.75 lb)
- HINT:
- When performing the sensitivity check, use a solid metal weight (the check result may not be accurate if a liquid weight is used).
Turn the ignition switch to the lock position.
Disconnect the negative (-) terminal cable from the battery, and wait for at least 90 seconds.
Check that the connectors are properly connected to the occupant classification ECU and the 4 occupant classification sensors.
- OK:
- The connectors are connected.
Disconnect the connectors from the occupant classification ECU and the 4 occupant classification sensors.
Check that the connectors are not damaged or deformed.
- OK:
- The connectors are normal.
| | REPAIR OR REPLACE WIRE HARNESS AND CONNECTOR |
|
|
Connect the connectors to the occupant classification ECU and the 4 occupant classification sensors.
Connect the negative (-) terminal cable to the battery.
Turn the ignition switch to the on position, and wait for at least 60 seconds.
Turn the ignition switch to the lock position.
Clear the DTCs stored in the memory (YARIS_NCP93 RM0000010VK06DX.html).
Turn the ignition switch to the on position, and wait for at least 60 seconds.
Check the DTCs (YARIS_NCP93 RM0000010VK06DX.html).
- OK:
- DTC is not output.
| | REPLACE CENTER AIRBAG SENSOR ASSEMBLY |
|
|
| 10.REPLACE OCCUPANT CLASSIFICATION ECU |
Turn the ignition switch to the lock position.
Disconnect the negative (-) terminal cable from the battery, and wait for at least 90 seconds.
Replace the occupant classification ECU (YARIS_NCP93 RM0000012DU00KX.html).
- HINT:
- Perform the inspection using parts from a normal vehicle if possible.
| 11.PERFORM ZERO POINT CALIBRATION |
Connect the negative (-) terminal cable to the battery.
Connect the Techstream to the DLC3.
Turn the ignition switch to the on position.
Using the Techstream, perform the zero point calibration (YARIS_NCP93 RM0000010VN06EX.html).
- OK:
- COMPLETE is displayed.
| 12.PERFORM SENSITIVITY CHECK |
Using the Techstream, perform the sensitivity check (YARIS_NCP93 RM0000010VN06EX.html).
Confirm that nothing is placed on the passenger seat.
Confirm that the beginning sensor reading is within the standard range.
- Standard range:
- -3.2 to 3.2 kg (-7 to 7 lb)
Place a 30 kg (66.14 lb) weight (e.g. a lead mass) onto the front passenger seat.
Confirm that the sensitivity is within the standard range.
- Standard range:
- 27 to 33 kg (59.52 to 72.75 lb)
- HINT:
- When performing the sensitivity check, use a solid metal weight (the check result may not be accurate if a liquid weight is used).