Transmission Control Cable (For Hatchback) -- Removal |
| 1. REMOVE REAR CONSOLE BOX ASSEMBLY |
| 2. REMOVE AIR CLEANER CAP W/ AIR CLEANER HOSE |
Disengage the clamp and disconnect the fuel vapor feed hose assembly from the No. 1 air cleaner hose.
 |
Loosen the 2 hose clamps and disconnect the fuel vapor feed hose assembly from the No. 1 air cleaner hose and vacuum switching valve assembly.
Disconnect the No. 2 fuel vapor feed hose from the intake manifold.
 |
Disengage the 2 clamps and disconnect the wire harness from the air cleaner cap sub-assembly and vacuum switching valve assembly.
 |
Disconnect the mass air flow meter connector.
Disconnect the vacuum switching valve connector.
Loosen the hose clamp and disconnect the No. 1 air cleaner hose from the throttle with motor body assembly.
 |
Disengage the 2 clamps and remove the air cleaner cap sub-assembly with No. 1 air cleaner hose.
Remove the air cleaner element.
 |
Disengage the clamp and disconnect the wire harness from the air cleaner case.
 |
Remove the 2 bolts and the air cleaner case from the air cleaner bracket.
| 3. REMOVE FRONT FLOOR CENTER BRACE (w/ Side Mudguard) |
 |
Remove the 2 bolts and the front floor center brace from the body.
| 4. REMOVE FRONT EXHAUST PIPE ASSEMBLY |
Remove the 2 bolts and 2 compression springs, and separate the front exhaust pipe assembly from the exhaust manifold.
 |
Remove the 3 exhaust pipe supports and the front exhaust pipe assembly.
| 5. REMOVE FRONT NO. 1 FLOOR HEAT INSULATOR |
 |
Remove the 2 bolts and nut, and then remove the front No. 1 floor heat insulator.
| 6. SEPARATE TRANSMISSION CONTROL CABLE ASSEMBLY |
 |
Remove the clip A, and separate the control select cable from the floor shift shift lever assembly.
Text in Illustration *1 Control Select Cable *2 Control Shift Cable *3 Clip A *4 Clip B *5 Nut *6 Shift Lever Plate *a Rotate 180°
Disengage the clip B, and separate the control shift cable from the floor shift shift lever assembly.
Rotate the nut clockwise approximately 180° and, while holding the nut in that position, separate the control select cable from the shift lever plate.
- NOTICE:
- Do not rotate the nut excessively as it may damage the internal spring and the transmission control cable assembly will not be reusable.
Rotate the nut clockwise approximately 180° and, while holding the nut in that position, separate the control shift cable from the shift lever plate.
- NOTICE:
- Do not rotate the nut excessively as it may damage the internal spring and the transmission control cable assembly will not be reusable.
| 7. REMOVE TRANSMISSION CONTROL CABLE ASSEMBLY |
Remove the clip A and washer, and separate the control shift cable from the manual transaxle assembly.
Text in Illustration *1 Control Shift Cable *2 Control Select Cable *3 Clip A *4 Clip B
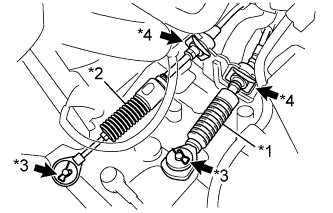 |
Remove the clip B from the control shift cable, and separate the control shift cable from the shift cable bracket.
Remove the clip A and washer, and separate the control select cable from the manual transaxle assembly.
Remove the clip B from the control select cable, and separate the control select cable from the shift cable bracket.
Remove the 3 nuts and remove the transmission control cable assembly.
 |