Clutch Master Cylinder (For Lhd) Removal
Clutch. Toyota Rav4. Aca30, 33, 38 Gsa33 Zsa30, 35
DISCONNECT CABLE FROM NEGATIVE BATTERY TERMINAL
REMOVE FRONT WIPER ARM HEAD CAP
REMOVE FRONT WIPER ARM AND BLADE ASSEMBLY LH
REMOVE FRONT WIPER ARM AND BLADE ASSEMBLY RH
REMOVE FRONT FENDER TO COWL SIDE SEAL LH
REMOVE FRONT FENDER TO COWL SIDE SEAL RH
REMOVE COWL TOP VENTILATOR LOUVER
REMOVE WINDSHIELD WIPER MOTOR AND LINK ASSEMBLY
REMOVE COWL VENTILATOR HOUSING SUB-ASSEMBLY
REMOVE COWL TOP PANEL OUTER SUB-ASSEMBLY
REMOVE COWL BODY MOUNTING REINFORCEMENT LH
REMOVE NO. 1 INSTRUMENT PANEL UNDER COVER SUB-ASSEMBLY
REMOVE DRIVER SIDE KNEE AIRBAG ASSEMBLY (w/ Knee Airbag)
REMOVE LOWER INSTRUMENT PANEL FINISH PANEL (w/o Knee Airbag)
DISCONNECT CLUTCH MASTER CYLINDER PUSH ROD CLEVIS
DRAIN BRAKE FLUID
DISCONNECT CLUTCH RESERVOIR TUBE
DISCONNECT CLUTCH MASTER CYLINDER TO FLEXIBLE HOSE TUBE
REMOVE CLUTCH MASTER CYLINDER ASSEMBLY
Clutch Master Cylinder (For Lhd) -- Removal |
| 1. DISCONNECT CABLE FROM NEGATIVE BATTERY TERMINAL |
- NOTICE:
- w/ Navigation System (for HDD):
After the ignition switch is turned off, the HDD navigation system requires approximately a minute to record various types of memory and settings. As a result, after turning the ignition switch off, wait a minute or more before disconnecting the cable from the negative (-) battery terminal.
- Wait at least 90 seconds after disconnecting the cable from the negative (-) battery terminal to disable the SRS system.
| 2. REMOVE FRONT WIPER ARM HEAD CAP |
Remove the 2 caps.
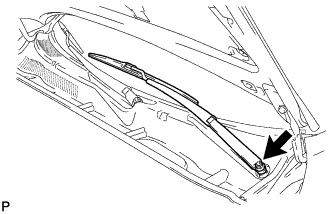
| 3. REMOVE FRONT WIPER ARM AND BLADE ASSEMBLY LH |
Remove the nut and arm and blade.
| 4. REMOVE FRONT WIPER ARM AND BLADE ASSEMBLY RH |
Remove the nut and arm and blade.
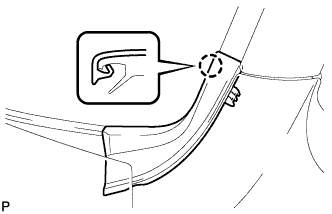
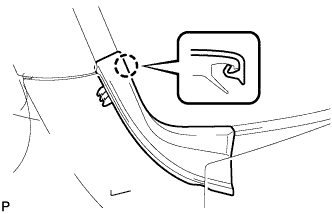
| 5. REMOVE FRONT FENDER TO COWL SIDE SEAL LH |
Detach the claw and remove the front fender to cowl side seal.
| 6. REMOVE FRONT FENDER TO COWL SIDE SEAL RH |
Detach the claw and remove the front fender to cowl side seal.
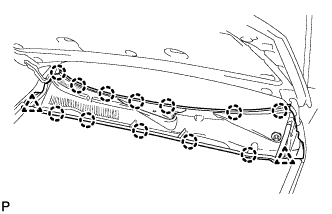
| 7. REMOVE COWL TOP VENTILATOR LOUVER |
Remove the 2 clips.
Detach the 12 claws and remove the louver.
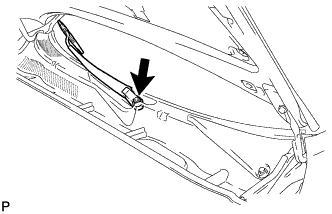
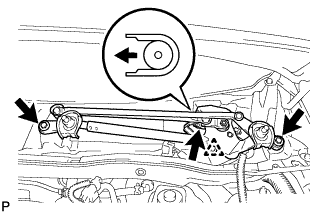
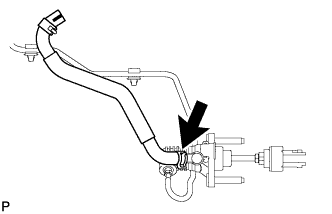
| 8. REMOVE WINDSHIELD WIPER MOTOR AND LINK ASSEMBLY |
Remove the 2 bolts.
Move the wiper cushion in the direction shown by the arrow in the illustration to detach the wiper cushion from the body, and remove the wiper motor and link.
Disconnect the connector and detach the clamp.
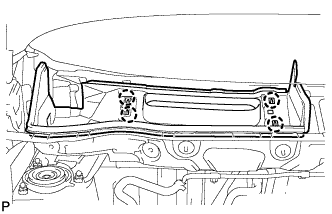
| 9. REMOVE COWL VENTILATOR HOUSING SUB-ASSEMBLY |
Detach the 4 claws and remove the ventilator housing.
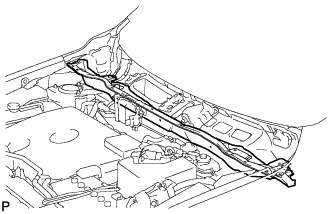
| 10. REMOVE COWL TOP PANEL OUTER SUB-ASSEMBLY |
Remove the 14 bolts and cowl top panel outer.
| 11. REMOVE COWL BODY MOUNTING REINFORCEMENT LH |
Remove the 2 nuts and mounting reinforcement.
| 12. REMOVE NO. 1 INSTRUMENT PANEL UNDER COVER SUB-ASSEMBLY |
Remove the 2 screws.
Detach the 3 claws and remove the cover.
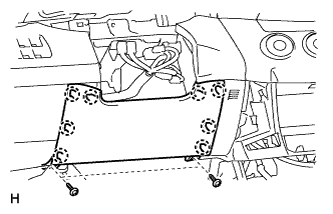
| 13. REMOVE DRIVER SIDE KNEE AIRBAG ASSEMBLY (w/ Knee Airbag) |
Remove the 4 bolts and driver side knee airbag.
Disconnect the connector.
- NOTICE:
- When handling the airbag connector, take care not to damage the airbag wire harness.
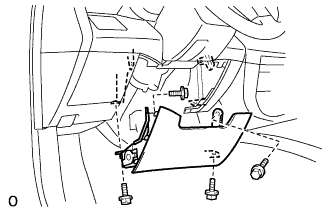
| 14. REMOVE LOWER INSTRUMENT PANEL FINISH PANEL (w/o Knee Airbag) |
Remove the 2 screws.
Using a screwdriver, detach the 8 claws and remove the lower instrument panel finish panel.
- HINT:
- Tape the screwdriver tip before use.
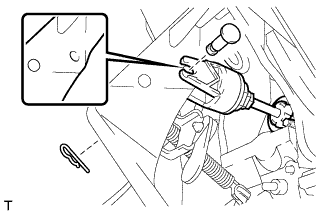
| 15. DISCONNECT CLUTCH MASTER CYLINDER PUSH ROD CLEVIS |
Remove the clip and pin, and disconnect the push rod clevis from the clutch pedal.
- NOTICE:
- Wash brake fluid off immediately if it adheres to any painted surface.
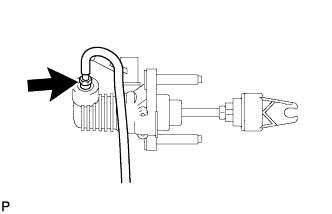
| 17. DISCONNECT CLUTCH RESERVOIR TUBE |
Loosen the clip and disconnect the tube from the clutch master cylinder.
- HINT:
- Use a container to catch the fluid.
| 18. DISCONNECT CLUTCH MASTER CYLINDER TO FLEXIBLE HOSE TUBE |
Using a union nut wrench, disconnect the flexible hose tube.
- HINT:
- Use a container to catch the fluid.
| 19. REMOVE CLUTCH MASTER CYLINDER ASSEMBLY |
Remove the 2 nuts and clutch master cylinder.