Intake Manifold -- Installation |
| 1. INSTALL STUD BOLT |
- NOTICE:
- If a stud bolt is deformed or its threads are damaged, replace it.
Using an E6 "TORX" socket wrench, install the 2 stud bolts to the intake manifold.
- Torque:
- 3.0 N*m{31 kgf*cm, 27 in.*lbf}
| 2. INSTALL INTAKE MANIFOLD |
Install the purge line hose to the intake manifold.
Install the 2 wire harness clamp brackets to the intake manifold with the 2 bolts.
- Torque:
- 8.0 N*m{82 kgf*cm, 71 in.*lbf}
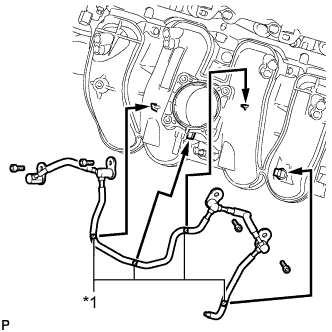
Apply gasoline to 4 new O-rings. Then install the 4 O-rings to the No. 1 fuel pipe sub-assembly.
Set the No. 1 fuel pipe sub-assembly against the 4 protrusions and install it with the 4 bolts.
- Torque:
- 10 N*m{102 kgf*cm, 7 ft.*lbf}
Text in Illustration *1 Paint Mark (White) - NOTICE:
- Set the areas of the fuel pipe marked with white paint marks against the protrusions of the intake manifold from the directions indicated by the arrows in the illustration.
- Make sure the fuel pipe does not become deformed when installing it.
 |
Install a new gasket to the intake manifold.
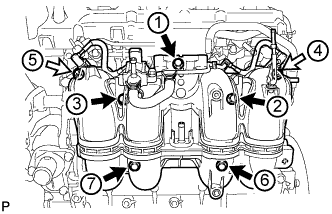
Install the intake manifold with the 5 bolts and 2 nuts, and tighten the bolts and nuts in the sequence shown in the illustration.
- Torque:
- 25 N*m{255 kgf*cm, 18 ft.*lbf}
Text in Illustration 
Bolt 
Nut
 |
Connect the No. 3 PCV hose and vacuum hose to the intake manifold.
Attach the No. 2 water by-pass hose.
Attach the No. 1 fuel hose to the intake manifold.
Install the clamp.
Attach the 3 wire harness clamps to the 2 wire harness clamp brackets.
| 3. INSTALL PURGE VSV |
Install the bracket with the bolt.
- Torque:
- 10 N*m{102 kgf*cm, 7 ft.*lbf}
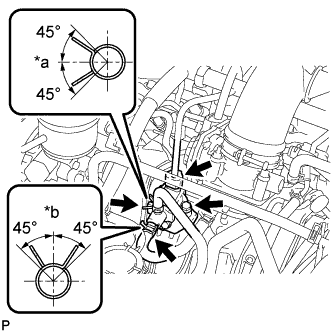
Install the purge VSV together with the bracket with the bolt.
- Torque:
- 10 N*m{102 kgf*cm, 7 ft.*lbf}
Text in Illustration *a Front *b Top
 |
Connect the 2 purge line hoses to the purge VSV.
Connect the purge VSV connector.
| 4. INSTALL FRONT UPPER FENDER APRON SEAL |
Install the front upper fender apron seal with the 5 clips.
| 5. INSTALL THROTTLE BODY WITH MOTOR ASSEMBLY |
| 6. INSTALL STARTER ASSEMBLY |
| 7. CONNECT CABLE TO NEGATIVE BATTERY TERMINAL |
- NOTICE:
- When disconnecting the cable, some systems need to be initialized after the cable is reconnected (HILUX_TGN26 RM000004QR3003X.html).
| 8. INSPECT FOR FUEL LEAK (for Fuel Sub Tank) |
Start the engine.
- NOTICE:
- Perform the inspection while the engine is cold.
- The fuel pump operates only for a calculated time when the coolant temperature is 20°C (68°F) or less and learned ethanol concentration is 85% or more.
Check for fuel leaks.
Check that there are no fuel leaks from the fuel system after doing any maintenance or repairs. If there is a fuel leak, repair or replace parts as necessary.