Audio And Visual System (For Radio And Display Type) -- Operation Check |
| CHECK PANEL & STEERING SWITCH |
- HINT:
- The radio and display receiver assembly panel switches are checked in the following procedure.
- Illustrations may differ from the actual vehicle screen depending on the device settings and options. Therefore, some detailed areas may not be exactly the same as on the actual vehicle screen.
- Some of the following functions may also differ from the actual vehicle depending on the device settings and options.
Enter diagnostic mode (HILUX_TGN26 RM0000011BU0F7X.html).
Select "Function Check/Setting" from the "Service Menu" screen.
Select "Panel & Steering Switch" from the "Function Check/Setting I" screen.
Panel & Steering Switch Check Mode
Operate each switch and check that the number of switches pushed and the switch conditions are correctly displayed.
Screen Description Display Content *1: Switch condition "Pushed" is displayed when any switch is pushed *2: Number of pushed switch - Number of switches pushed at once
- If more than 3 switches are pushed at once, "More than 3" is displayed
*3: Rotary switch direction Direction of rotary switch is displayed - Number of switches pushed at once

 |
 |
| CHECK TOUCH SWITCH |
- HINT:
- The touch switches on the screen are checked in the following procedure.
- Illustrations may differ from the actual vehicle screen depending on the device settings and options. Therefore, some detailed areas may not be exactly the same as on the actual vehicle screen.
Enter diagnostic mode (HILUX_TGN26 RM0000011BU0F7X.html).
Select "Function Check/Setting" from the "Service Menu" screen.
Select "Touch Switch" from the "Function Check/Setting I" screen.
Touch Switch Check
Touch the display anywhere in the open area to perform the check when the "Touch Switch Check" screen is displayed.
- HINT:
- A "+" mark is displayed where the display is touched.
- The "+" mark remains on the display even after the finger is removed.
|
 |
 |
| CHECK MIC & VOICE RECOGNITION |
- HINT:
- The microphone and microphone input level are checked in the following procedure.
- Illustrations may differ from the actual vehicle screen depending on the device settings and options. Therefore, some detailed areas may not be exactly the same as on the actual vehicle screen.
Enter diagnostic mode (HILUX_TGN26 RM0000011BU0F7X.html).
Select "Function Check/Setting" from the "Service Menu" screen.
Select "Mic & Voice Recognition" from the "Function Check/Setting I" screen.
Microphone & Voice Recognition Check
When speaking into the microphone, check that the microphone input level meter changes according to the input level.

|
 |
| CHECK COLOR BAR |
- HINT:
- The display color on the screen is checked in the following procedure.
- Illustrations may differ from the actual vehicle screen depending on the device settings and options. Therefore, some detailed areas may not be exactly the same as on the actual vehicle screen.
Enter diagnostic mode (HILUX_TGN26 RM0000011BU0F7X.html).
Select "Function Check/Setting" from the "Service Menu" screen.
Select "Color Bar" from the "Function Check/Setting I" screen.
Color Bar Check Mode
Select a color bar from the "Color Bar Check Mode" screen.
Check the display color.
- HINT:
- The entire screen turns to the color or stripe selected.
- Touching the display returns to the "Color Bar Check" screen.

|
 |
| CHECK VEHICLE SIGNAL |
- HINT:
- Vehicle signals received by the radio and display receiver assembly are checked in the following procedure.
- Illustrations may differ from the actual vehicle screen depending on the device settings and options. Therefore, some detailed areas may not be exactly the same as on the actual vehicle screen.
Enter diagnostic mode (HILUX_TGN26 RM0000011BU0F7X.html).
Select "Function Check/Setting" from the "Service Menu" screen.
Select "Vehicle Signal" from the "Function Check/Setting I" screen.
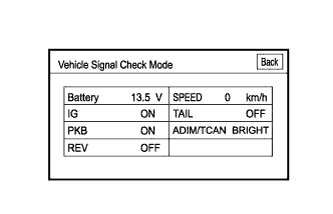
Vehicle Signal Check Mode
When the "Vehicle Signal Check Mode" screen is displayed, check all the vehicle signal conditions.
- HINT:
- Only conditions having inputs are displayed.
- This screen displays vehicle signals input to the radio and display receiver assembly.
- For details of this function, refer to Diagnosis Display Detailed Description in System Description (HILUX_TGN26 RM000003YVK017X.html).
|
 |
| CHECK HANDSFREE VOICE QUALITY SETTING |
- HINT:
- The handsfree volume of a "Bluetooth" compatible phone can be adjusted using the following procedure.
- Illustrations may differ from the actual vehicle screen depending on the device settings and options. Therefore, some detailed areas may not be exactly the same as on the actual vehicle screen.
Enter diagnostic mode (HILUX_TGN26 RM0000011BU0F7X.html).
Select "Function Check/Setting" from the "Service Menu" screen.
Select "HF Voice Quality Setting" from the "Function Check/Setting I" screen.
Receive/Send Voice Level adjustment
- NOTICE:
- Sound quality may deteriorate when the receive voice level is changed more than necessary. For this reason, check that the received voice quality is still acceptable after changing this setting.
If the voice level is low, press "+" button, and if the voice level is loud, press "-" button.
- HINT:
- Each voice level setting is reflected when going back to the normal mode.
- The changing voice level ranges from -5 to +5.
- The initial level is "0".
Voice Quality Type Adjustment
When changing the settings, use the number pad on the screen and input the voice quality type according to the chart below.
Text in Illustration *a Numeric keypad *b Setting button *c Reset button Settings Parameter Target Phenomenon Voice Quality Type (FUJITSU TEN) Voice Quality Type (Pioneer) Voice Quality Type (Panasonic) Effect of Changing Voice Quality Parameter Adverse Effect of Changing Voice Quality Parameter Echo The other party hears their own voice echoed back to a large degree. - 1000
- 2000
- 0001
- 0002
- 0003
- 0004
- 0005
0001 The amount that the other party hears their own voice echoed back is reduced. When both parties speak at the same time, the voice heard by the other party suddenly becomes quiet, cuts out, etc. Half Duplex When both parties speak at the same time, the voice heard by the other party suddenly becomes quiet, cuts out, etc. - 0100
- 0200
- 0010
- 0020
- 0030
- 0040
- 0050
0002 The phenomenon in which the voice heard by the other party suddenly becomes quiet, cuts out, etc. when both parties speak at the same time is reduced. The amount that the other party hears their own voice echoed back increases. Noise A large amount of noise, such as vehicle or road noise, is mixed together with the voice heard by the other party. - 0010
- 0020
- 0100
- 0200
- 0300
- 0400
- 0500
0004 The amount of noise, such as vehicle or road noise, that is mixed together with the voice heard by the other party is reduced. The quality of the voice heard by the other party worsens. Quality The quality of the voice heard by the other party is bad. - 0001
- 0002
- 1000
- 2000
- 3000
- 4000
- 5000
0003 The quality of the voice heard by the other party improves. The amount of noise, such vehicle or road noise, that is mixed together with the voice heard by the other party increases. - HINT:
- Refer to the "Unit Version Information" screen for information regarding the manufacturer of the radio and display receiver assembly (HILUX_TGN26 RM000003YVK017X.html).
- Voice Quality Type Adjustment can only be used to adjust the quality of the voice heard by the other party. It cannot be used to adjust the quality of the voice heard by the user.
- The default value is 0000.
- Any changes to settings are applied when the display returns to the normal screen.
- For cases where there is more than one value, selecting a larger value increases the effect, but the adverse effects also increase.
- If a value not listed in the chart is entered, the change may not be applied, or the desired effect may not be achieved.
- If voice quality worsens as a result of changing the settings, press the "INIT" switch and return the value to 0000.
- 1000

|
 |