INSTALL NO. 2 RADIO RECEIVER BRACKET (for Radio and Display Type)
INSTALL NO. 1 RADIO RECEIVER BRACKET (for Radio and Display Type)
INSTALL RADIO AND DISPLAY RECEIVER ASSEMBLY (for Radio and Display Type)
INSTALL RADIO RECEIVER ASSEMBLY WITH BRACKET (for Radio Receiver Type)
CONNECT CABLE TO NEGATIVE BATTERY TERMINAL (w/ Airbag System)
Radio Receiver -- Installation |
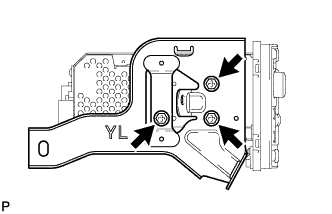
| 1. INSTALL NO. 2 RADIO RECEIVER BRACKET (for Radio and Display Type) |
Install the No. 2 radio bracket to the radio receiver with the 3 screws.
 |
| 2. INSTALL NO. 2 RADIO BRACKET (for Radio Receiver Type) |
Install the No. 2 radio bracket to the radio receiver with the 3 screws.
 |
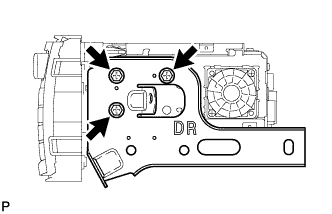
| 3. INSTALL NO. 1 RADIO RECEIVER BRACKET (for Radio and Display Type) |
Install the No. 1 radio bracket to the radio receiver with the 3 screws.
 |
| 4. INSTALL NO. 1 RADIO BRACKET (for Radio Receiver Type) |
Install the No. 1 radio bracket to the radio receiver with the 3 screws.
 |
| 5. INSTALL RADIO AND DISPLAY RECEIVER ASSEMBLY (for Radio and Display Type) |
Connect all the connectors.
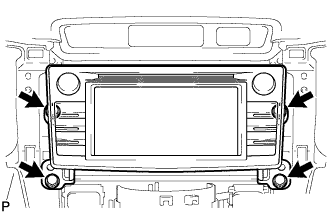 |
Install the radio and display receiver assembly with bracket with the 4 screws.
| 6. INSTALL RADIO RECEIVER ASSEMBLY WITH BRACKET (for Radio Receiver Type) |
Connect all the connectors.
 |
Install the radio receiver assembly with bracket with the 4 screws.
| 7. INSTALL CENTER INSTRUMENT CLUSTER FINISH PANEL ASSEMBLY |
for Manual Air Conditioning System:
Connect the connectors.
Attach the 4 claws to connect the air conditioner control.
Attach the 10 claws and 4 clips to install the center instrument cluster finish panel.
for Automatic Air Conditioning System:
Connect the connectors.
Attach the 8 claws and 4 clips to install the center instrument cluster finish panel.
| 8. CONNECT CABLE TO NEGATIVE BATTERY TERMINAL (w/ Airbag System) |
- NOTICE:
- When disconnecting the cable, some systems need to be initialized after the cable is reconnected (HILUX_TGN26 RM000004QR300CX.html).