Intake Manifold -- Removal |
| 1. DISCHARGE FUEL SYSTEM PRESSURE |
| 2. REMOVE NO. 2 ENGINE UNDER COVER |
Remove the 4 bolts and No. 2 engine under cover.
| 3. DRAIN ENGINE COOLANT |
- CAUTION:
- Do not remove the radiator cap while the engine and radiator are still hot. Pressurized, hot engine coolant and steam may be released and cause serious burns.

Text in Illustration *1 Radiator Cap *2 Reservoir Cap *3 Cylinder Block Water Drain Cock Plug *4 Reservoir Tank *5 Radiator Drain Cock Plug - -
Loosen the radiator drain cock plug.
Remove the radiator cap and drain the coolant.
- HINT:
- Collect the coolant in a container and dispose of it according to the regulations in your area.
Loosen the cylinder block water drain cock plug and drain the coolant from the engine.
| 4. REMOVE V-BANK COVER |
Remove the 2 nuts and V-bank cover.
 |
| 5. REMOVE AIR CLEANER ASSEMBLY |
Disconnect the vacuum hose.
 |
Disconnect the mass air flow meter connector.
Detach the 2 wire harness clamps.
Loosen the 2 hose clamps.
 |
Remove the 2 bolts and air cleaner.
| 6. REMOVE NO. 2 AIR CLEANER HOSE |
Remove the 2 bolts and No. 2 air cleaner hose.
| 7. REMOVE INTAKE AIR SURGE TANK |
Disconnect the No. 4 water by-pass hose.
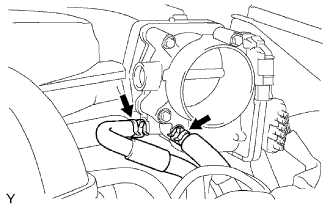 |
Disconnect the No. 5 water by-pass hose.
Disconnect the purge line hose.
 |
Disconnect the vacuum hose.
Disconnect the No. 1 PCV hose.
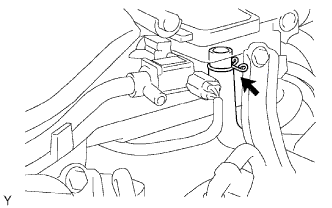 |
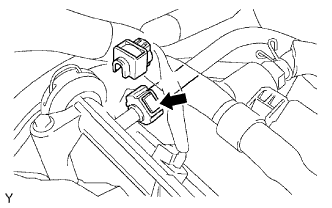
Disconnect the purge VSV connector.
 |
Disconnect the vacuum switching valve (for ACIS) connector.
Disconnect the throttle body connector.
Detach the 3 wire harness clamps and disconnect the wire harness.
Remove the 2 bolts and throttle body bracket.
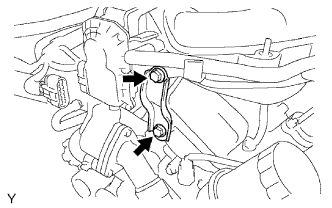 |
Remove the bolt and oil baffle plate.
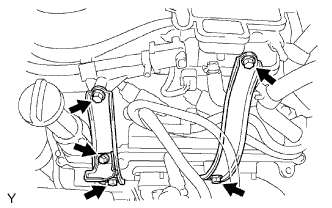 |
Remove the 2 bolts and No. 1 surge tank stay.
Remove the 2 bolts and No. 2 surge tank stay.
Remove the 2 bolts and disconnect the water hose sub-assembly.
 |
Using an 8 mm hexagon wrench, remove the 4 bolts, 2 nuts, intake air surge tank and gasket.
Text in Illustration 
Bolt 
Nut
 |
| 8. DISCONNECT NO. 1 FUEL PIPE SUB-ASSEMBLY |
Disconnect the No. 1 fuel pipe (HILUX_TGN26 RM000000YL401PX.html).
 |
| 9. DISCONNECT NO. 2 FUEL PIPE SUB-ASSEMBLY |
Disconnect the No. 2 fuel pipe (HILUX_TGN26 RM000000YL401PX.html).
 |
| 10. REMOVE FUEL DELIVERY PIPE SUB-ASSEMBLY |
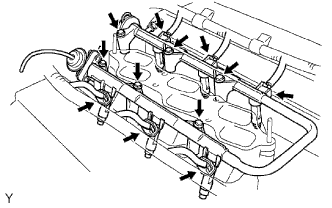 |
Disconnect the 6 fuel injector connectors.
Remove the 6 bolts and fuel delivery pipe together with the 6 fuel injectors.
- NOTICE:
- Be careful not to drop the injectors when removing the fuel delivery pipe.
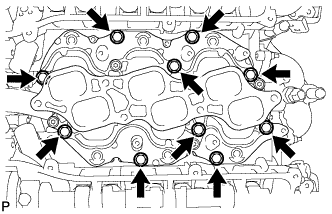
| 11. REMOVE INTAKE MANIFOLD |
Remove the 10 bolts, intake manifold and 2 gaskets.
 |
| 12. REMOVE STUD BOLT |
- HINT:
- If a stud bolt is deformed or its threads are damaged, replace it.
Using an E7 "TORX" socket wrench, remove the stud bolts.