Timing Belt (W/O Dpf) -- Removal |
| 1. REMOVE NO. 1 ENGINE UNDER COVER |
| 2. DRAIN ENGINE COOLANT |
- CAUTION:
- Do not remove the radiator reservoir cap while the engine and radiator are still hot. Pressurized, hot engine coolant and steam may be released and cause serious burns.
Loosen the radiator drain cock plug.
- HINT:
- Collect the coolant in a container and dispose of it according to the regulations in your area.
Drain the coolant by removing the radiator reservoir cap and, using a wrench, remove the vent plug.
 |
Loosen the cylinder block drain cock plug.

Text in Illustration *1 Radiator Reservoir *2 Radiator Reservoir Cap *3 Vent Plug *4 Cylinder Block Drain Cock Plug *5 Radiator Drain Cock Plug - -
| 3. REMOVE RADIATOR HOSE INLET |
| 4. REMOVE FAN SHROUD |
Remove the 3 bolts and oil reservoir.
 |
Disconnect the No. 1 and No. 2 water by-pass hoses from the radiator.
 |
Remove the 2 bolts and radiator reservoir.
Loosen the 4 nuts holding the fluid coupling with fan.
Remove the fan and generator V belt (HILUX_TGN26 RM000001477016X_01_0001.html).
Remove the 2 bolts holding the fan shroud.
Remove the 4 nuts of the fluid coupling with fan, and then remove the fan shroud together with the fluid coupling with fan.
- NOTICE:
- Be careful not to damage the radiator core.
Remove the fan pulley from the water pump.
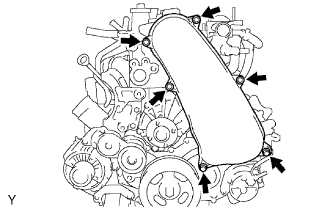
| 5. REMOVE NO. 1 TIMING BELT COVER |
Remove the 6 bolts, 6 washers and timing belt cover.
 |
| 6. REMOVE TIMING BELT |
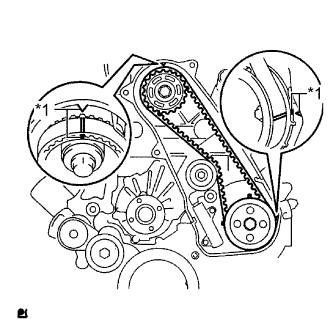
Turn the crankshaft clockwise and align the timing marks as shown in the illustration.
Text in Illustration *1 Timing Mark - HINT:
- If reusing the timing belt, place matchmarks on the timing belt so that it can be installed exactly as before.
 |
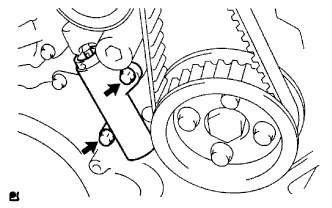
Uniformly loosen and remove the 2 bolts and No. 1 timing belt tensioner.
 |
Remove the timing belt.
- HINT:

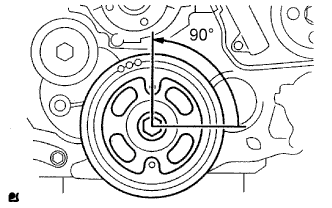
- If turning the camshaft while the timing belt is removed, turn the crankshaft 90° counterclockwise as shown in the illustration.
- When installing the timing belt, turn the camshaft to align the timing marks, and then turn the crankshaft clockwise to align the timing marks.
| 7. REMOVE NO. 1 TIMING BELT IDLER SUB-ASSEMBLY |
- NOTICE:
- When inspecting the No. 1 timing belt idler, do not remove it unless absolutely necessary.
Using a 10 mm hexagon wrench, remove the bolt, No. 1 timing belt idler and washer.