Automatic Transmission Assembly Removal
Drivetrain. Hilux. Tgn26, 36 Kun25, 26, 35, 36 Ggn25
PRECAUTION
DISCONNECT CABLE FROM NEGATIVE BATTERY TERMINAL
REMOVE FRONT CONSOLE BOX
REMOVE SHIFT LEVER BOOT ASSEMBLY
REMOVE TRANSFER HIGH AND LOW SHIFT LEVER ASSEMBLY
REMOVE NO. 1 ENGINE UNDER COVER
REMOVE NO. 2 ENGINE UNDER COVER
REMOVE FRONT EXHAUST PIPE ASSEMBLY
REMOVE FRONT PROPELLER SHAFT ASSEMBLY
REMOVE PROPELLER SHAFT ASSEMBLY
DRAIN AUTOMATIC TRANSMISSION FLUID
REMOVE TRANSMISSION OIL FILLER TUBE SUB-ASSEMBLY
DISCONNECT OIL COOLER TUBE
DISCONNECT TRANSMISSION CONTROL CABLE ASSEMBLY
DISCONNECT GROUND CABLE
REMOVE STARTER ASSEMBLY
SUPPORT AUTOMATIC TRANSMISSION ASSEMBLY
REMOVE NO. 3 FRAME CROSSMEMBER SUB-ASSEMBLY
REMOVE REAR NO. 1 ENGINE MOUNTING INSULATOR
DISCONNECT ENGINE WIRE
REMOVE WIRE HARNESS CLAMP BRACKET
REMOVE STIFFENER PLATE
REMOVE AUTOMATIC TRANSMISSION ASSEMBLY
REMOVE TRANSMISSION CONTROL CABLE BRACKET
REMOVE TRANSFER ASSEMBLY
REMOVE TORQUE CONVERTER ASSEMBLY
Automatic Transmission Assembly -- Removal |
- NOTICE:
- After turning the ignition switch off, waiting time may be required before disconnecting the cable from the battery terminal. Therefore, make sure to read the disconnecting the cable from the battery terminal notice before proceeding with work (HILUX_TGN26 RM000004QR1006X.html)
| 2. DISCONNECT CABLE FROM NEGATIVE BATTERY TERMINAL |
- NOTICE:
- When disconnecting the cable, some systems need to be initialized after the cable is reconnected (HILUX_TGN26 RM000004QR300CX.html).
| 3. REMOVE FRONT CONSOLE BOX |
(HILUX_TGN26 RM000003NEC00QX.html)
| 4. REMOVE SHIFT LEVER BOOT ASSEMBLY |
Remove the 4 screws and shift lever boot assembly.
| 5. REMOVE TRANSFER HIGH AND LOW SHIFT LEVER ASSEMBLY |
Fold back the transfer front drive shift boot.
Using needle-nose pliers, remove the snap ring and pull out the shift lever.
- HINT:
- Move the transfer shift lever to the H4 position.
| 6. REMOVE NO. 1 ENGINE UNDER COVER |
| 7. REMOVE NO. 2 ENGINE UNDER COVER |
| 8. REMOVE FRONT EXHAUST PIPE ASSEMBLY |
Remove the 2 bolts and 2 compression springs.
Disconnect the front exhaust pipe from the turbine outlet elbow and remove the gasket.
Remove the front exhaust pipe from the exhaust pipe support.
| 9. REMOVE FRONT PROPELLER SHAFT ASSEMBLY |
(HILUX_TGN26 RM0000010QG00XX.html)
| 10. REMOVE PROPELLER SHAFT ASSEMBLY |
(HILUX_TGN26 RM000000ZZ3029X.html)
| 11. DRAIN AUTOMATIC TRANSMISSION FLUID |
Remove the drain plug and gasket, and drain ATF.
Install a new gasket and the drain plug.
- Torque:
- 20 N*m{205 kgf*cm, 15 ft.*lbf}
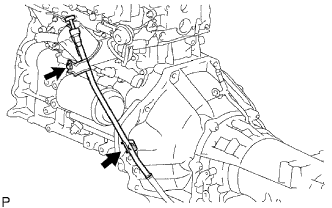
| 12. REMOVE TRANSMISSION OIL FILLER TUBE SUB-ASSEMBLY |
Remove the oil dipstick.
Remove the 2 bolts and oil filler tube.
Remove the O-ring from the oil filler tube.
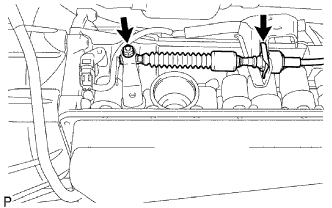
| 13. DISCONNECT OIL COOLER TUBE |
Using a union nut wrench, disconnect the inlet tube and outlet tube.
Remove the 3 bolts and 3 clamps.
| 14. DISCONNECT TRANSMISSION CONTROL CABLE ASSEMBLY |
Remove the nut and disconnect the control cable.
Remove the clip and disconnect the control cable.
| 15. DISCONNECT GROUND CABLE |
Remove the nut and disconnect the ground cable.
| 16. REMOVE STARTER ASSEMBLY |
(HILUX_TGN26 RM0000013XL04AX.html)
| 17. SUPPORT AUTOMATIC TRANSMISSION ASSEMBLY |
Support the transmission with a transmission jack.
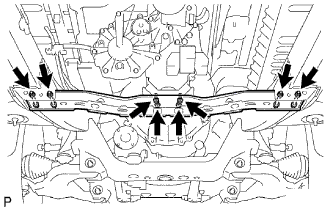
| 18. REMOVE NO. 3 FRAME CROSSMEMBER SUB-ASSEMBLY |
Remove the 4 set bolts of the No. 1 engine mounting insulator rear.
Remove the 4 nuts, 4 bolts and frame crossmember.
| 19. REMOVE REAR NO. 1 ENGINE MOUNTING INSULATOR |
Remove the 4 bolts and engine mounting insulator.
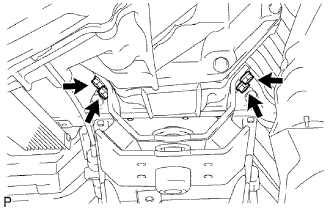
| 20. DISCONNECT ENGINE WIRE |
Tilt the transmission downward.
- NOTICE:
- Make sure the cooling fan does not contact the fan shroud.
Disconnect the 5 connectors and detach the 6 clamps.
Text in Illustration*A
| LH Side
| *B
| RH Side
|
Disconnect the 5 connectors.
| 21. REMOVE WIRE HARNESS CLAMP BRACKET |
Remove the bolt and wire harness clamp bracket from the transmission.
| 22. REMOVE STIFFENER PLATE |
Remove the 4 bolts and stiffener plate RH (with clamp).
Text in Illustration*A
| LH Side
| *B
| RH Side
|
Remove the 4 bolts and stiffener plate LH.
Remove the No. 4 cylinder block insulator.
Remove the No. 2 end plate.
| 23. REMOVE AUTOMATIC TRANSMISSION ASSEMBLY |
Turn the crankshaft to gain access to each bolt.
Hold the crankshaft pulley bolt with a wrench, and remove the 6 torque converter clutch mounting bolts.
Remove the 5 bolts and transmission from the engine.
Text in Illustration*1
| Knock Pin
|
- NOTICE:
- To prevent damage to the knock pins, do not pry between the automatic transmission assembly and engine assembly.
| 24. REMOVE TRANSMISSION CONTROL CABLE BRACKET |
Remove the 2 bolts and control cable bracket from the transmission.
| 25. REMOVE TRANSFER ASSEMBLY |
Remove the 8 bolts and 2 clamps.
Remove the transfer from the transmission.
- NOTICE:
- Do not damage the lip of the transfer adaptor oil seal.
| 26. REMOVE TORQUE CONVERTER ASSEMBLY |