Audio And Visual System (W/ Multi-Display With Dvd Player) -- Operation Check |
| CHECK PANEL & STEERING SWITCH |
- HINT:
- The navigation receiver assembly panel switches and steering switch are checked in the following procedure.
- Illustrations may differ from the actual vehicle screen depending on the device settings and options. Therefore, some detailed areas may not be shown exactly the same as on the actual vehicle screen.
Enter diagnostic mode (COROLLA_ZRE142 RM0000011BU0JSX.html).
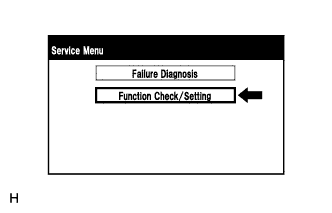
Select "Function Check/Setting" from the "Service Menu" screen.
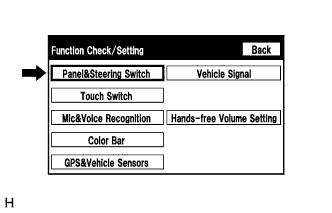
Select "Panel&Steering Switch" from the "Function Check/Setting" screen.
Panel&Steering Switch Check Mode
Operate each switch and check that the switch names and condition are correctly displayed.
Screen Description Display Content *a: Name of switch being pushed - Name of the pushed switch is displayed.
- If more than one switch is pressed, "MULTIPLE" will be displayed.
*b: Rotary switch name Name of the rotary switch is displayed. *c: Rotary switch direction Direction of the rotary switch is displayed. - Name of the pushed switch is displayed.

 |
 |
| CHECK TOUCH SWITCH |
- HINT:
- The touch switches on the screen are checked in the following procedure.
- Illustrations may differ from the actual vehicle screen depending on the device settings and options. Therefore, some detailed areas may not be shown exactly the same as on the actual vehicle screen.
Enter diagnostic mode (COROLLA_ZRE142 RM0000011BU0JSX.html).
Select "Function Check/Setting" from the "Service Menu" screen.
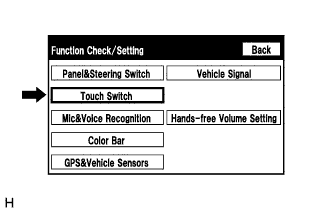
Select "Touch Switch" from the "Function Check/Setting" screen.
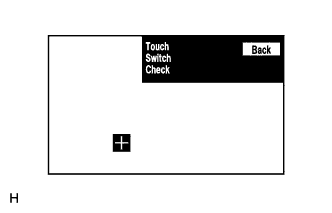
Touch Switch Check
Touch the display anywhere in the open area to perform the check when the "Touch Switch Check" screen is displayed.
- HINT:
- A "+" mark is displayed where the display is touched.
- The "+" mark remains on the display even after the finger is removed.
|
 |
| CHECK MIC & VOICE RECOGNITION |
- HINT:
- The microphone and microphone input level are checked in the following procedure.
- Illustrations may differ from the actual vehicle screen depending on the device settings and options. Therefore, some detailed areas may not be shown exactly the same as on the actual vehicle screen.
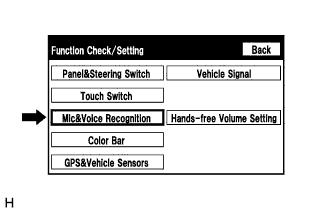
Enter diagnostic mode (COROLLA_ZRE142 RM0000011BU0JSX.html).
Select "Function Check/Setting" from the "Service Menu" screen.
Select "Mic&Voice Recognition" from the "Function Check/Setting" screen.
Microphone&Voice Recognition Check
When speaking into the microphone, check that the microphone input level meter changes according to the input level.
Push the recording switch and perform voice recording.
Check that the recording indicator remains on while recording and that the recording can be played normally.
- HINT:
- For details of this function, refer to Diagnosis Display Detailed Description (COROLLA_ZRE142 RM0000011BT0C2X.html).
- This function is controlled by the built-in navigation ECU.
- Select the recording switch with the blower motor of the air conditioning system stopped. If an outlet of the air conditioning system is facing the microphone, noise may be recorded.

|
 |
| CHECK COLOR BAR |
- HINT:
- The display color on the screen is checked in the following procedure.
- Illustrations may differ from the actual vehicle screen depending on the device settings and options. Therefore, some detailed areas may not be shown exactly the same as on the actual vehicle screen.
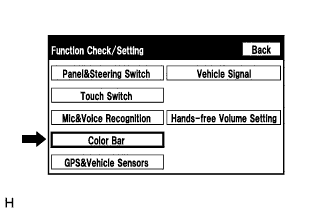
Enter diagnostic mode (COROLLA_ZRE142 RM0000011BU0JSX.html).
Select "Function Check/Setting" from the "Service Menu" screen.
Select "Color Bar" from the "Function Check/Setting" screen.
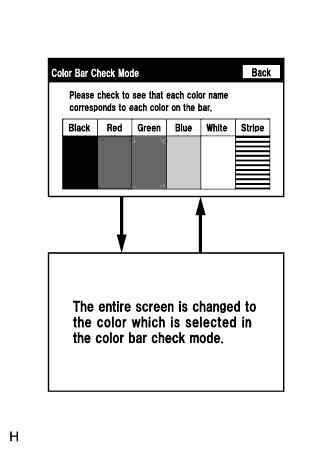
Color Bar Check Mode
Select a color bar from the "Color Bar Check Mode" screen.
Check the display color.
- HINT:
- The entire screen turns to the color or stripe selected.
- Touching the display will return to the "Color Bar Check Mode" screen.
|
 |
| CHECK GPS & VEHICLE SENSORS |
- HINT:
- GPS information, vehicle signals and sensor signals are checked in the following procedure.
- Illustrations may differ from the actual vehicle screen depending on the device settings and options. Therefore, some detailed areas may not be shown exactly the same as on the actual vehicle screen.
Enter diagnostic mode (COROLLA_ZRE142 RM0000011BU0JSX.html).
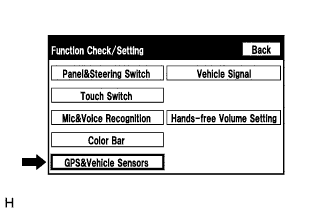
Select "Function Check/Setting" from the "Service Menu" screen.
Select "GPS&Vehicle Sensors" from the "Function Check/Setting" screen.
GPS Information
When GPS information is displayed, check the GPS conditions.
- HINT:
- This screen is updated once per second when input signals to the vehicle are changed.
- For details of this function, refer to Diagnosis Display Detailed Description (COROLLA_ZRE142 RM0000011BT0C2X.html).
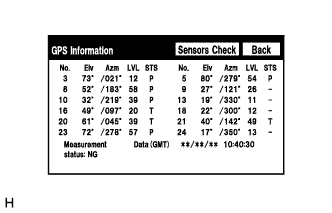
Select "Sensors Check" from the "GPS Information" screen.
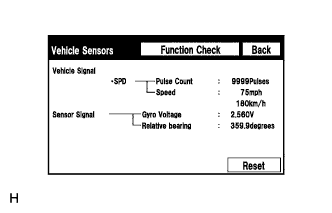
Vehicle Sensors
Check all the signals and sensors when vehicle signal information is displayed.
- HINT:
- This screen is updated once per second when input signals to the vehicle are changed.
- This screen displays vehicle signals input to the built-in navigation ECU.
- For details of this function, refer to Diagnosis Display Detailed Description (COROLLA_ZRE142 RM0000011BT0C2X.html).
|
 |
| CHECK VEHICLE SIGNAL |
- HINT:
- Vehicle signals received by the navigation receiver assembly are checked in the following procedure.
- Illustrations may differ from the actual vehicle screen depending on the device settings and options. Therefore, some detailed areas may not be shown exactly the same as on the actual vehicle screen.
Enter diagnostic mode (COROLLA_ZRE142 RM0000011BU0JSX.html).
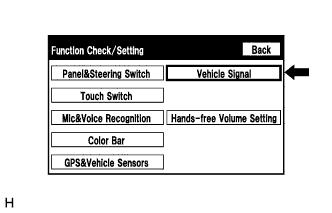
Select "Function Check/Setting" from the "Service Menu" screen.
Select "Vehicle Signal" from the "Function Check/Setting" screen.
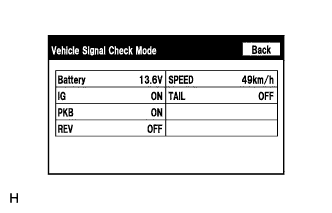
Vehicle Signal Check Mode
When the "Vehicle Signal Check Mode" screen is displayed, check all the vehicle signal conditions.
- HINT:
- Only conditions having inputs are displayed.
- This screen displays vehicle signals input to the navigation receiver assembly (built-in navigation ECU).
- For details of this function, refer to Diagnosis Display Detailed Description (COROLLA_ZRE142 RM0000011BT0C2X.html).
|
 |
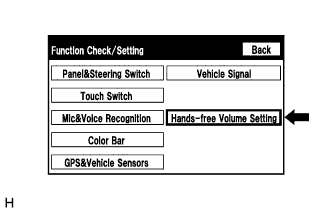
| CHECK HANDS-FREE VOLUME SETTING |
- HINT:
- The hands-free volume of a "Bluetooth" compatible phone can be adjusted using the following procedure.
- Illustrations may differ from the actual vehicle screen depending on the device settings and options. Therefore, some detailed areas may not be shown exactly the same as on the actual vehicle screen.
Enter diagnostic mode (COROLLA_ZRE142 RM0000011BU0JSX.html).
Select "Function Check/Setting" from the "Service Menu" screen.
Select "Hands-free Volume Setting" from the "Function Check/Setting" screen.
Hands-free Volume Setting
Check the hands-free volume level.
Screen Description Display Content *1: Receive voice level adjustment Setting possible for the voice level received from "Bluetooth" compatible phones. *2: Send voice level adjustment Setting possible for the voice level sent from "Bluetooth" compatible phones. - NOTICE:
- Sound quality may deteriorate when the receive voice level is changed more than necessary. For this reason, check that the receive voice quality is still acceptable after changing this setting.
- HINT:
- Sound quality of sent voice may deteriorate when the send voice level is adjusted.

|
 |