Parking Brake Lever Removal
Brake. Camry. Acv40 Gsv40
PRECAUTION
REMOVE FRONT SEAT ASSEMBLY LH (for Manual Seat)
REMOVE FRONT SEAT ASSEMBLY LH (for Power Seat)
REMOVE FRONT SEAT ASSEMBLY RH (for Manual Seat)
REMOVE FRONT SEAT ASSEMBLY RH (for Power Seat)
REMOVE COWL SIDE TRIM SUB-ASSEMBLY LH
REMOVE COWL SIDE TRIM SUB-ASSEMBLY RH
REMOVE INSTRUMENT PANEL NO. 2 UNDER COVER SUB-ASSEMBLY
REMOVE LOWER INSTRUMENT PANEL FINISH PANEL LH
REMOVE LOWER INSTRUMENT PANEL SUB-ASSEMBLY
REMOVE SHIFT LEVER KNOB SUB-ASSEMBLY
REMOVE NO. 1 INSTRUMENT CLUSTER FINISH PANEL GARNISH
REMOVE NO. 2 INSTRUMENT CLUSTER FINISH PANEL GARNISH
REMOVE UPPER CONSOLE PANEL
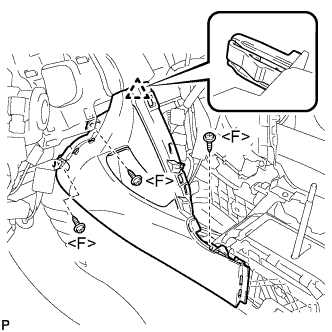
REMOVE UPPER CONSOLE REAR PANEL SUB-ASSEMBLY
REMOVE LOWER INSTRUMENT CLUSTER FINISH PANEL CENTER SUB-ASSEMBLY
REMOVE CONSOLE BOX POCKET
REMOVE CONSOLE BOX CARPET
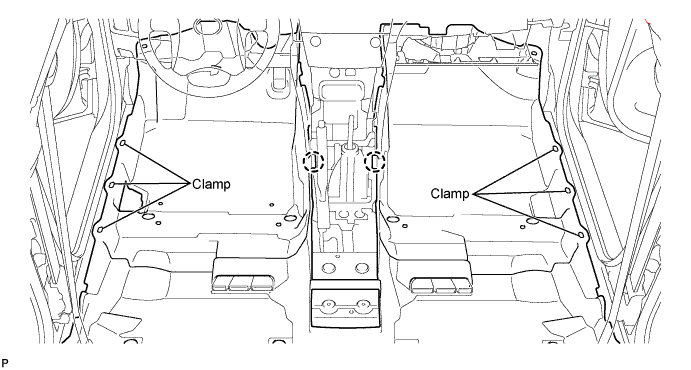
REMOVE CONSOLE BOX ASSEMBLY
REMOVE FLOOR CARPET BRACKET LH
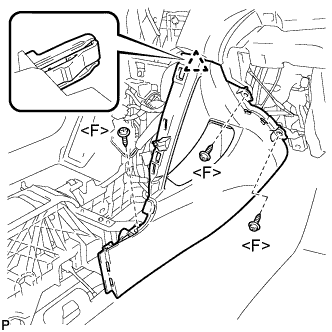
REMOVE FLOOR CARPET BRACKET RH
REMOVE NO. 2 CONSOLE BOX INSERT FRONT
REMOVE NO. 1 CONSOLE BOX INSERT FRONT
REMOVE FRONT DOOR SCUFF PLATE LH
REMOVE FRONT DOOR OPENING TRIM WEATHERSTRIP LH
REMOVE REAR DOOR SCUFF PLATE LH
REMOVE REAR DOOR OPENING TRIM WEATHERSTRIP LH
REMOVE LOWER CENTER PILLAR GARNISH LH
REMOVE FRONT DOOR SCUFF PLATE RH
REMOVE FRONT DOOR OPENING TRIM WEATHERSTRIP RH
REMOVE REAR DOOR SCUFF PLATE RH
REMOVE REAR DOOR OPENING TRIM WEATHERSTRIP RH
REMOVE LOWER CENTER PILLAR GARNISH RH
REMOVE FRONT FLOOR CAUTION PLATE COVER
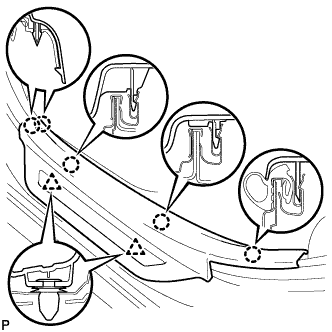
REMOVE LUGGAGE DOOR LOCK OPEN LEVER SUB-ASSEMBLY
REMOVE FRONT FLOOR CARPET ASSEMBLY
REMOVE CROSS MEMBER FLOOR NO. 4 REINFORCEMENT SUB-ASSEMBLY
SEPARATE NO. 3 PARKING BRAKE CABLE ASSEMBLY
SEPARATE NO. 2 PARKING BRAKE CABLE ASSEMBLY
REMOVE PARKING BRAKE EQUALIZER
REMOVE PARKING BRAKE LEVER SUB-ASSEMBLY
Parking Brake Lever -- Removal |
(CAMRY_ACV40 RM0000024DB001X.html)
| 2. REMOVE FRONT SEAT ASSEMBLY LH (for Manual Seat) |
- HINT:
- Refer to the procedures up to "REMOVE FRONT SEAT ASSEMBLY (for Manual Seat)". (Link)
| 3. REMOVE FRONT SEAT ASSEMBLY LH (for Power Seat) |
- HINT:
- Refer to the procedures up to "REMOVE FRONT SEAT ASSEMBLY (for Power Seat)". (CAMRY_ACV40 RM000000VBG008X.html)
| 4. REMOVE FRONT SEAT ASSEMBLY RH (for Manual Seat) |
- HINT:
- Use the same procedures for the RH side and the LH side.
| 5. REMOVE FRONT SEAT ASSEMBLY RH (for Power Seat) |
- HINT:
- Use the same procedures for the RH side and the LH side.
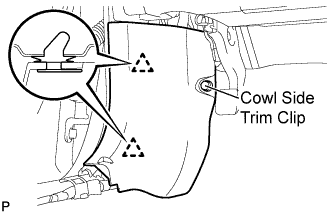
| 6. REMOVE COWL SIDE TRIM SUB-ASSEMBLY LH |
Remove the cowl side trim clip.
Disengage the 2 clips and remove the cowl side trim sub-assembly LH.
| 7. REMOVE COWL SIDE TRIM SUB-ASSEMBLY RH |
- HINT:
- Use the same procedures for the RH side and the LH side.
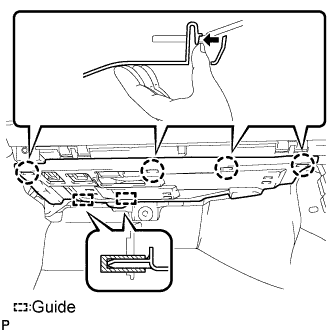
| 8. REMOVE INSTRUMENT PANEL NO. 2 UNDER COVER SUB-ASSEMBLY |
Disengage the 4 claws.
Disengage the 2 guides and remove the No. 2 under cover sub-assembly.
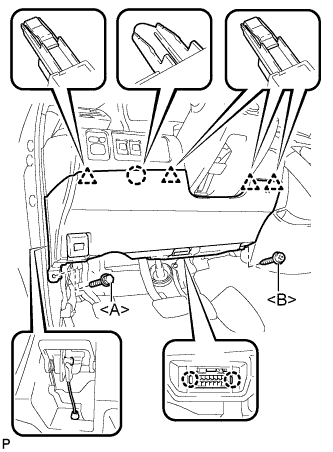
| 9. REMOVE LOWER INSTRUMENT PANEL FINISH PANEL LH |
Remove the bolt <A> and the screw <B>.
Disengage the 2 claws and the DLC3.
Disconnect the hood lock control cable assembly.
Disengage the claw and the 4 clips.
Remove the air hose, disconnect the connector, and then remove the lower instrument panel finish panel LH.
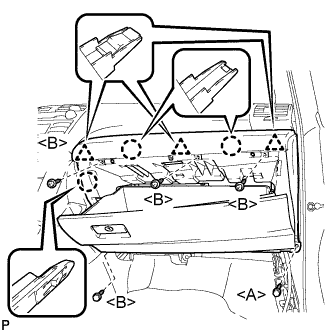
| 10. REMOVE LOWER INSTRUMENT PANEL SUB-ASSEMBLY |
Remove the bolt <A>.
Remove the 4 screws <B>.
Disengage the 3 claws and 3 clips, and then remove the lower instrument panel sub-assembly.
| 11. REMOVE SHIFT LEVER KNOB SUB-ASSEMBLY |
Turn the shift lever knob counterclockwise and remove the shift lever knob sub-assembly.
| 12. REMOVE NO. 1 INSTRUMENT CLUSTER FINISH PANEL GARNISH |
Disengage the 2 clips and remove the No. 1 instrument cluster finish panel garnish.
| 13. REMOVE NO. 2 INSTRUMENT CLUSTER FINISH PANEL GARNISH |
Disengage the 2 clips and remove the No. 2 instrument cluster finish panel garnish.
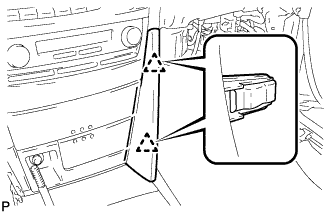
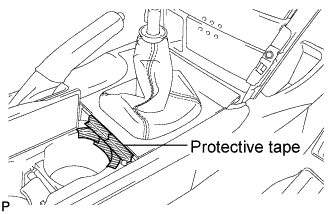
| 14. REMOVE UPPER CONSOLE PANEL |
Open the lid of the upper console panel.
Apply protective tape to the area shown in the illustration.
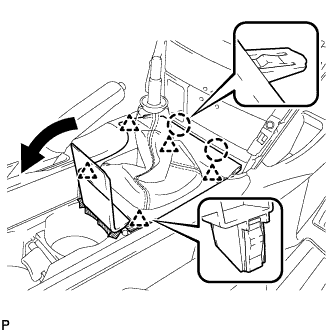
Using a moulding remover, disengage the 2 claws and the 5 clips, and then remove the upper console panel as shown in the illustration.
| 15. REMOVE UPPER CONSOLE REAR PANEL SUB-ASSEMBLY |
Disengage the 3 claws and the 5 clips, and remove the upper console rear panel sub-assembly.
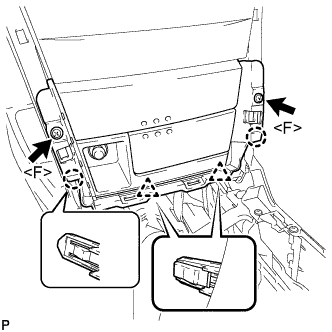
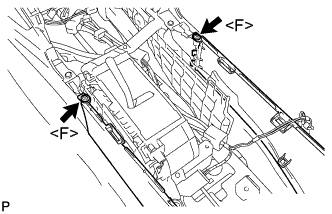
| 16. REMOVE LOWER INSTRUMENT CLUSTER FINISH PANEL CENTER SUB-ASSEMBLY |
Remove the 2 screws <F>.
Disengage the 4 claws.
Disconnect each connector and remove the instrument cluster finish panel center sub-assembly.
- HINT:
- Set the shift lever in the D position.
| 17. REMOVE CONSOLE BOX POCKET |
Remove the console box pocket.
| 18. REMOVE CONSOLE BOX CARPET |
Remove the console box carpet.
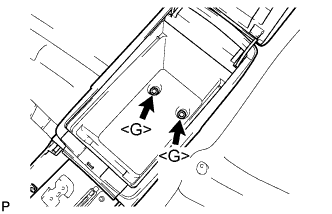
| 19. REMOVE CONSOLE BOX ASSEMBLY |
Remove the 2 screws <F>.
Remove the 2 bolts <G> and the console box assembly.
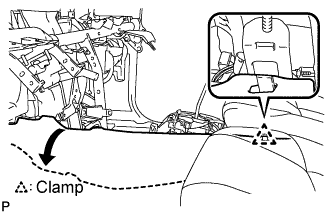
| 20. REMOVE FLOOR CARPET BRACKET LH |
Release the clamp.
Turn back the floor carpet.
Remove the 3 clips.
Remove the floor carpet bracket LH.
| 21. REMOVE FLOOR CARPET BRACKET RH |
Release the clamp.
Turn back the floor carpet.
Remove the 3 clips.
Remove the floor carpet bracket RH.
| 22. REMOVE NO. 2 CONSOLE BOX INSERT FRONT |
Remove the 3 screws <F>.
Disengage the clip and remove the No. 2 console box insert front.
| 23. REMOVE NO. 1 CONSOLE BOX INSERT FRONT |
Remove the 3 screws <F>.
Disengage the clip and remove the No. 1 console box insert front.
| 24. REMOVE FRONT DOOR SCUFF PLATE LH |
Disengage the 7 claws and 3 clips, and remove the front door scuff plate LH.
| 25. REMOVE FRONT DOOR OPENING TRIM WEATHERSTRIP LH |
| 26. REMOVE REAR DOOR SCUFF PLATE LH |
Disengage the 5 claws and 2 clips, and remove the rear door scuff plate LH.
| 27. REMOVE REAR DOOR OPENING TRIM WEATHERSTRIP LH |
| 28. REMOVE LOWER CENTER PILLAR GARNISH LH |
Disengage the 2 claws and 2 clips, and remove the lower center pillar garnish LH.
| 29. REMOVE FRONT DOOR SCUFF PLATE RH |
- HINT:
- Use the same procedures for the RH side and the LH side.
| 30. REMOVE FRONT DOOR OPENING TRIM WEATHERSTRIP RH |
| 31. REMOVE REAR DOOR SCUFF PLATE RH |
- HINT:
- Use the same procedures for the RH side and the LH side.
| 32. REMOVE REAR DOOR OPENING TRIM WEATHERSTRIP RH |
| 33. REMOVE LOWER CENTER PILLAR GARNISH RH |
- HINT:
- Use the same procedures for the RH side and the LH side.
| 34. REMOVE FRONT FLOOR CAUTION PLATE COVER |
Disengage the clip and the claw and remove the front floor caution plate cover.
| 35. REMOVE LUGGAGE DOOR LOCK OPEN LEVER SUB-ASSEMBLY |
Remove the screw.
Disengage the claw and remove the luggage door open lever sub-assembly.
| 36. REMOVE FRONT FLOOR CARPET ASSEMBLY |
Disengage the 6 clamps and the 2 claws.
Turn back the front floor carpet assembly until the bolts of the cross member floor No. 4 reinforcement sub-assembly can be seen.
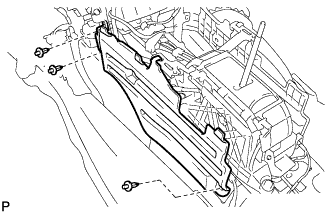
| 37. REMOVE CROSS MEMBER FLOOR NO. 4 REINFORCEMENT SUB-ASSEMBLY |
Remove the 8 bolts and the cross member floor No. 4 reinforcement sub-assembly.
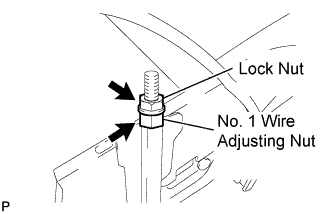
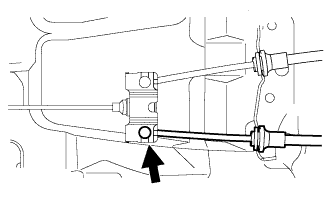
| 38. SEPARATE NO. 3 PARKING BRAKE CABLE ASSEMBLY |
Loosen the lock nut and the No. 1 wire adjusting nut of the No. 1 parking brake cable assembly.
Separate the No. 3 parking brake cable assembly from the parking brake equalizer.
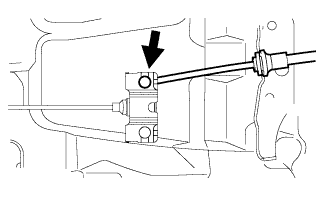
| 39. SEPARATE NO. 2 PARKING BRAKE CABLE ASSEMBLY |
Separate the No. 2 parking brake cable assembly from the parking brake equalizer.
| 40. REMOVE PARKING BRAKE EQUALIZER |
Slide the rubber boot as shown in the illustration.
Remove the parking brake equalizer from the No. 1 parking brake cable assembly.
| 41. REMOVE PARKING BRAKE LEVER SUB-ASSEMBLY |
Disconnect the parking brake switch connector.
Remove the 2 bolts, the clip, and the parking brake lever.