Parking Brake Lever -- Installation |
| 1. INSTALL PARKING BRAKE LEVER SUB-ASSEMBLY |
Install the parking brake lever sub-assembly with the 2 bolts and the clip.
- Torque:
- 21 N*m{214 kgf*cm, 15 ft.*lbf}
 |
Connect the parking brake switch connector.
| 2. INSTALL PARKING BRAKE EQUALIZER |
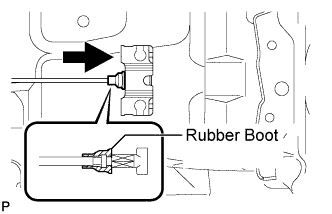
Install the parking brake equalizer to the No. 1 parking brake cable assembly.
 |
Slide the rubber boot back as shown in the illustration.
 |
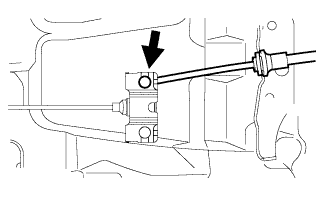
| 3. INSTALL NO. 2 PARKING BRAKE CABLE ASSEMBLY |
Connect the No. 2 parking brake cable assembly to the parking brake equalizer.
 |
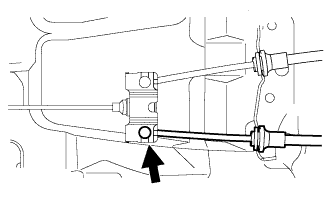
| 4. INSTALL NO. 3 PARKING BRAKE CABLE ASSEMBLY |
Connect the No. 3 parking brake cable assembly to the parking brake equalizer.
 |
| 5. INSTALL CROSS MEMBER FLOOR NO. 4 REINFORCEMENT SUB-ASSEMBLY |
Install the cross member floor No. 4 reinforcement sub-assembly with the 8 bolts.
 |
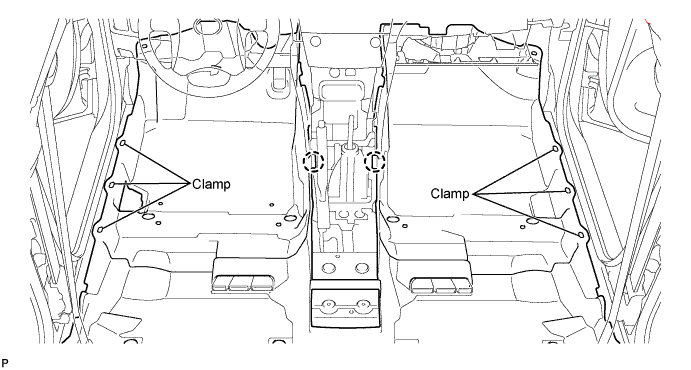
| 6. INSTALL FRONT FLOOR CARPET ASSEMBLY |
Engage the 6 clamps and the 2 claws and install the front floor carpet assembly.
| 7. INSTALL LUGGAGE DOOR LOCK OPEN LEVER SUB-ASSEMBLY |
Engage the claw and install the luggage door open lever sub-assembly with the screw.
 |
| 8. INSTALL FRONT FLOOR CAUTION PLATE COVER |
Engage the claw and the clip and install the front floor caution plate cover.
 |
| 9. INSTALL LOWER CENTER PILLAR GARNISH LH |
Engage the 2 claws and 2 clips, then install the lower center pillar garnish LH.
 |
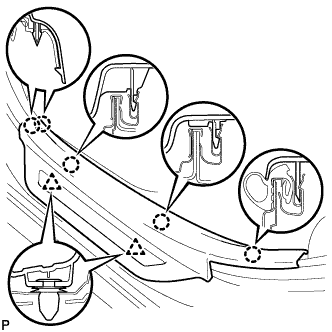
| 10. INSTALL REAR DOOR OPENING TRIM WEATHERSTRIP LH |
Install the rear door opening trim weatherstrip LH as shown in the illustration.
- NOTICE:
- After installation, check that the corners fit correctly.
 |
| 11. INSTALL REAR DOOR SCUFF PLATE LH |
Engage the 5 claws and 2 clips, then install the rear door scuff plate LH.
 |
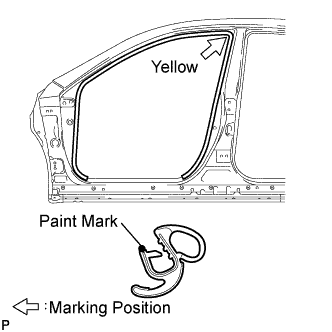
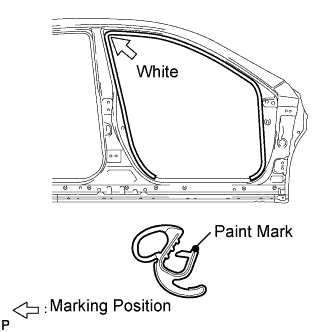
| 12. INSTALL FRONT DOOR OPENING TRIM WEATHERSTRIP LH |
Install the front door opening trim weatherstrip LH as shown in the illustration.
- NOTICE:
- After installation, check that the corners fit correctly.
 |
| 13. INSTALL FRONT DOOR SCUFF PLATE LH |
Engage the 7 claws and 3 clips, then install the front door scuff plate LH.
 |
| 14. INSTALL LOWER CENTER PILLAR GARNISH RH |
- HINT:
- Use the same procedures for the RH side and the LH side.
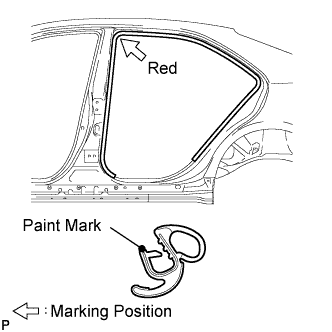
| 15. INSTALL REAR DOOR OPENING TRIM WEATHERSTRIP RH |
Install the rear door opening trim weatherstrip RH as shown in the illustration.
- NOTICE:
- After installation, check that the corners fit correctly.
 |
| 16. INSTALL REAR DOOR SCUFF PLATE RH |
- HINT:
- Use the same procedures for the RH side and the LH side.
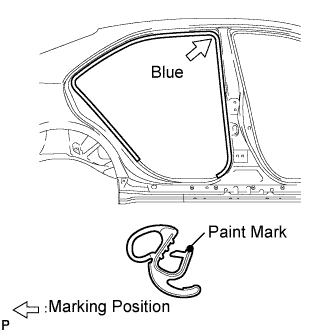
| 17. INSTALL FRONT DOOR OPENING TRIM WEATHERSTRIP RH |
Install the front door opening trim weatherstrip RH as shown in the illustration.
- NOTICE:
- After installation, check that the corners fit correctly.
 |
| 18. INSTALL FRONT DOOR SCUFF PLATE RH |
- HINT:
- Use the same procedures for the RH side and the LH side.
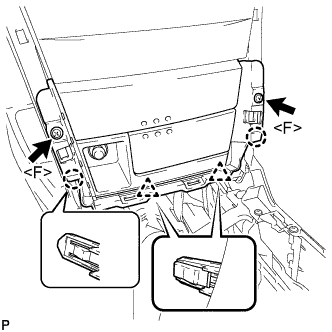
| 19. INSTALL NO. 2 CONSOLE BOX INSERT FRONT |
Engage the clip.
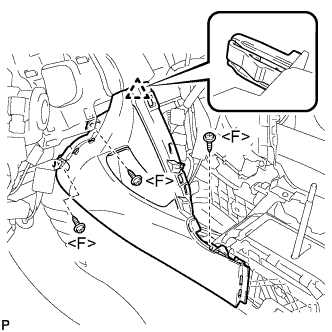 |
Install the No. 2 console box insert front with the 3 screws <F>.
| 20. INSTALL NO. 1 CONSOLE BOX INSERT FRONT |
Engage the clip.
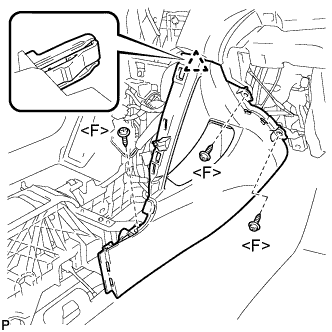 |
Install the No. 1 console box insert front with the 3 screws <F>.
| 21. INSTALL FLOOR CARPET BRACKET LH |
| 22. INSTALL FLOOR CARPET BRACKET RH |
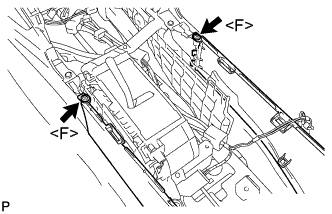
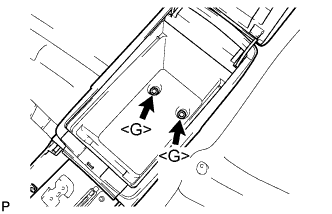
| 23. INSTALL CONSOLE BOX ASSEMBLY |
Install the 2 screws <F>.
 |
Install the console box assembly with the 2 bolts <G>.
 |
| 24. INSTALL CONSOLE BOX CARPET |
Install the console box carpet.
 |
| 25. INSTALL CONSOLE BOX POCKET |
Install the console box pocket.
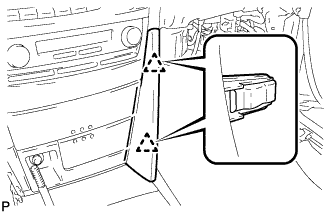
| 26. INSTALL LOWER INSTRUMENT CLUSTER FINISH PANEL CENTER SUB-ASSEMBLY |
Connect each connector.
Engage the 2 claws and 2 clips.
 |
Install the lower instrument cluster finish panel center sub-assembly with the 2 screws <F>.
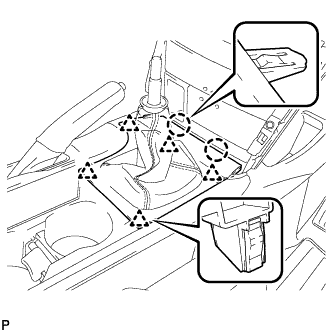
| 27. INSTALL UPPER CONSOLE REAR PANEL SUB-ASSEMBLY |
Engage the 3 claws and 5 clips to install the upper console rear panel sub-assembly.
 |
| 28. INSTALL UPPER CONSOLE PANEL |
Engage the 2 claws and the 5 clips to install the upper console panel as shown in the illustration.
 |
| 29. INSTALL NO. 1 INSTRUMENT CLUSTER FINISH PANEL GARNISH |
Engage the 2 clips and install the No. 1 instrument cluster finish panel garnish.
 |
| 30. INSTALL NO. 2 INSTRUMENT CLUSTER FINISH PANEL GARNISH |
Engage the 2 clips and install the No. 2 instrument cluster finish panel garnish.
 |
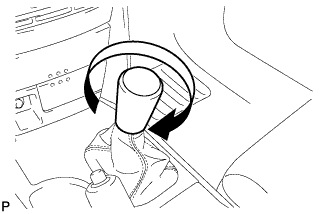
| 31. INSTALL SHIFT LEVER KNOB SUB-ASSEMBLY |
Install the shift lever knob sub-assembly.
 |
| 32. INSTALL LOWER INSTRUMENT PANEL SUB-ASSEMBLY |
Engage the 3 claws and 3 clips.
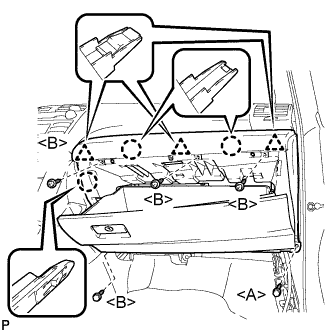 |
Install the 4 screws <B>.
Install the lower instrument panel sub-assembly with the bolt <A>.
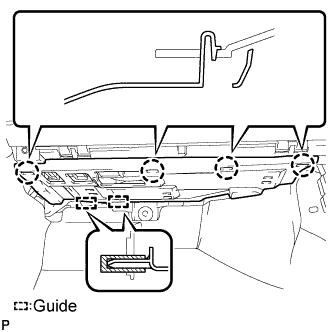
| 33. INSTALL INSTRUMENT PANEL NO. 2 UNDER COVER SUB-ASSEMBLY |
Engage the 4 claws and 2 guides and install the instrument panel No. 2 under cover.
 |
| 34. INSTALL LOWER INSTRUMENT PANEL FINISH PANEL LH |
Install the air hose and connect the connector.
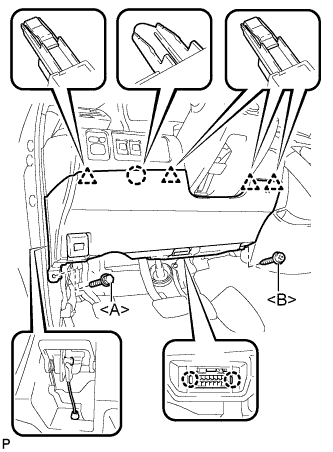 |
Engage the 2 claws and the DLC3.
Engage the claw and the 4 clips.
Instal the lower instrument panel finish panel LH with the screw <B> and bolt <A>.
| 35. INSTALL COWL SIDE TRIM SUB-ASSEMBLY LH |
Engage the 2 clips.
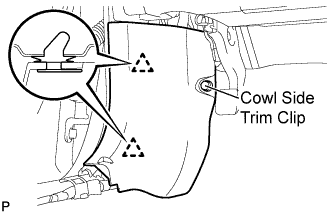 |
Install the cowl side trim sub-assembly LH with the cowl side trim clip.
| 36. INSTALL COWL SIDE TRIM SUB-ASSEMBLY RH |
- HINT:
- Use the same procedures for the RH side and the LH side.
| 37. INSTALL FRONT SEAT ASSEMBLY LH (for Manual Seat) |
- HINT:
- Refer to the procedures up to "INSTALL FRONT SEAT ASSEMBLY (for Manual Seat)". (Link)
| 38. INSTALL FRONT SEAT ASSEMBLY LH (for Power Seat) |
- HINT:
- Refer to the procedures up to "INSTALL FRONT SEAT ASSEMBLY (for Power Seat)". (CAMRY_ACV40 RM000000VBE01LX.html)
| 39. INSTALL FRONT SEAT ASSEMBLY RH (for Manual Seat) |
- HINT:
- Use the same procedures for the RH side and the LH side.
| 40. INSTALL FRONT SEAT ASSEMBLY RH (for Power Seat) |
- HINT:
- Use the same procedures for the RH side and the LH side.