INSTALL REAR SEAT CUSHION ASSEMBLY (for Fold Down Seat Type)
INSTALL REAR SEAT CUSHION ASSEMBLY (for Reclining Seat Type)
Fuel Tank -- Installation |
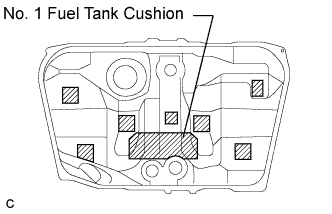
| 1. INSTALL NO. 1 FUEL TANK CUSHION |
Install a new No. 1 fuel tank cushion to the fuel tank.
 |
| 2. INSTALL NO. 2 FUEL TANK CUSHION |
Install 7 new No. 2 fuel tank cushions to the fuel tank.
| 3. INSTALL NO. 4 FUEL TUBE CLAMP |
Install the 3 clamps.
 |
| 4. INSTALL FUEL MAIN TUBE SUPPORT |
Install the fuel main tube support with the bolt.
- Torque:
- 5.4 N*m{55 kgf*cm, 48 in.*lbf}
 |
| 5. INSTALL FUEL PUMP TUBE SUB-ASSEMBLY |
Install the fuel pump tube to the fuel main tube support and the clamp.
 |
| 6. INSTALL FUEL CUT OFF WITH TUBE VALVE ASSEMBLY |
Install 2 new gaskets to the fuel tank.
Apply light oil around 2 new fuel cut off valves as shown in the illustration, and carefully insert them into the tank.
Be careful not to drop the gasket into the tank.
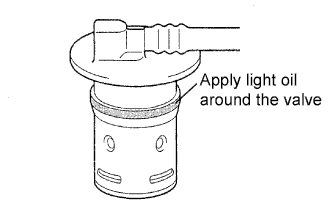 |
Check that the fuel cut off valve is fully inserted.
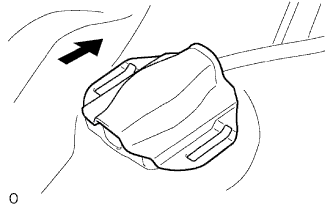
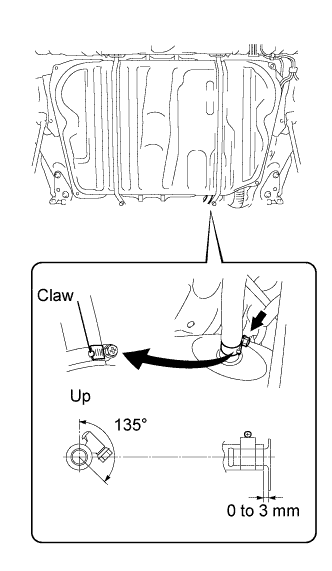
| 7. INSTALL NO. 3 FUEL TANK PROTECTOR |
Install the No. 3 fuel tank protector by sliding it as shown in the illustration.
 |
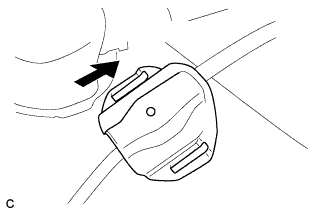
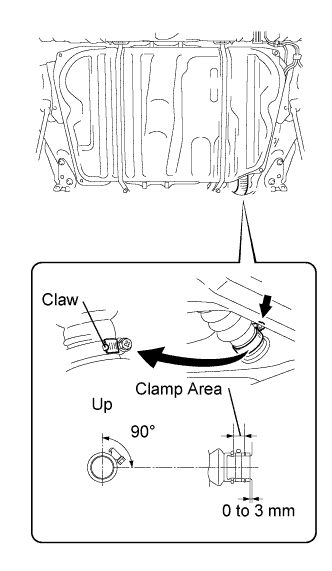
| 8. INSTALL NO. 2 FUEL TANK PROTECTOR |
Install the No. 2 fuel tank protector by sliding it as shown in the illustration.
 |
| 9. INSTALL FUEL TANK ASSEMBLY |
Install the 4 clip nuts.
 |
Install the 2 fuel tank bands with the 2 pins.
 |
Set the fuel tank assembly onto the transmission jack.
Raise the transmission jack so that the fuel tank vent hose can be connected as shown in the illustration.
- NOTICE:
- Slowly raise the jack not to drop the fuel tank assembly.
 |
Connect the fuel tank inlet pipe with the fuel filter pipe clamp as shown in the illustration.
 |
Tighten the 2 set bolts of the fuel tank bands.
- Torque:
- 39 N*m{400 kgf*cm, 29 ft.*lbf}
 |
Connect the fuel emission hose to the charcoal canister.
 |
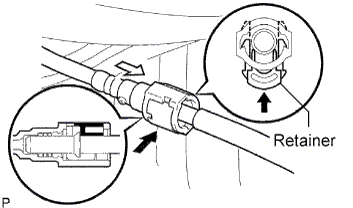
Connect the fuel pump tube.
Push the fuel connector into the pipe and push up the retainer so that the claws engage.
- NOTICE:
- Before connecting the tube, make sure that it is not damaged. Make sure that there is no dirt present on the connecting surfaces.
- After connecting, check if the fuel tube connector and the pipe are securely connected by pulling on them.
 |
| 10. INSTALL FUEL TANK PROTECTOR LOWER CENTER |
Install the 4 bolts and fuel tank protector.
- Torque:
- 5.4 N*m{55 kgf*cm, 48 in.*lbf}
 |
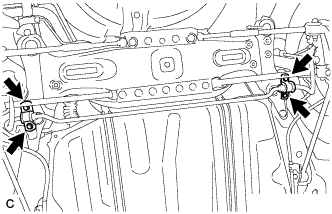
| 11. INSTALL REAR STABILIZER BAR NO. 1 BRACKET |
Install the 2 rear stabilizer bar No. 1 brackets with the 4 bolts.
- Torque:
- 31 N*m{316 kgf*cm, 23 ft.*lbf}
 |
| 12. INSTALL NO. 3 PARKING BRAKE CABLE ASSEMBLY |
Install the No. 3 parking brake cable assembly with the bolt and nut.
- Torque:
- Bolt:
- 6.0 N*m{61 kgf*cm, 53 in.*lbf}
- Nut:
- 8.5 N*m{87 kgf*cm, 75 in.*lbf}
 |
| 13. INSTALL NO. 2 PARKING BRAKE CABLE ASSEMBLY |
Install the No. 2 parking brake cable assembly with the bolt and nut.
- Torque:
- Bolt:
- 6.0 N*m{61 kgf*cm, 53 in.*lbf}
- Nut:
- 8.5 N*m{87 kgf*cm, 75 in.*lbf}
 |
| 14. INSTALL CENTER EXHAUST PIPE ASSEMBLY |
Install a new gasket to the exhaust center pipe assembly.
Install the exhaust center pipe to the exhaust front pipe with the 2 nuts and 2 bolts.

- Torque:
- 56 N*m{571 kgf*cm, 41 ft.*lbf}
| 15. INSTALL FUEL SUCTION TUBE ASSEMBLY WITH PUMP AND GAUGE |
Install a new gasket to the fuel suction tube.
 |
Install the fuel suction tube.
- NOTICE:
- Do not damage the fuel pump filter.
- Be careful that the arm of the sender gauge does not bend.
| 16. INSTALL FUEL TANK VENT TUBE SET PLATE |
Align the mark of the set plate with the fuel suction tube.
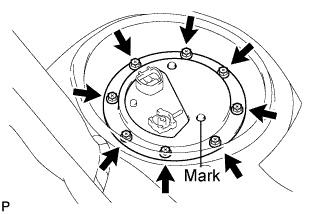 |
Install the set plate with the 8 bolts.
- Torque:
- 5.9 N*m{60 kgf*cm, 52 in.*lbf}
| 17. CONNECT FUEL PUMP TUBE SUB-ASSEMBLY |
Install the fuel pump tube with the tube joint clip.
- NOTICE:
- Check that there are no scratches or foreign objects on the connecting part.
- Check that the fuel tube joint is inserted securely.
- Check that the tube joint clip is on the collar of the fuel tube joint.
- After installing the tube joint clip, check that the fuel tube joint is pulled off.
 |
| 18. ADD FUEL |
| 19. CONNECT CABLE TO NEGATIVE BATTERY TERMINAL |
| 20. CHECK FOR FUEL LEAKS |
- HINT:
| 21. CHECK FOR EXHAUST GAS LEAKS |
| 22. INSTALL REAR FLOOR SERVICE HOLE COVER |
Connect the fuel pump connector.
 |
Install the rear floor service hole cover with new butyl tape.
| 23. INSTALL REAR SEAT CUSHION ASSEMBLY (for Fold Down Seat Type) |
Attach the front hooks of the bench type rear seat cushion assembly to the vehicle body.
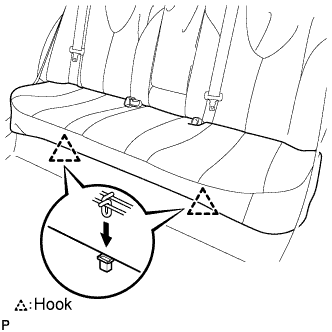 |
Confirm that the seat cushion is firmly installed.
- NOTICE:
- When installing the bench type rear seat cushion assembly, make sure that the seat belt buckle is not under the bench type rear seat cushion assembly.
| 24. INSTALL REAR SEAT CUSHION ASSEMBLY (for Reclining Seat Type) |
Attach the front hooks of the bench type rear seat cushion assembly to the vehicle body.
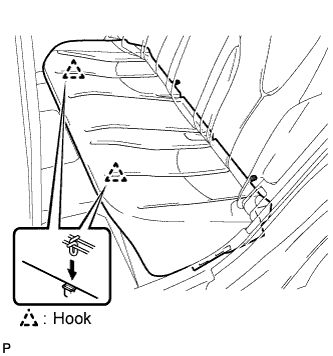 |
Confirm that the seat cushion is firmly installed.
- NOTICE:
- When installing the bench type rear seat cushion assembly, make sure that the seat belt buckle is not under the bench type rear seat cushion assembly.