Valve Body Assembly Removal
REMOVE AUTOMATIC TRANSAXLE ASSEMBLY
REMOVE AUTOMATIC TRANSAXLE OIL PAN SUB-ASSEMBLY
REMOVE VALVE BODY OIL STRAINER ASSEMBLY
REMOVE TRANSMISSION VALVE BODY ASSEMBLY
REMOVE MANUAL VALVE
Valve Body Assembly -- Removal |
| 1. REMOVE AUTOMATIC TRANSAXLE ASSEMBLY |
- HINT:
- (CAMRY_ACV40 RM0000016DV005X.html)
| 2. REMOVE AUTOMATIC TRANSAXLE OIL PAN SUB-ASSEMBLY |
Remove the 18 bolts and oil pan from the transaxle.
- NOTICE:
- Some fluid will remain in the oil pan. remove all the pan bolts, and carefully remove the oil pan assembly.
Remove the gasket from the oil pan.
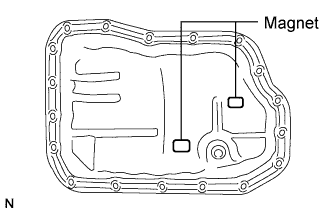
Remove the 2 magnets from the oil pan.
Examine particles in the oil pan.
Collect any steel chips with the removed magnets. Lock carefully at the chips and particles in the oil pan and on the magnets to see the type of wear which might be found in the transaxle.
- Result:
- Steel (magnetic):
- Bearing, gear and plate wear
- Brass (non-magnetic):
- Bearing wear
| 3. REMOVE VALVE BODY OIL STRAINER ASSEMBLY |
Remove the 2 bolts and oil strainer from the valve body.
Remove the O-ring from the oil strainer.
| 4. REMOVE TRANSMISSION VALVE BODY ASSEMBLY |
Remove the 11 bolts and valve body from the transaxle.
- NOTICE:
- When removing the transmission valve body assembly, be careful not to allow the transmission revolution sensor and the transaxle case to interfere each other.
Remove the manual valve from the valve body.